Tiny Studio Build
April 8-10
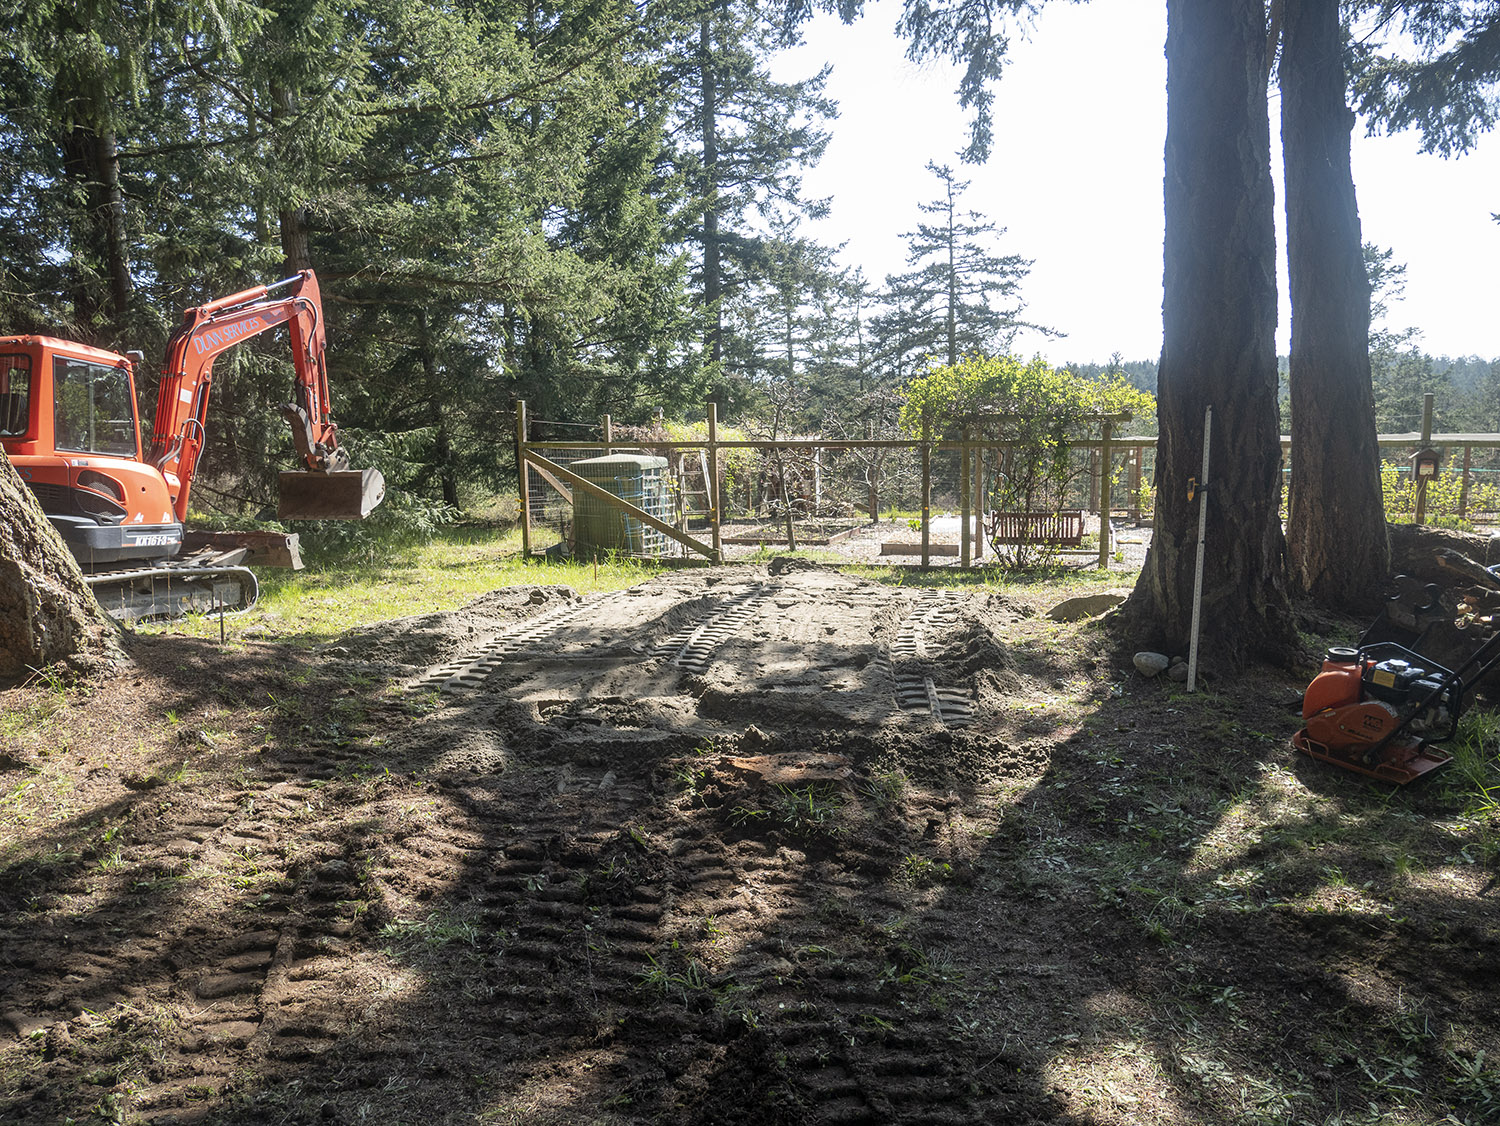
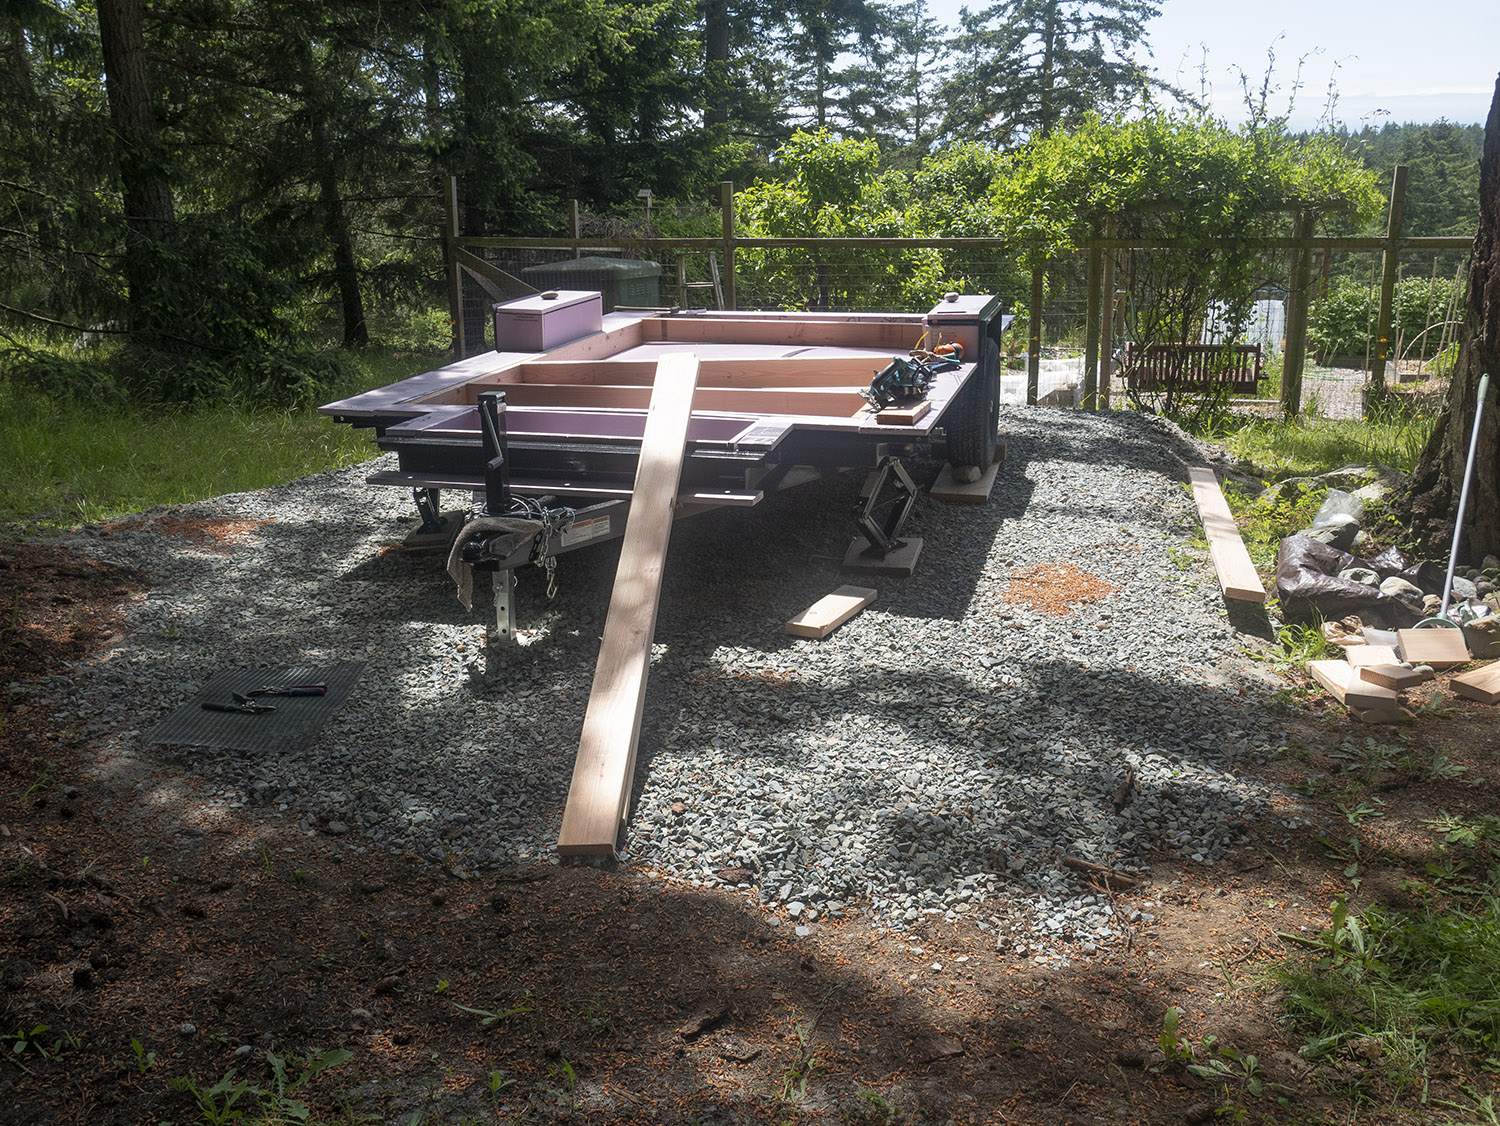
The first step was to choose a location and level it. I picked a spot where I’d get plenty of sun during the afternoon, close to the driveway, and with a great view over the garden and out over the hill. My friend Reggie brought in sand and rock chip to create the level spot. We used his tamping machine to pack down the sand, and then covered that with rock.
April 10
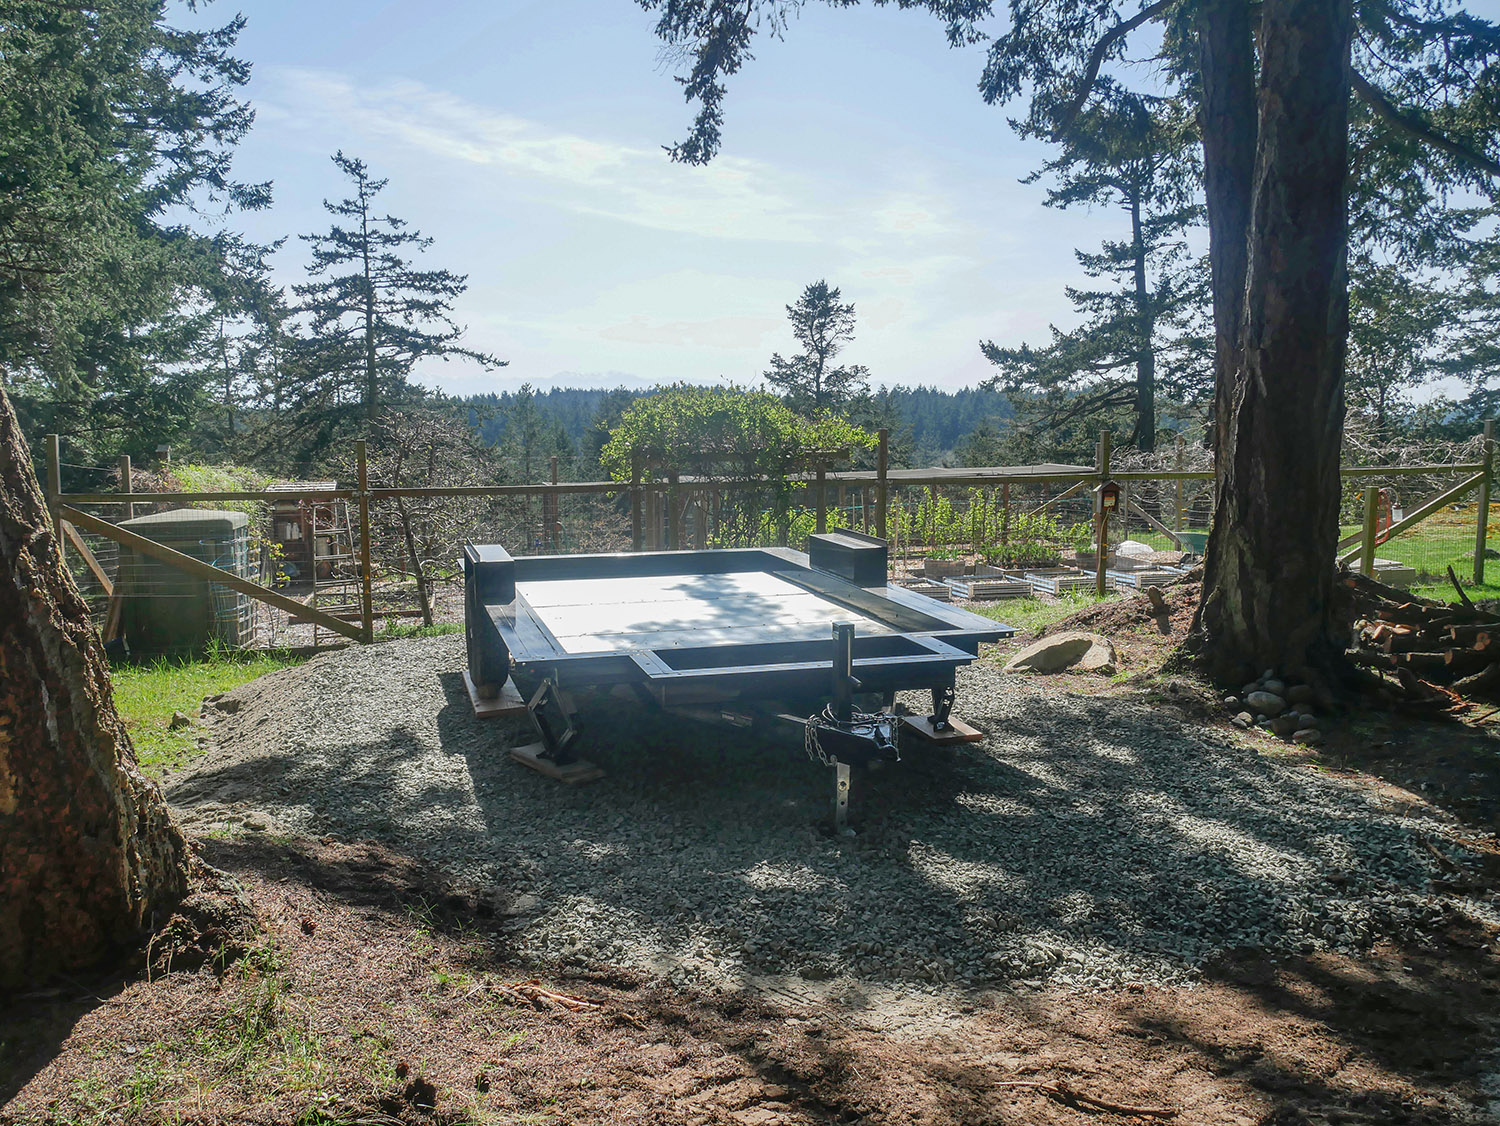
Once we finished creating the level spot, we moved the trailer in place, placed boards under the jacks and tires, and then leveled the trailer. We used Reggie’s large jack to lift up the trailer to slide the boards under the tires (thank goodness for friends with tools).
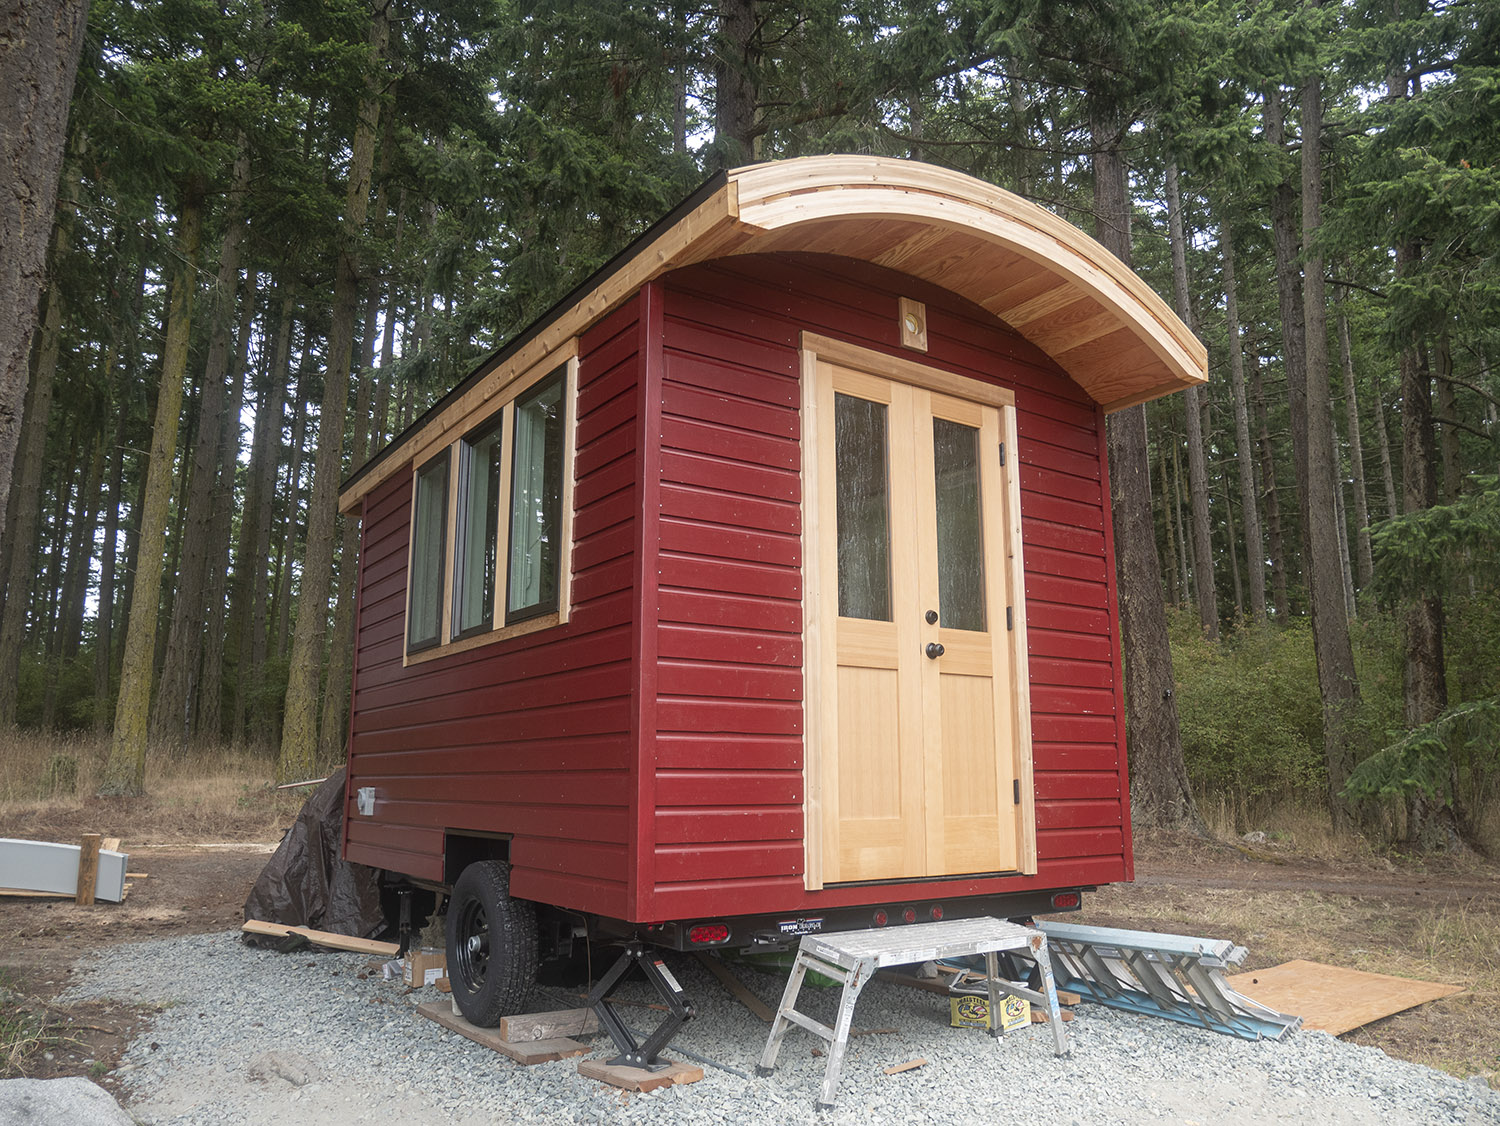
Trailer: Iron Eagle 12′ trailer, designed specifically for tiny houses.
April 12
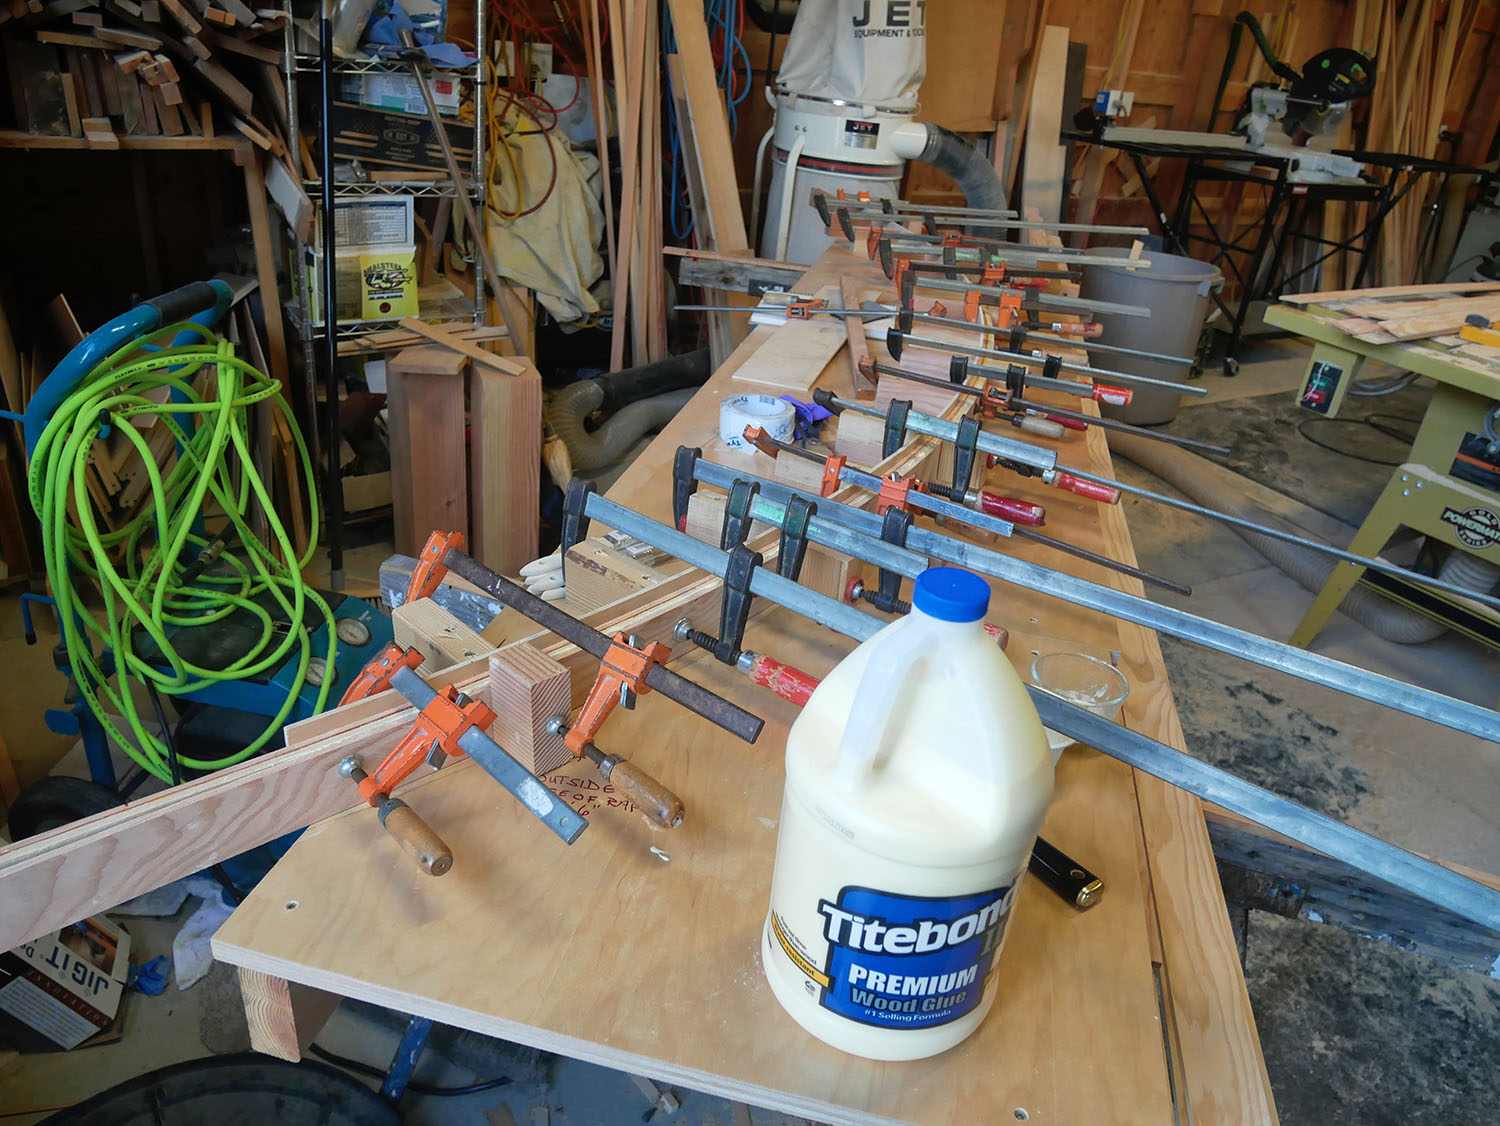
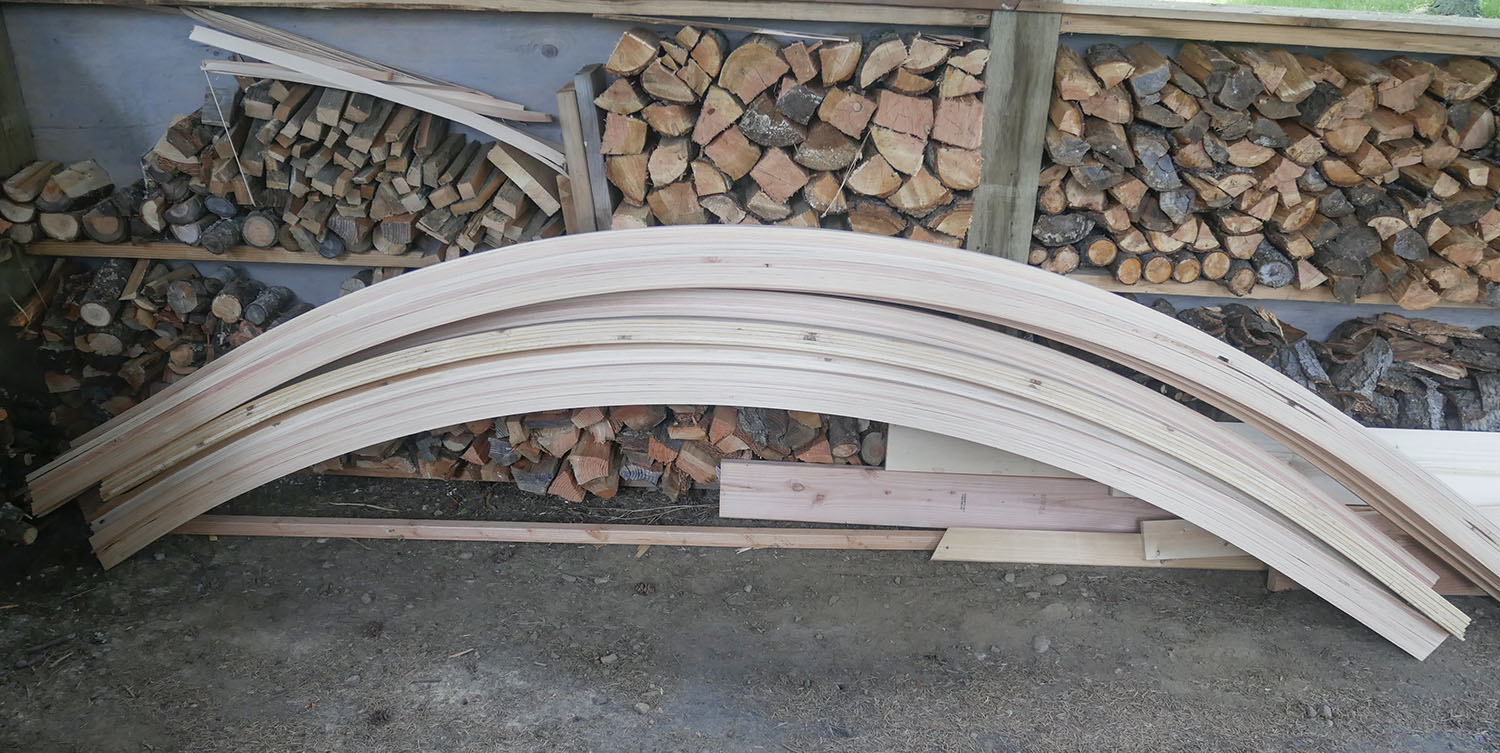
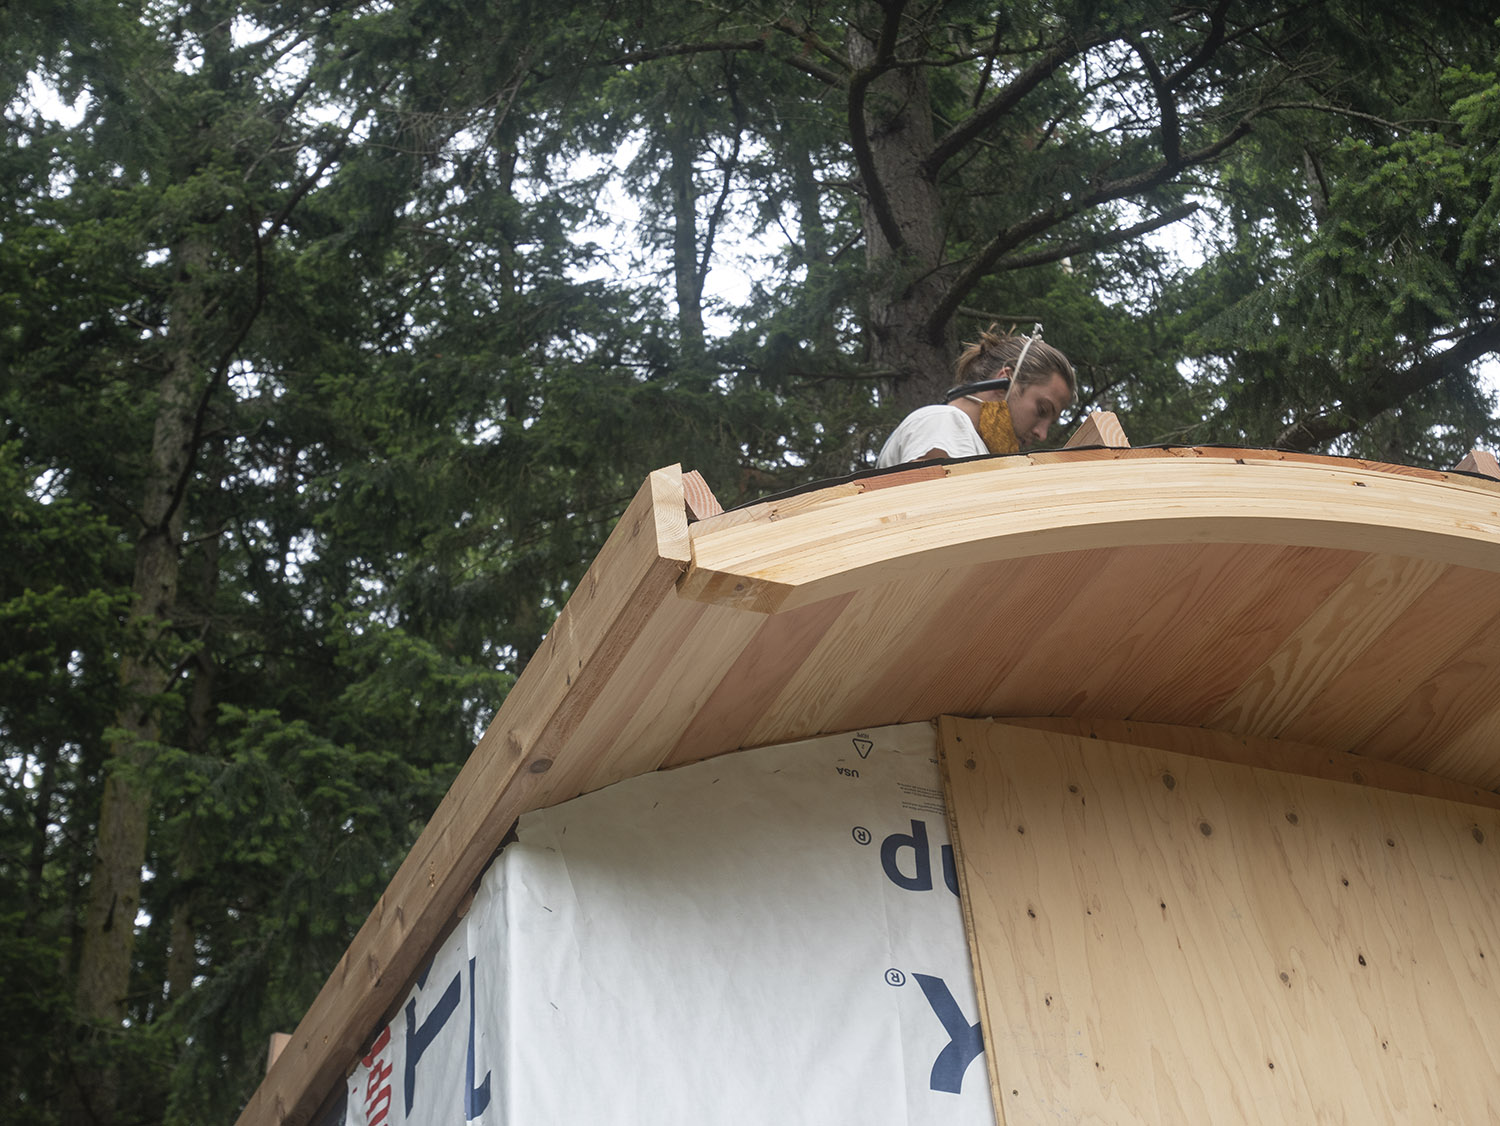
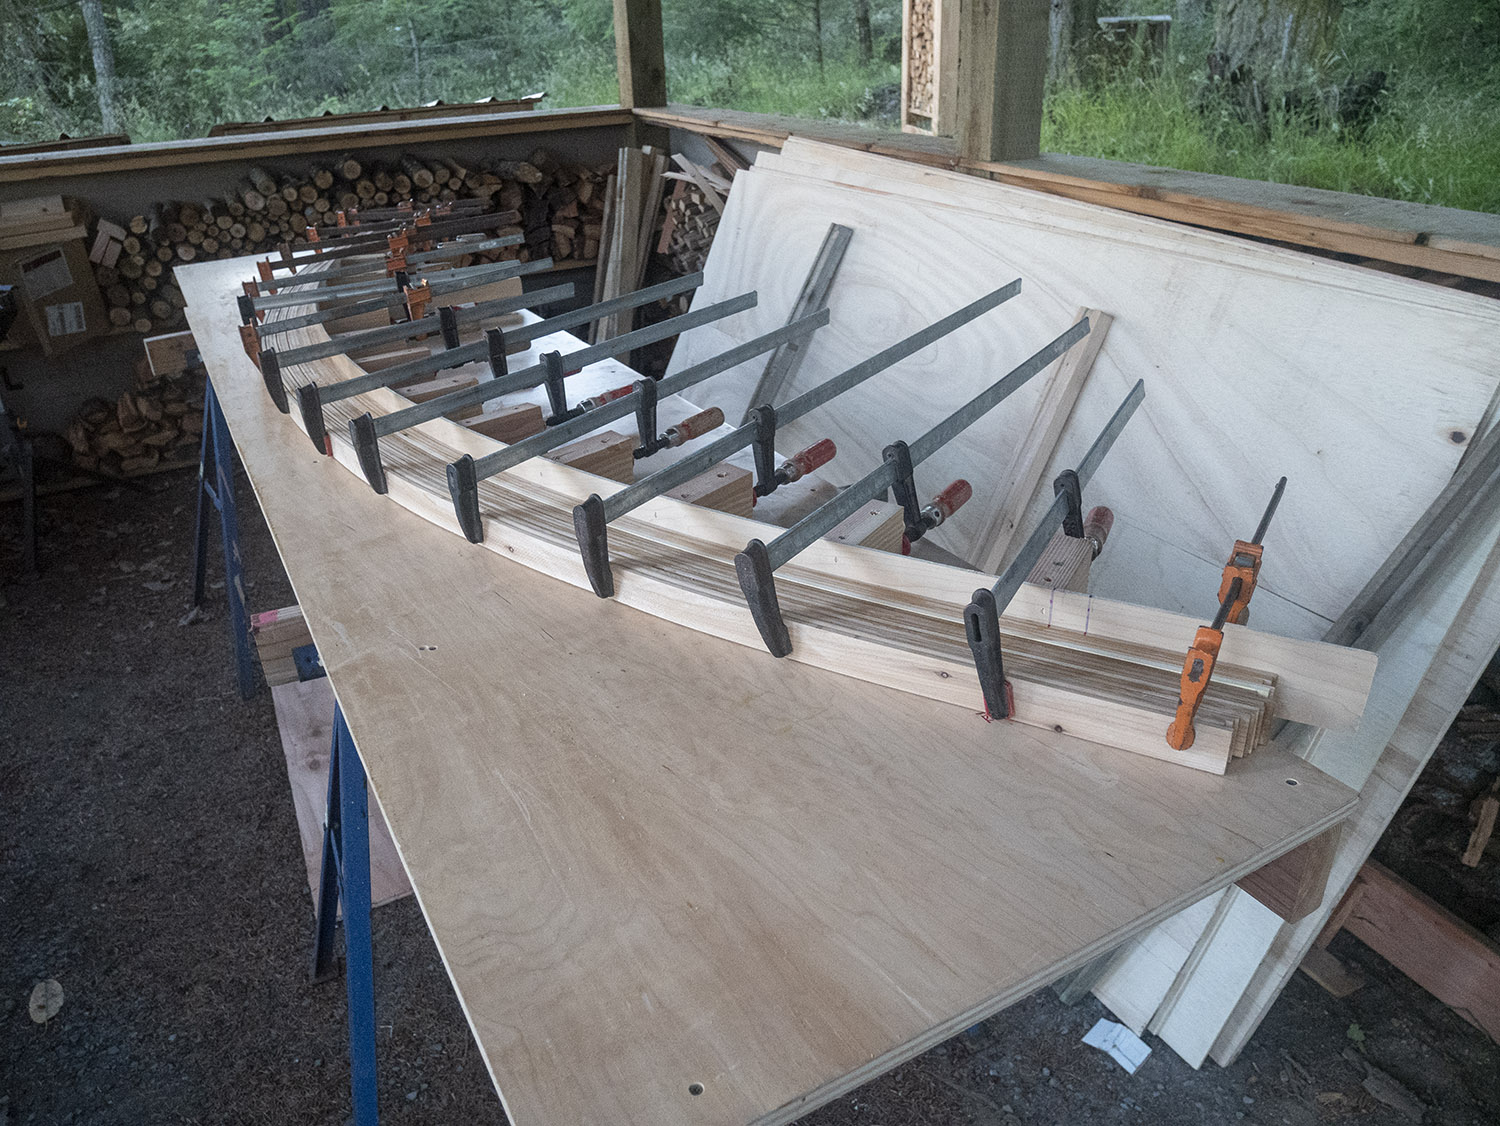
Before I build the frame, I want to build all the beams for the roof, so once we start framing, we can get the roof on quickly. The tiny studio will have 10 beams total, and each beam will have 12 strips of wood that must be glued together and clamped on a form to make the curved beams. My friend Pamela built the form and together we are gluing, 3 times a day, 2 strips at a time. It will take about a month of this work to build the beams. But yeah, I really like the idea of a curved roof.
The gluing doesn’t take too long (about 10 minutes per 2 strips); it’s the clamping that’s more time consuming.
April 15
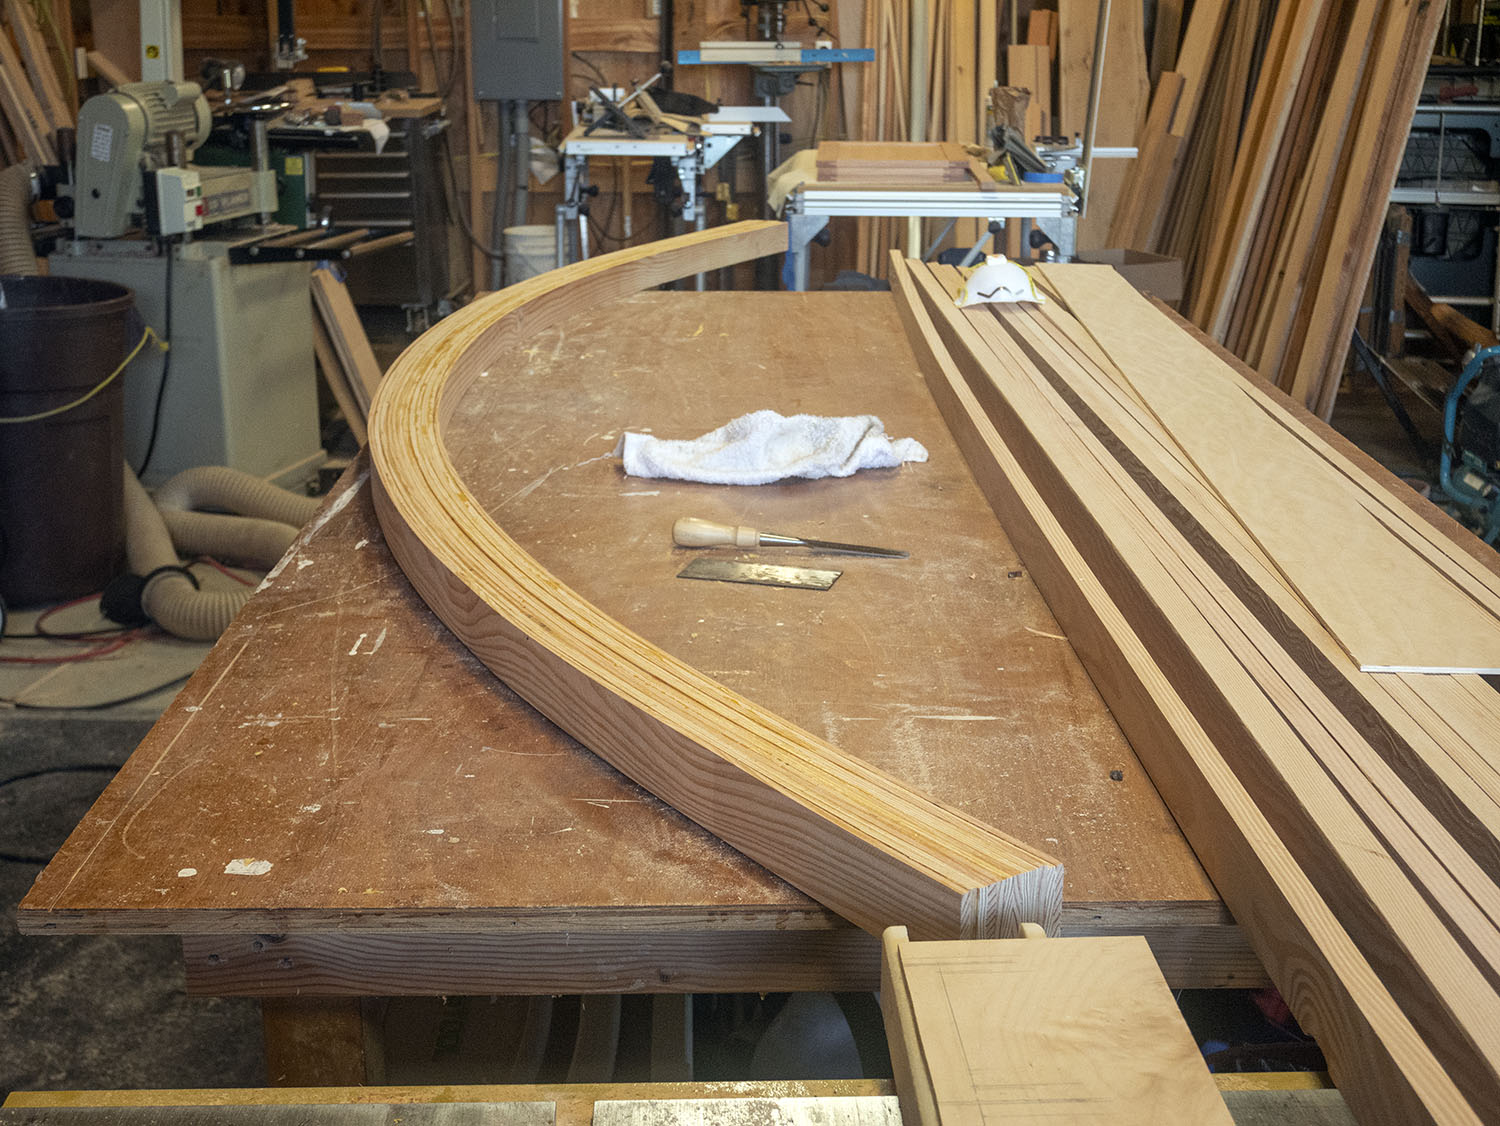
Beam 1 is done! Time to start beam 2… (9 more to go).
May 11
11 beams done! 7 fir, 4 cedar. The 7 fir beams will be visible beams inside the studio. Two of the cedar will be inside the walls as support for the roof, and two will be outside visible beams on the front and back of the trailer. They got moved from the workshop to my car port this morning. A lot of work, and I have the callouses to show for it, but I think and hope they will be well worth it.

May 23
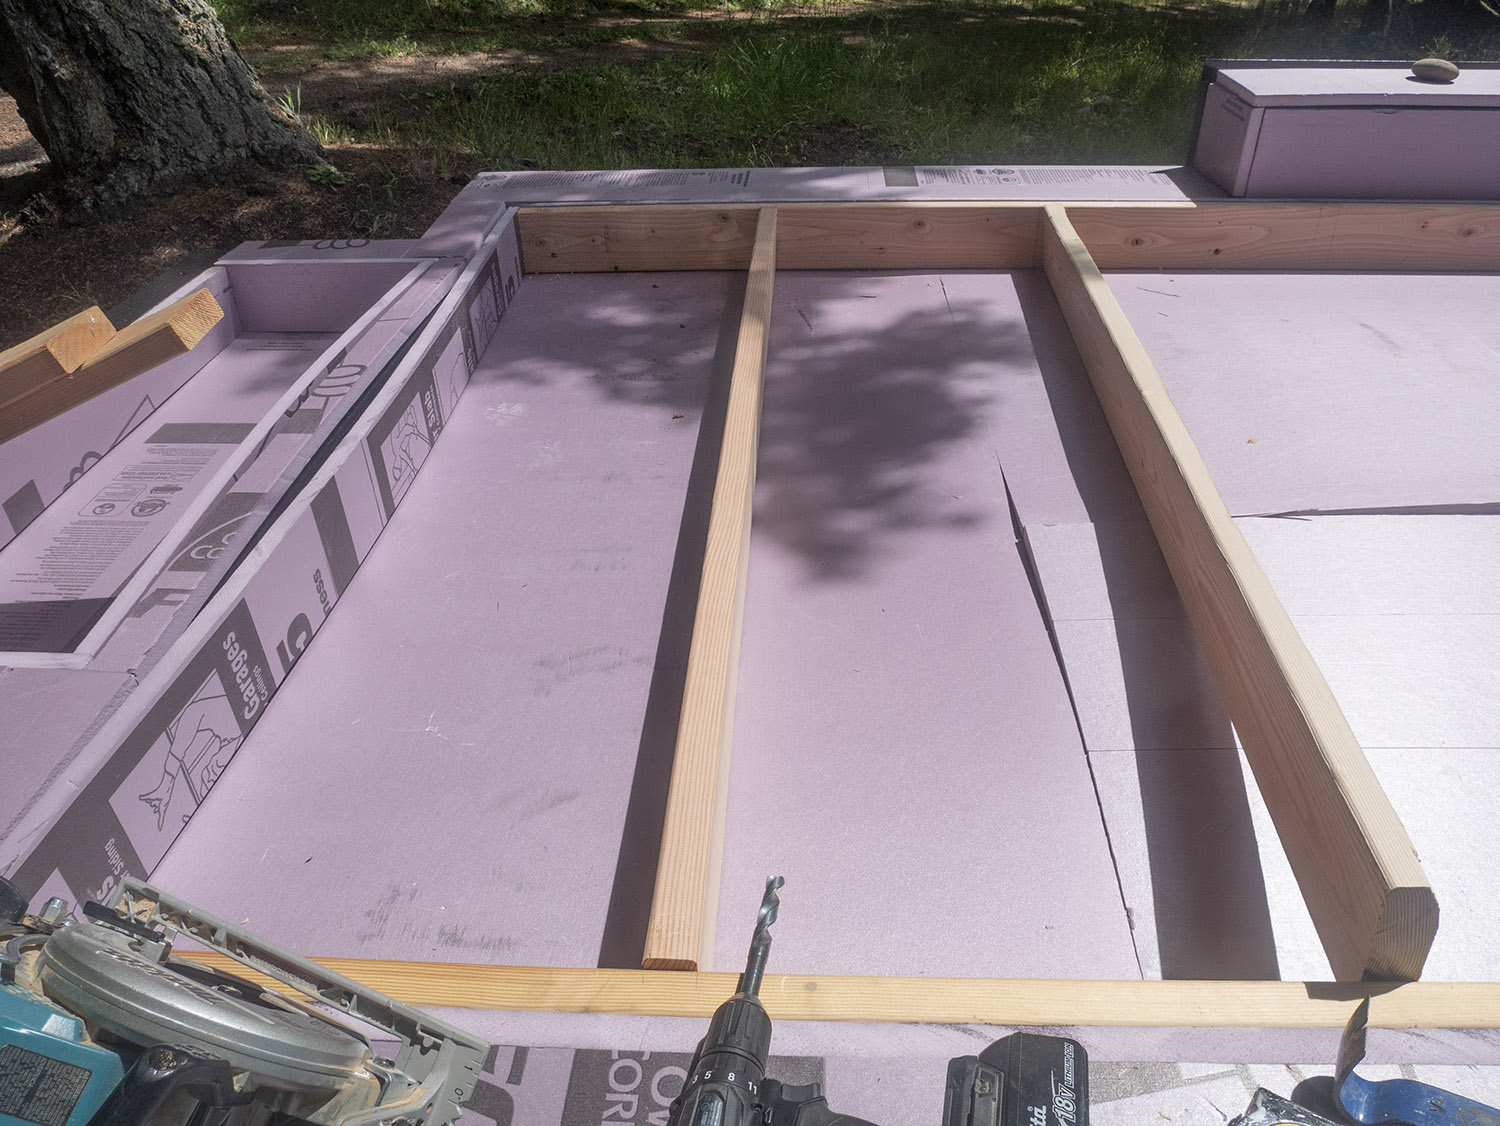
Today I worked with Pamela all day to cut all the pieces of wood and insulation for the flooring, as well as all the plates for the walls. I got up early to clean out the trailer as it had accumulated all kinds of tree gunk—pollen, which had stuck to the trailer with getting wet, and then drying again—seeds, and needles. Got that nice and clean.
Cutting all the pieces was tedious! The rims were easy (the long pieces down the sides and across the front and back), the joists were easy (the pieces going across the bottom of the trailer from one side to the other—7 total), but all the other pieces were niggly.
The insulation for the bottom pan of the trailer was pretty easy – two pieces lengthwise, and the one piece across. We were able to cut these with a knife and snap them. We then had to cut the pieces to go up the rim sides, and then out over the rim, as well as the pieces for the bumpout. It was a ton of little pieces of insulation. Some we cut on the table saw, which basically meant spewing tiny bits of insulation all over the place (despite having a shop vac attached!)—little bits of pink plastic. Ugh! The parts we could cut with a knife were much better and didn’t make too much of a mess. We cut most of them to be quite tight. This insulation goes over all the metal so that no wood touches metal. This reduces the transfer of heat from the floor and walls to the metal, which should keep the studio space warmer.
Once we’d finished that, we started cutting the wood. We used 2×6’s for the rims and the joists, and 2×4’s for everything else. Most of the bottom plates for the walls get bolted into the trailer frame, so once we’d measured and cut the pieces that get bolted, we clamped them to the sides and drilled from the outside of the trailer through the bolt holes, through the insulation and through the wood. Basically the trailer is acting as a foundation for the studio, and it’s really handy to be able to bolt the main part of the frame to the trailer.
We cut and drilled 2×4’s for the bottom plates all around the edge of the trailer and the bumpout, and then cut the top plates to match (which was easier without having to worry about the wheel rims). We double insulated in front of the wheel rim to the wall, and will build a “box” of sorts to frame around this and attach the inside wall plywood to the studs on each side. We’ll probably cover this on one side with a desk, and on the other with a storage unit for my art supplies.
Once we had everything cut, we screwed together the bottom and top plates and marked everything very carefully so we’d know what goes where, and put it all in the car port to stay dry until we get the studs cut and all the ceiling and roof pieces ready. Then we did the same with the insulation—grouping together and marking the various pieces and taping them together with masking tape.
I learned how to use a skill saw properly, and how to measure for the joists and studs, and what a “California corner” is. I learned I really dislike insulation but it’s kind of a necessary evil. We’ll be using a different kind of insulation between the floor joists that’s still kind of nasty to work with but is a tiny bit more “natural” (i.e. not made out of fossil fuels). And I learned how to properly mark wood for measuring and cutting.
May 29
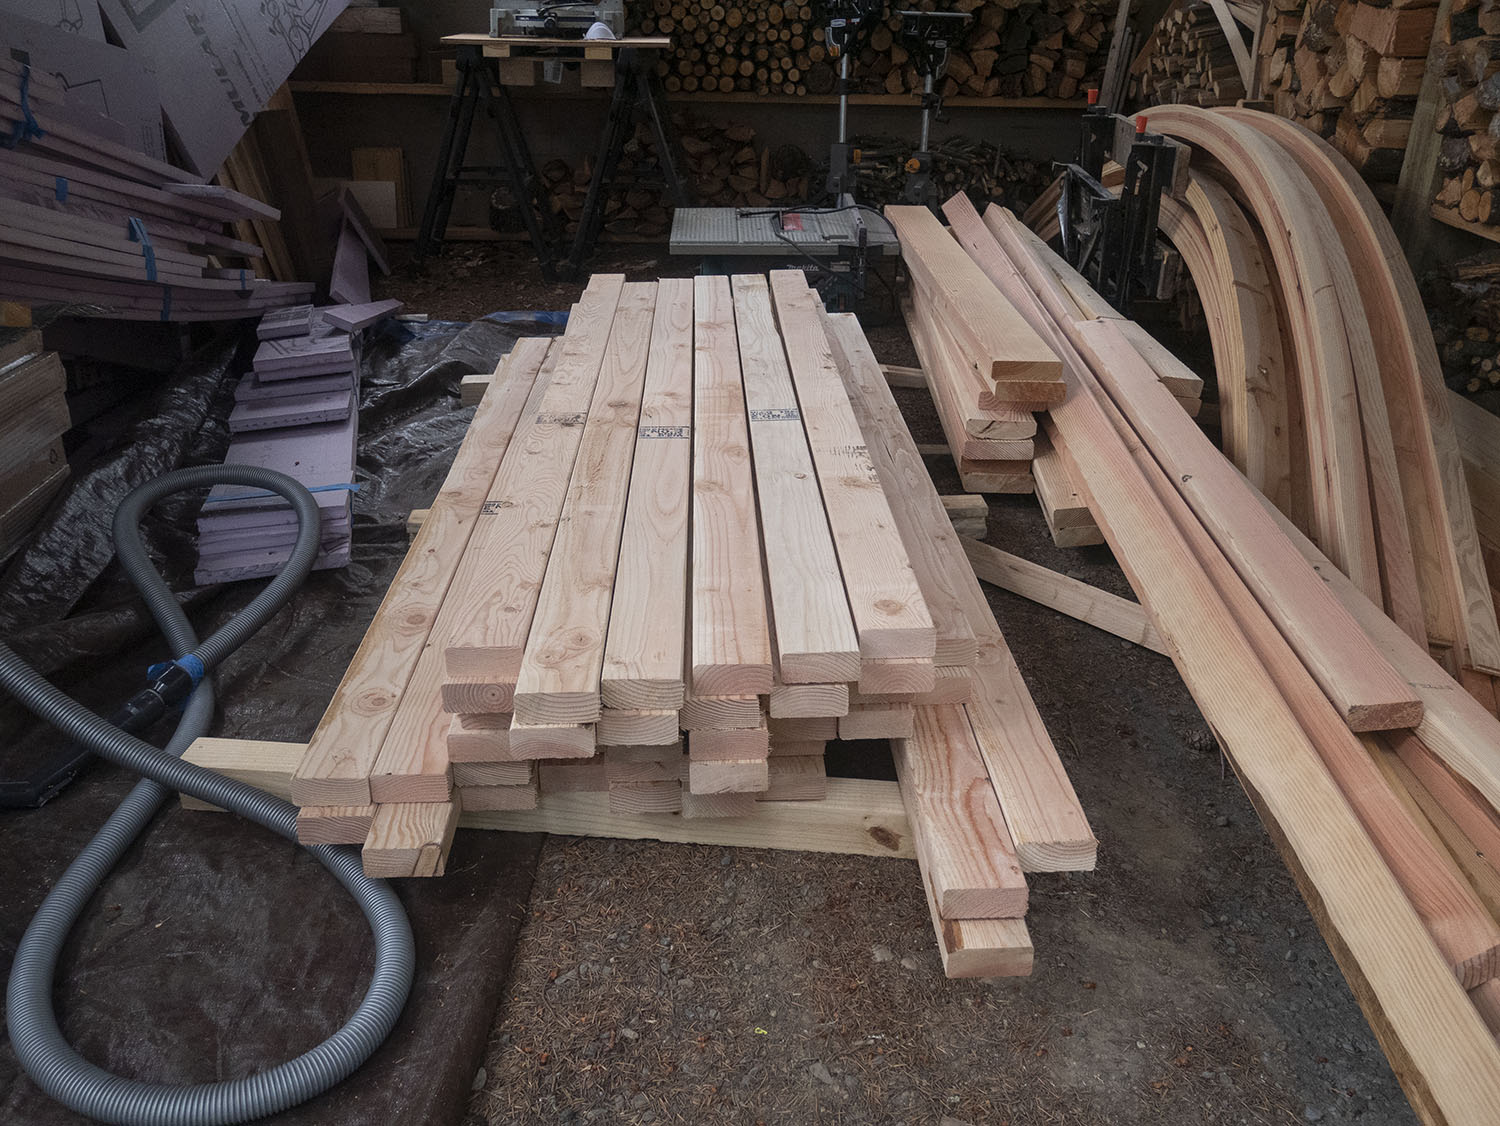
Yesterday the wood for the wall studs was delivered, and today I cut 42 of 46 to 82″ long. 4 extra in case I messed up. Took about an hour and a half.
June 3-5
The build begins!
We had three days of good weather to get the floor, frame, and some part of the ceiling/roof done. We’d hoped to finish the ceiling and tar paper it but ran out of ceiling material because while Pamela ordered square feet, the store ordered linear feet so we had only half of what we needed.
But we got it mostly done. Getting the flooring done wasn’t too bad since we’d precut all the materials, but it still took an entire day. I noticed that each piece of plywood we put on the floor, we left about 1/16″ or 1/8″ for wiggle room so the floor doesn’t buckle as the floor expands and contracts. Same for the plywood we attached to the frame for the walls.
The floor joists sit on top of the formular insulation in the bottom of the trailer and there’s a small space between the joists and the formular to allow for air flow. The joists get tied into the floor rims, which are bolted onto the trailer. The bottom plates are also bolted onto the trailer.
We cut the studs pretty tight so there was a lot of banging things into place. Some of the studs we used were sitting right on top of the framing bolts that go into the trailer, so we had to cut niggly holes in the bottom of some of the studs to fit around the bolts. I wondered if that would be a structural problem but apparently not. There are only a few of these. We added extra sill studs under the window frames of course to hold the sills in place.
In between the joists we used Roxul rockwall insulation. This is more bug resistant than the formular and tends to hold onto moisture less, too. We had put screen meshing in each corner of the trailer where the drain holes are to prevent bugs coming in but to allow moisture out.
We built part of each wall flat on the trailer, and then raised them up and bolted the bottom plates into the trailer, and then added more studs.
Lots of measuring, cutting, nailing. Using the nail gun is fun, although that thing is super heavy and my shoulder was aching by the end.
June 13
Today we put in the windows. We had covered the entire framing with plywood, so to make holes for the windows, we (well, Lucas mostly) used a router. He started a router hole kind of in the middle of where the window would be, then moved the router to the edge to run it up along the side of the window frame stud. The router bit has extra length precisely for this, which I didn’t know before. He offered to let me try routing but I declined—I figured it would be better for me to try routing for the first time on something simpler!
Once we had the window holes complete, we unpacked the windows and Lucas got on the roof, Pamela on the ladder and I handed each window to Pamela. She got the window into place and then Lucas and Pamela adjusted each window so it was straight and plum, not an easy task. This involved making small adjustments, checking the level, etc. many times for each window. The windows come with a flexible material attached all around the outside that you can screw into place, which hold the window in.
We also added Tyvek wrap to the building, one strip around the bottom, and one around the top in multiple pieces to get around the windows and the corners. We snapped lines with the chalk line to make sure to get the Tyvek mostly straight, and overlapped the Tyvek about 1-2″ with the top overlapping the bottom so any water that gets in will hopefully not get behind the Tyvek. We also used flashing tape around the windows to help seal those holes from the rain. This stuff smelled like tar, and Pamela said it’s made out of bitumen. Gross…. but it works. So… Unfortunately some elements of building which help prevent rot from water are also not very good for the environment. Tyvek is essentially plastic, and the flashing tape and tar paper for the roof are also made out of oil/tar.
June 19
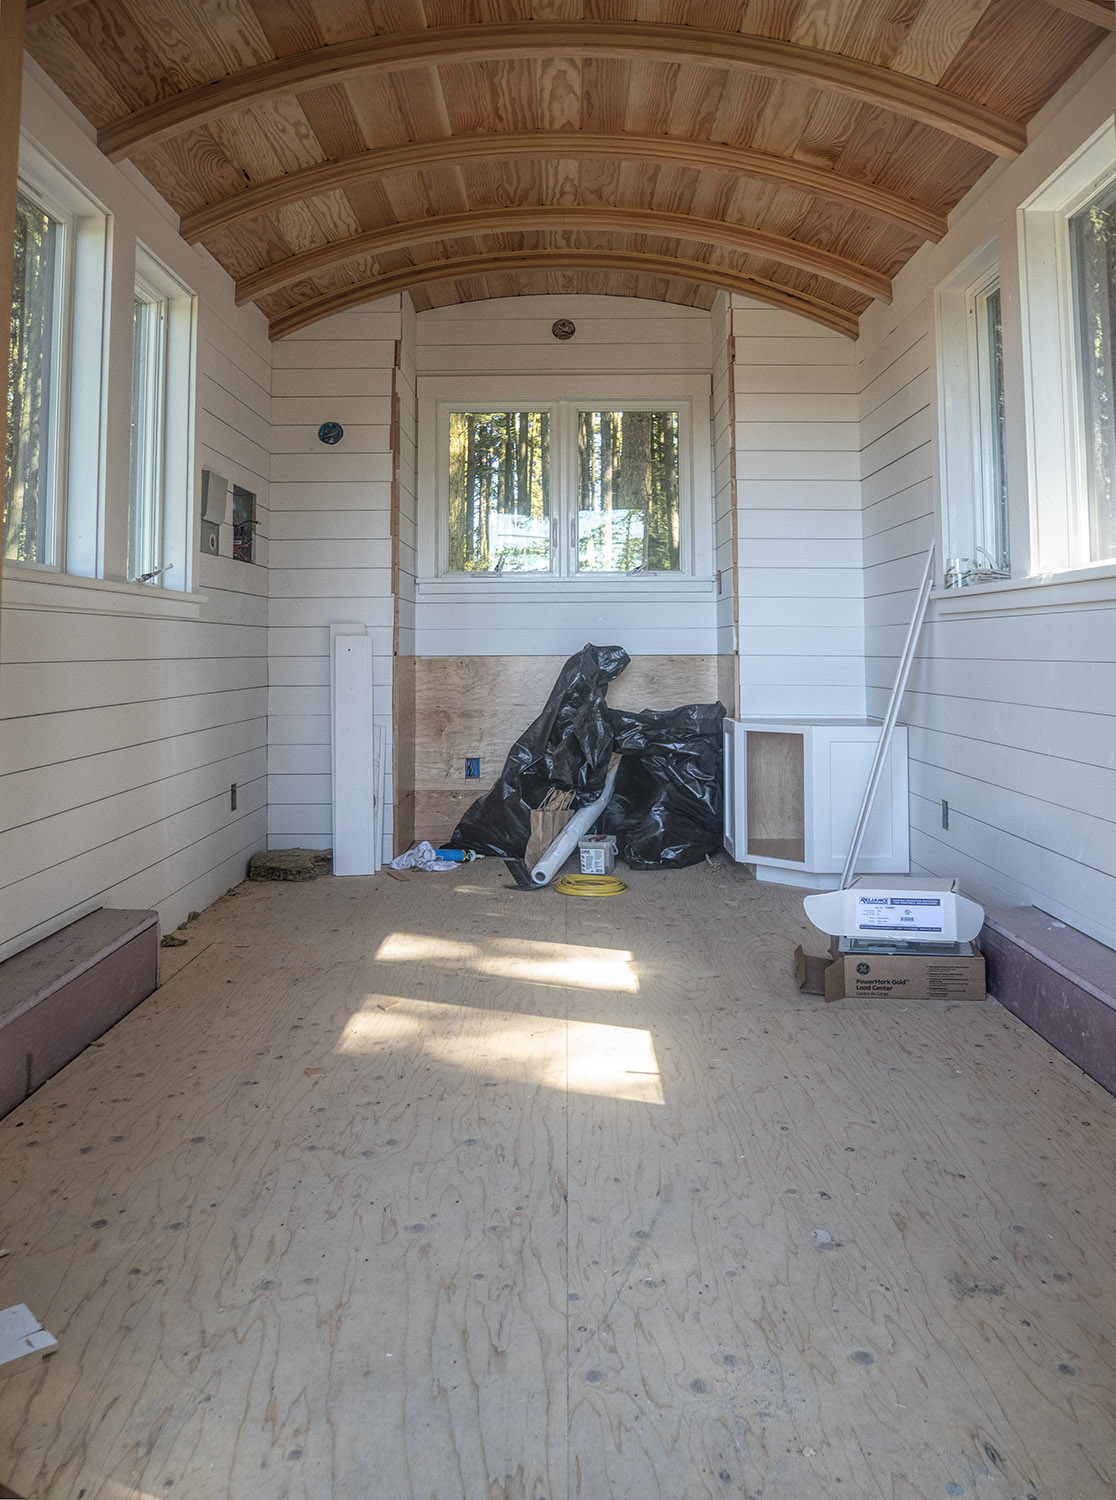
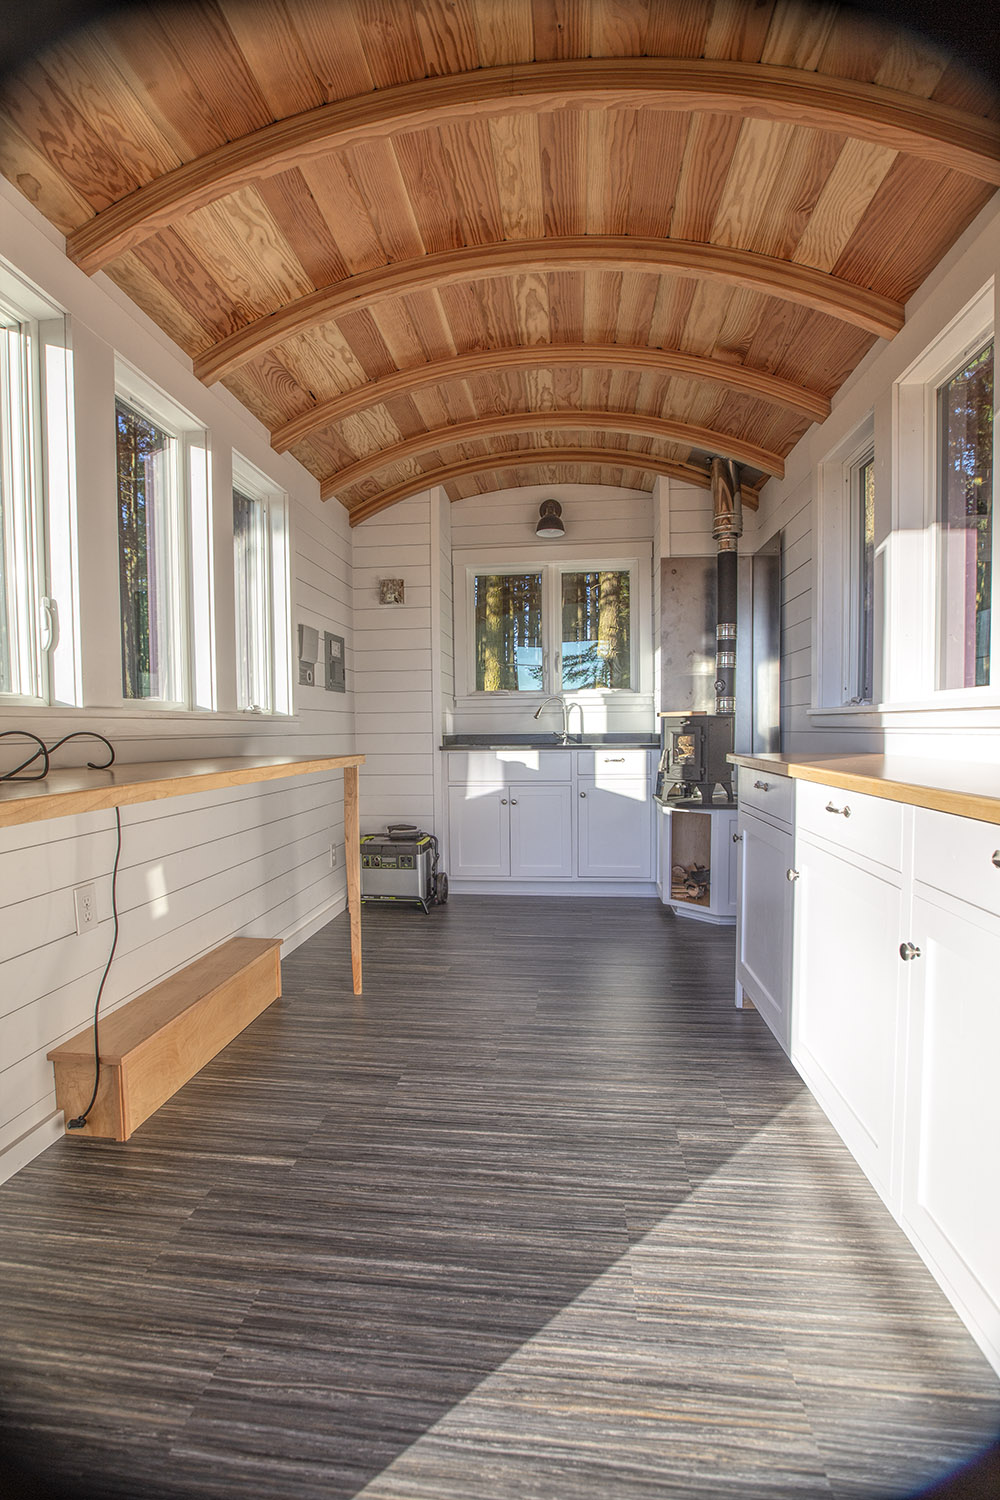
Today we finished the ceiling with car decking. Then we tar papered the top of the decking. Then we added purlins (long beams running lengthwise, 2×4’s cut to 2×3.75) and bolted those into the beams. Then we added spacers on top running side to side. Each spacer was 3 pieces of thin cedar layer and stapled. Then we added venting between the spacers. I need to glue two more beams for the ends of the roof, after which we can add the Roxul insulation, then a layer of plywood, then more tar paper, and finally the metal roof. It’s like building a layer cake!
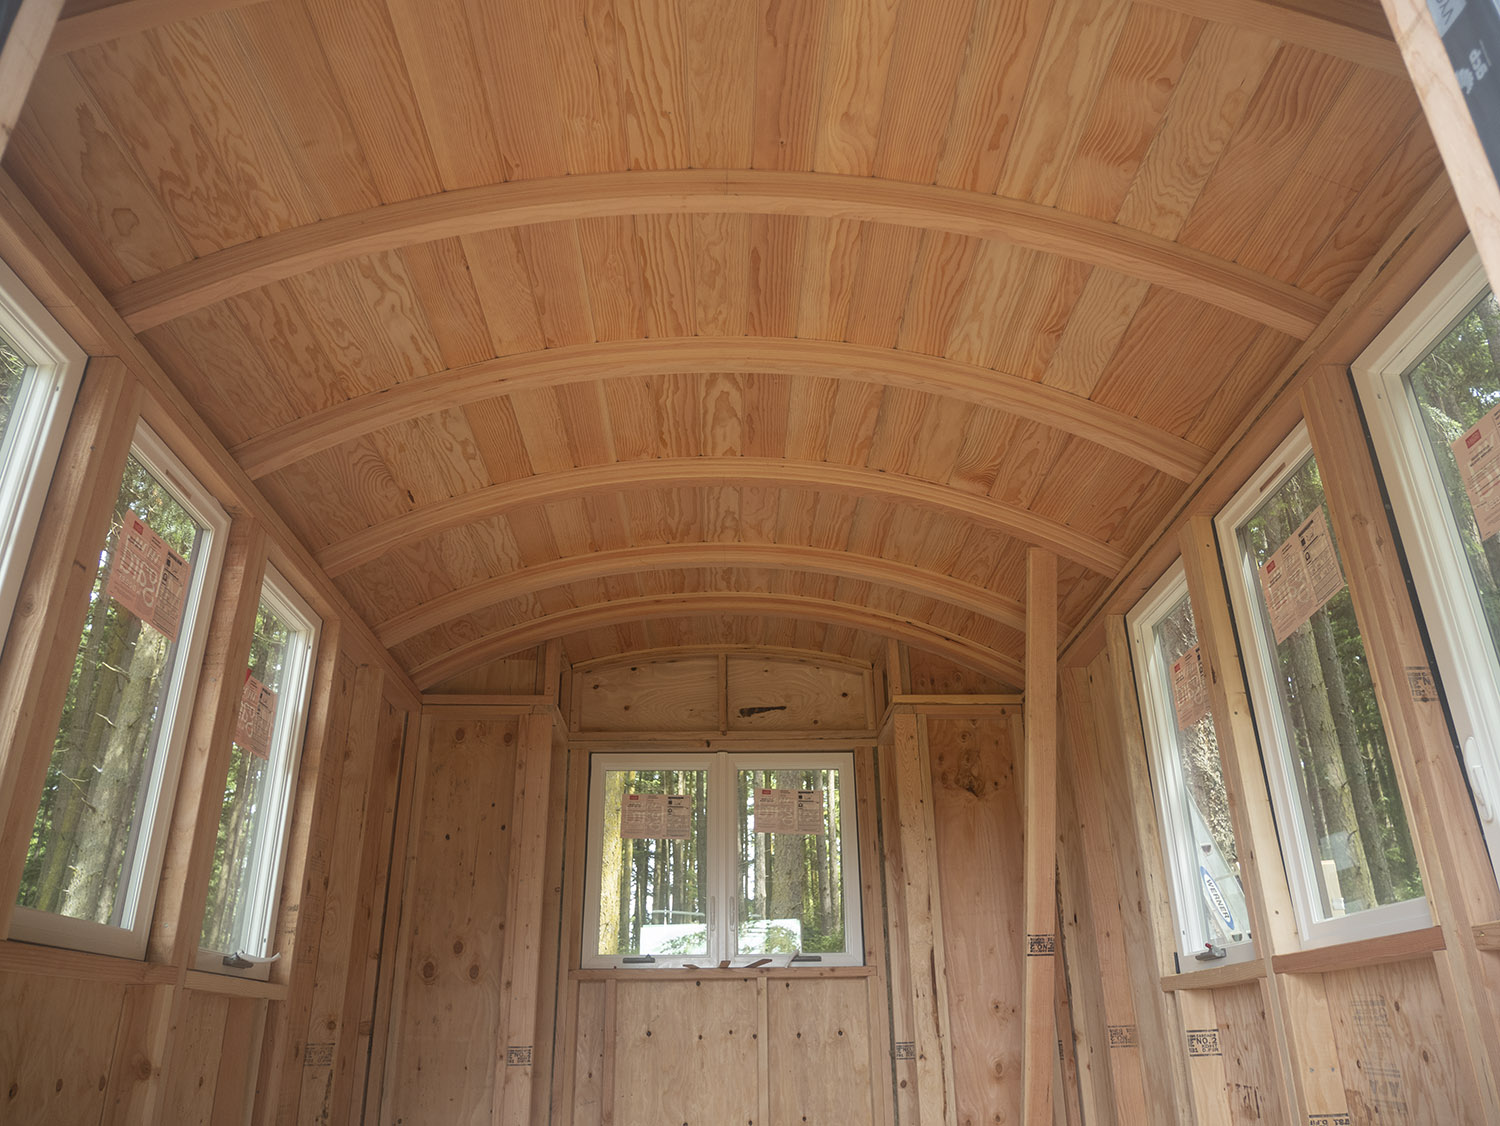
The beams and ceiling look great together from the inside.
The purlins. On each side, a full length cedar board, in between fir 1″ short on each end to add an extra beam on each end.
Bolting in the purlins.
The spacers. These add extra space above the insulation for venting.
Stapling the spacers. Three layers to make a spacer, each stapled to the purlins.
Shows the cedar on the side, and the purlin next to it. The purlins are 1″ shorter than the roof on each end to leave room for beams.
June 23
Back to making beams again! We decided to add beams at each end of the roof above the ceiling decking rather than blocks between the purlins to tie in with the beams underneath. So I am making two additional beams, 4″ tall, but only 1″ wide this time. We moved the form for making the beams from the workshop to my car port, so it’s an easier “commute” to work on the beams. The callouses on my hands were just starting to heal from the previous beams, so those are coming back quickly. But I think it will be worth it.
June 26
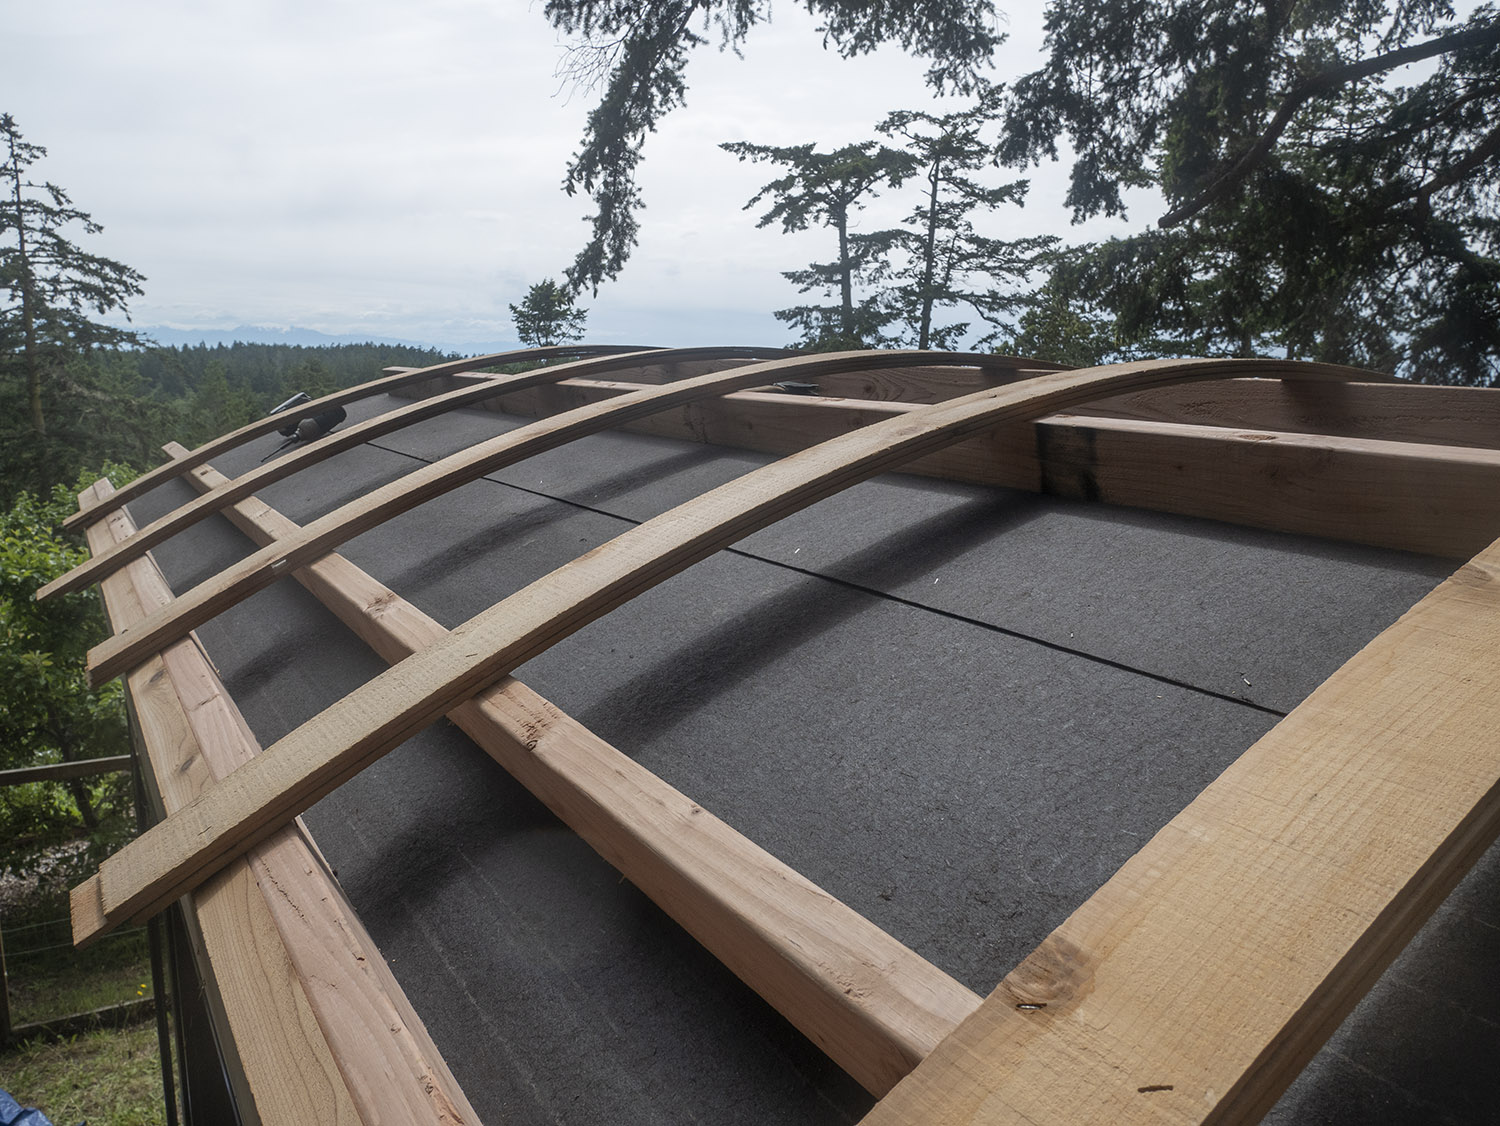
I got the beams done yesterday, so Pamela came to pick them up this morning and took them to her to shop to plane them, and then brought them back. We fitted them into the ends of the roof—this was tricky! Lucas clamped them to the roof then measured where the ends should be cut, and cut the ends off, while Pamela pulled up the tar paper a bit so that the beams could go onto the car decking and we could roll the tar paper up along the side of the beam to form a barrier for water. Then we put the beams back up, clamped them again, and then screwed them into the ends of the purlins. There were small holes in the corners where the beams met the fascia boards so we cut out the sections of the ends of the beams that had already been cut off to fit those back into those holes. Worked great.
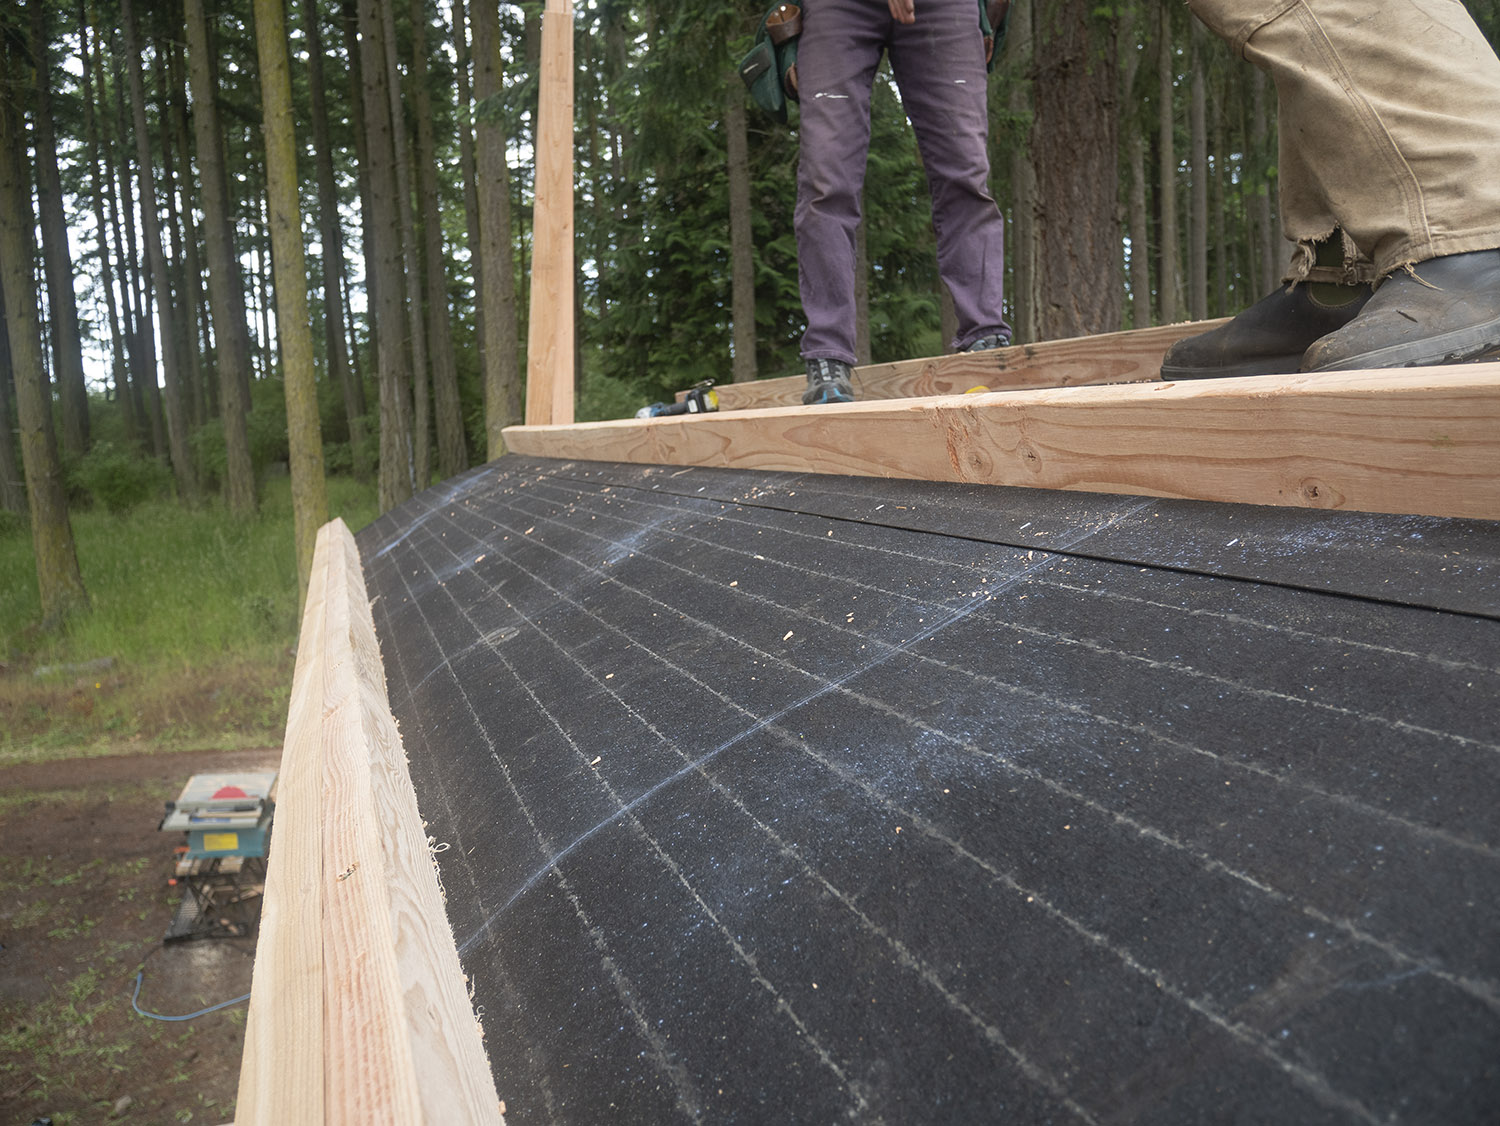
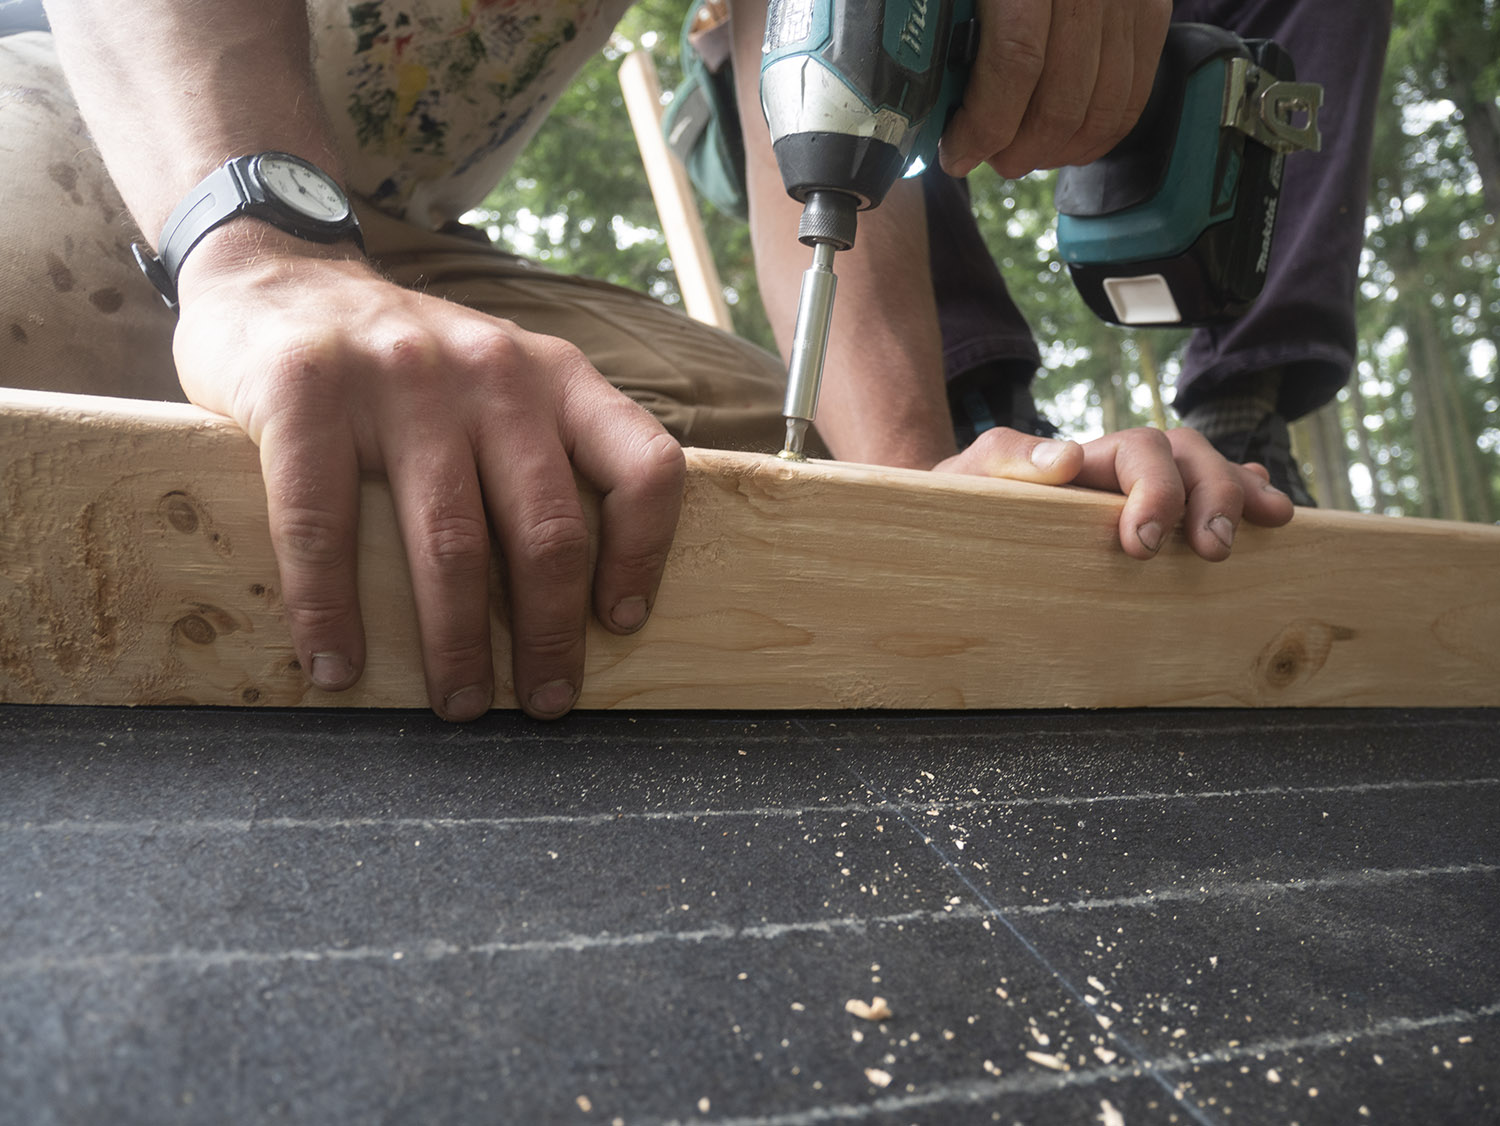
Next, we stuffed insulation between the purlins, and under the spacers. Pamela put on the flashing along the sides of the building, and then we put two layers of 1/2″ plywood on the roof across the spacers to the ends and sides of the roof. Pamela put the two layers on so that the top layer overlaps the seams of the bottom layer to add extra protection against water getting in.
Once the plywood was on, we added another layer of tar paper on top of that.
Pamela brought along a piece of 3′ wide metal roofing so we could test the bendiness. At the moment we aren’t sure that it will work, so we need to find out how to make the metal work on the curved roof.
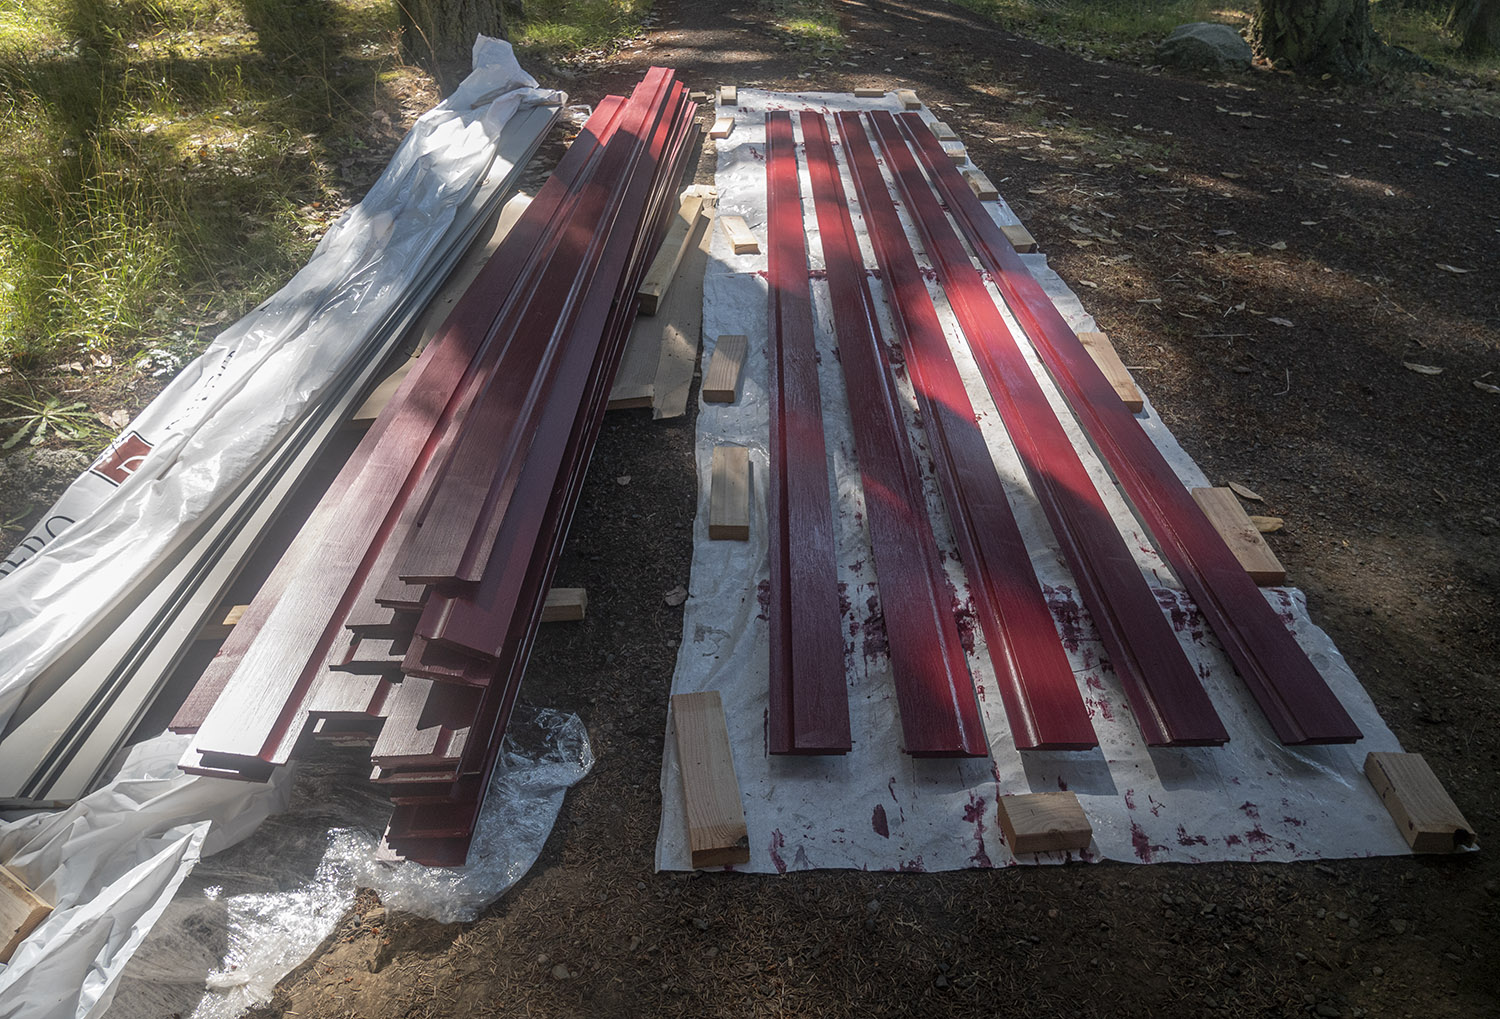
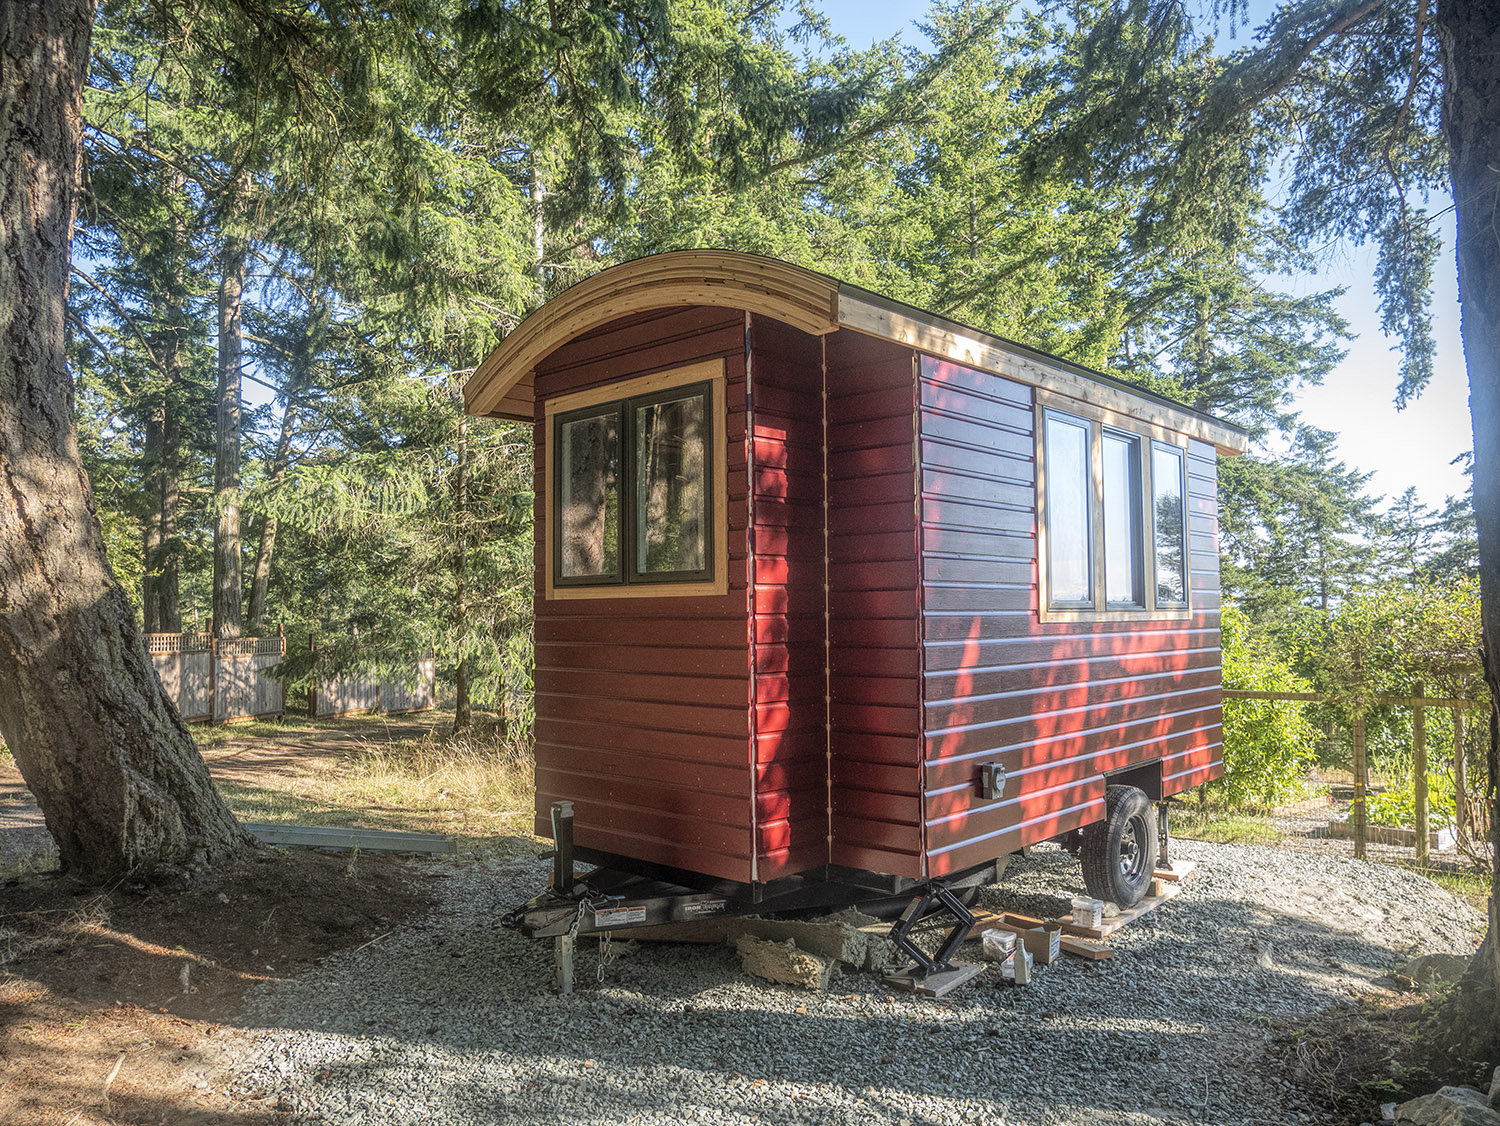
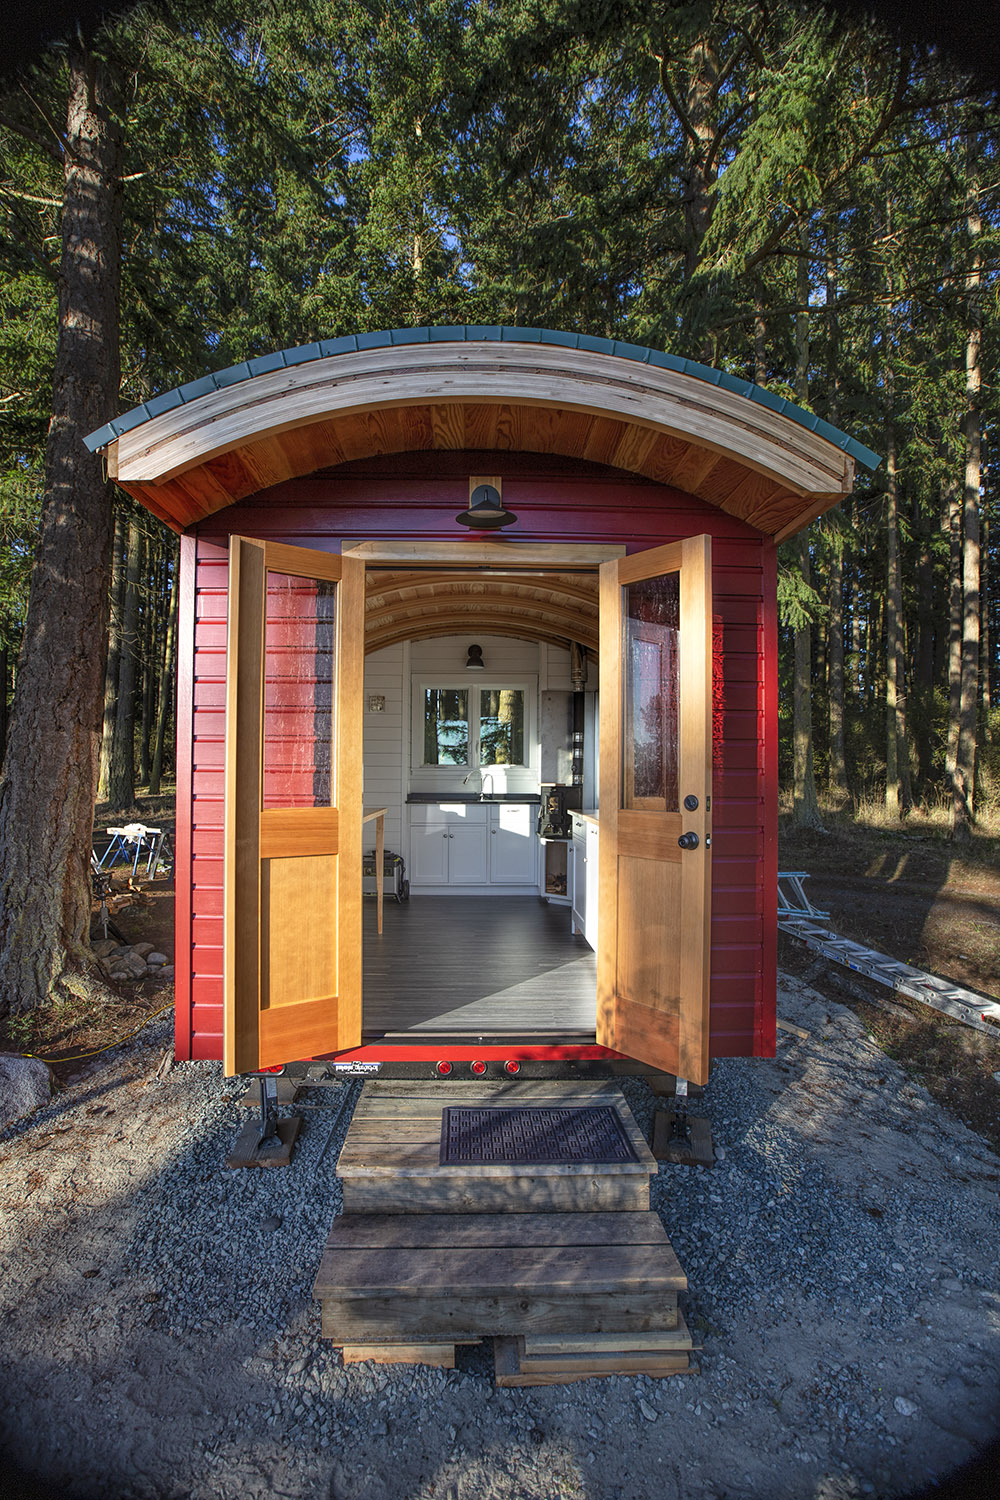
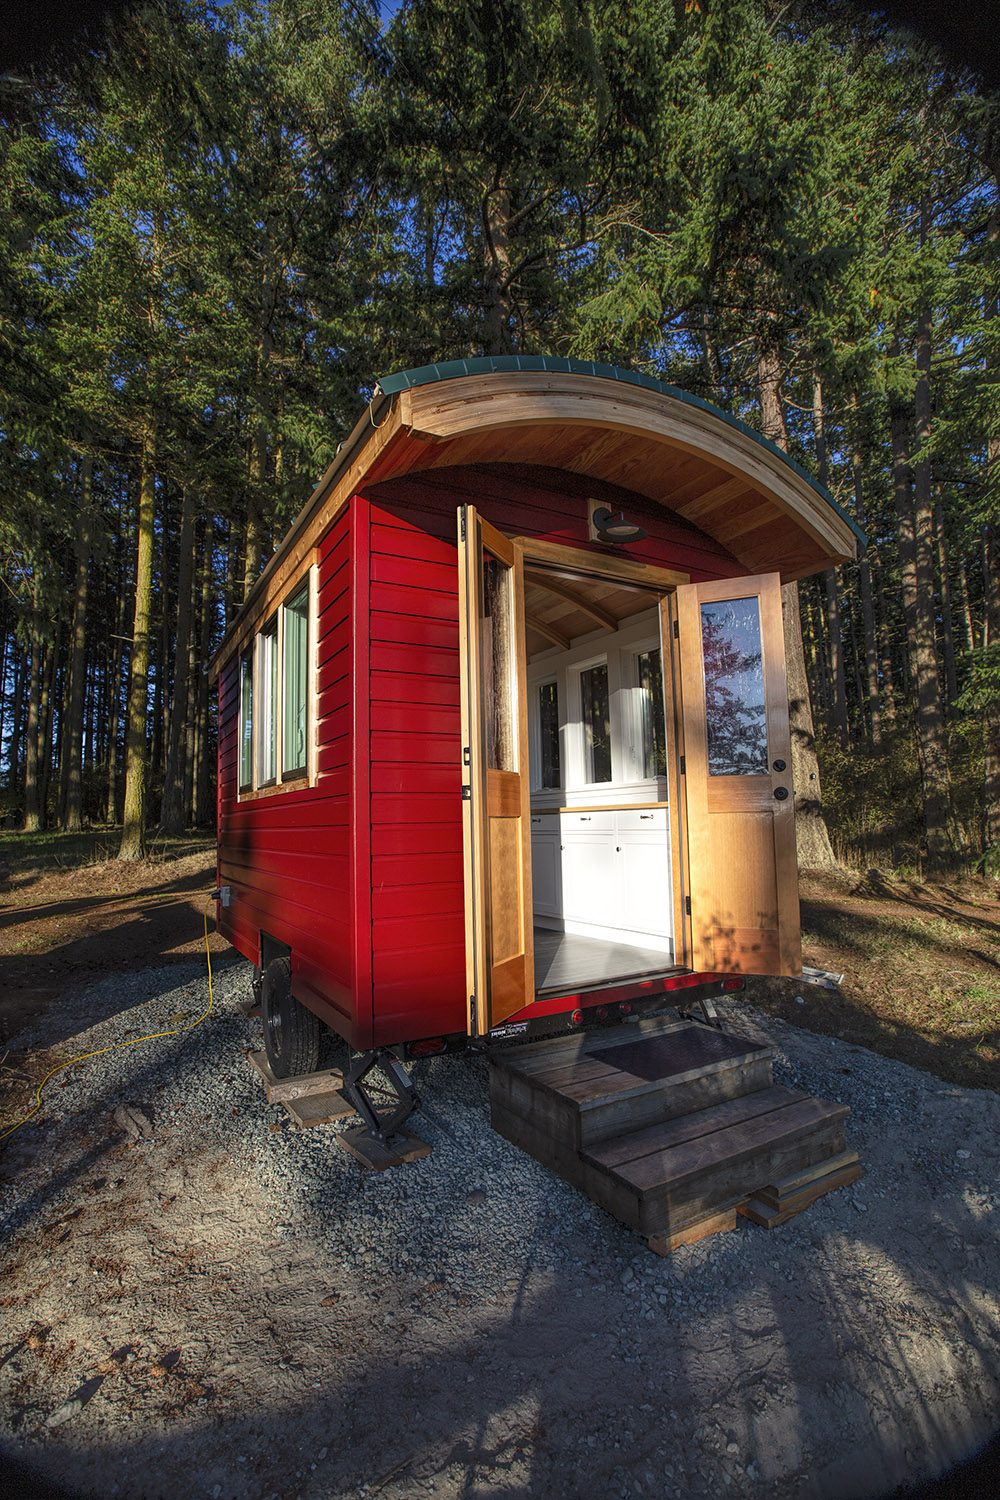
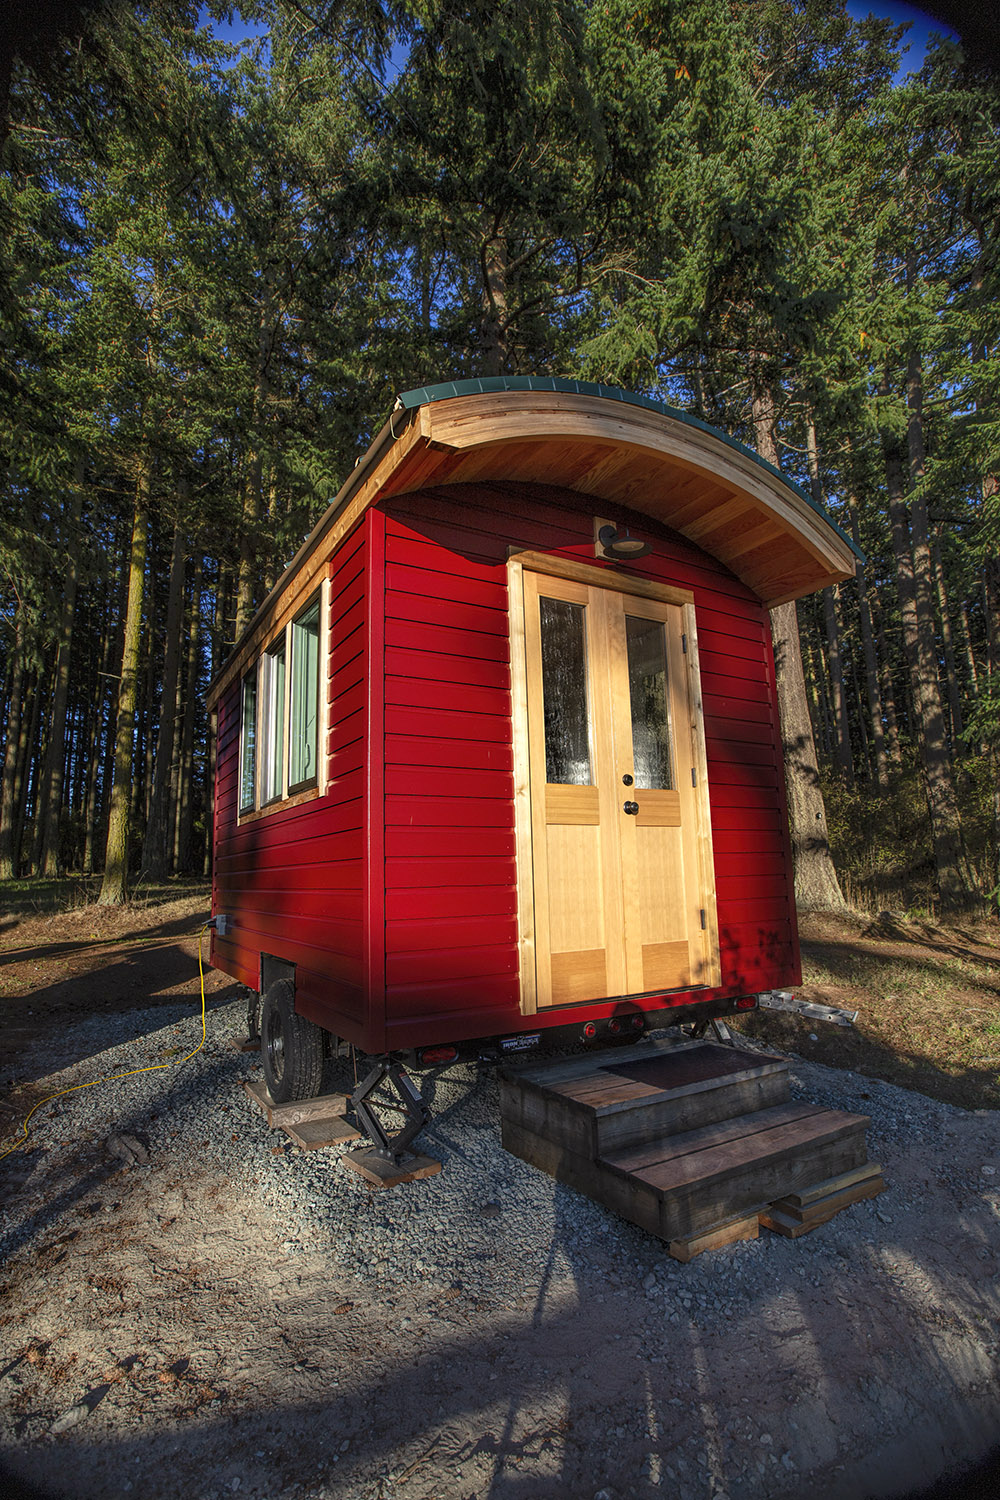
July 14
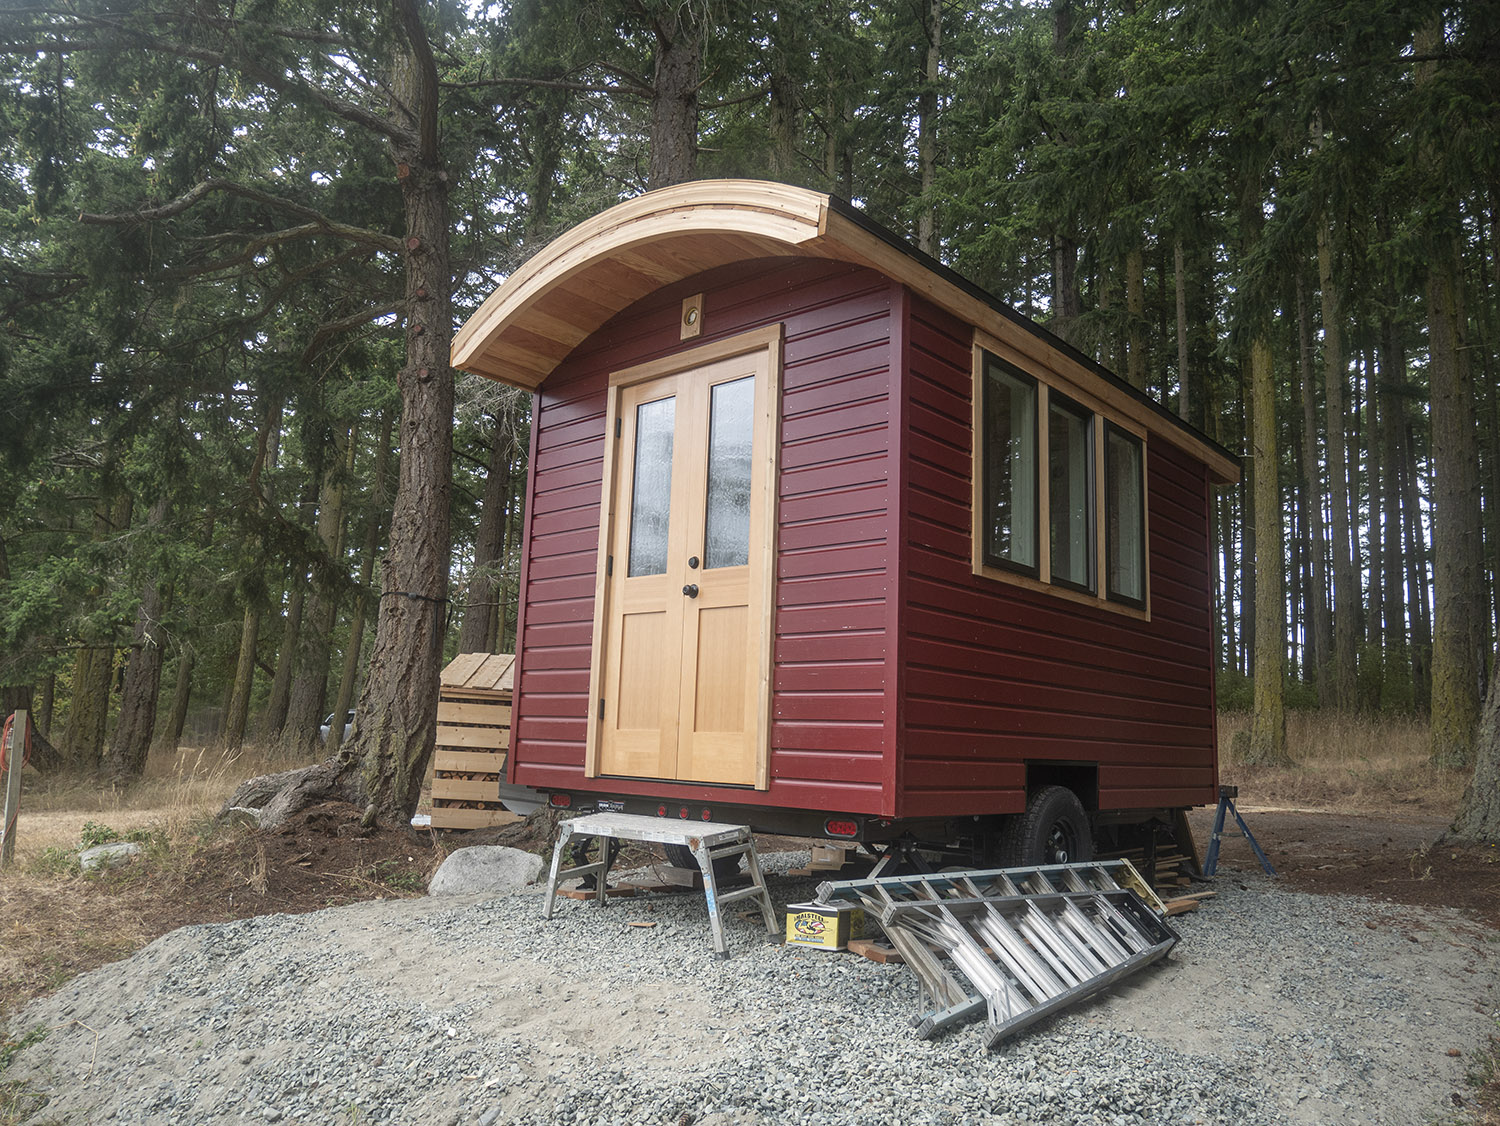
The siding arrived today. So the painting began today. The siding was pre-primed, so I didn’t have to prime it. I am going to paint each board with two coats of “Burgandy Classic”.
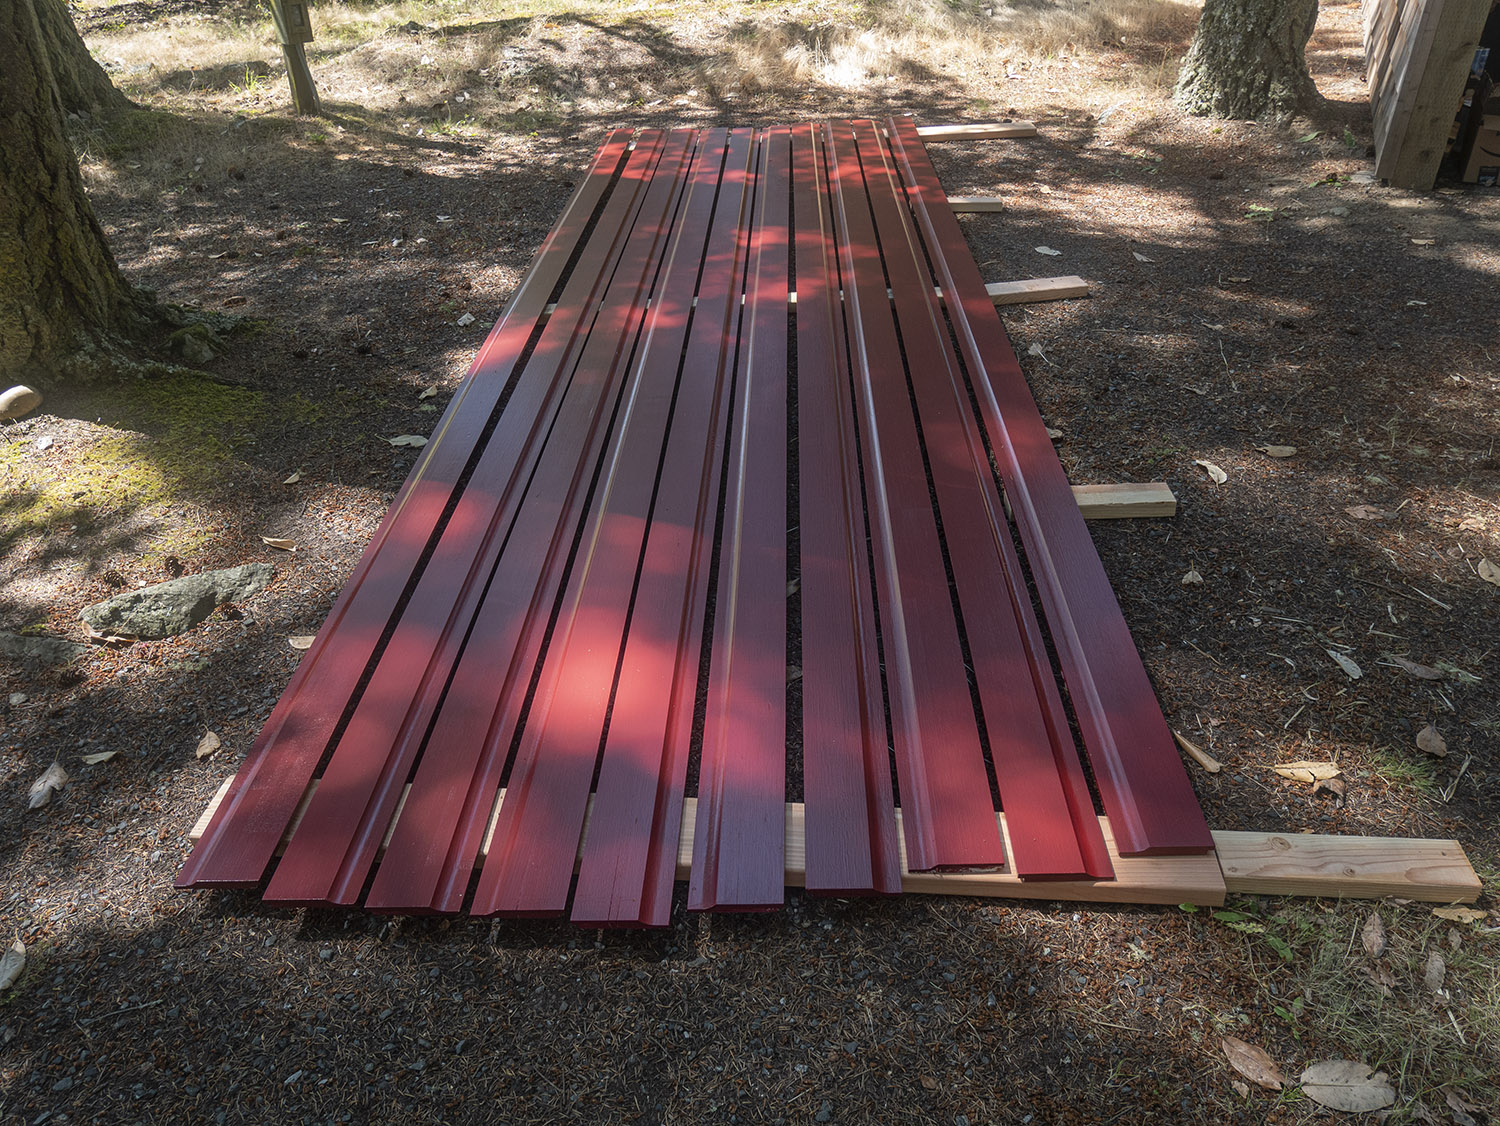
July 18
Still painting — I’m on the second coat! I am leaving the boards with the second coat to dry for much longer so they don’t stick together when they are stacked.
July 19
I’m still painting the siding… getting there. Probably will be done tomorrow. It’s kind of amazing how quickly the brush gets torn up while painting. I bought some high quality Wooster brushes to paint with and I’m on the 2nd brush and it’s pretty beat up. I will be able to finish with the 2nd brush, barely!
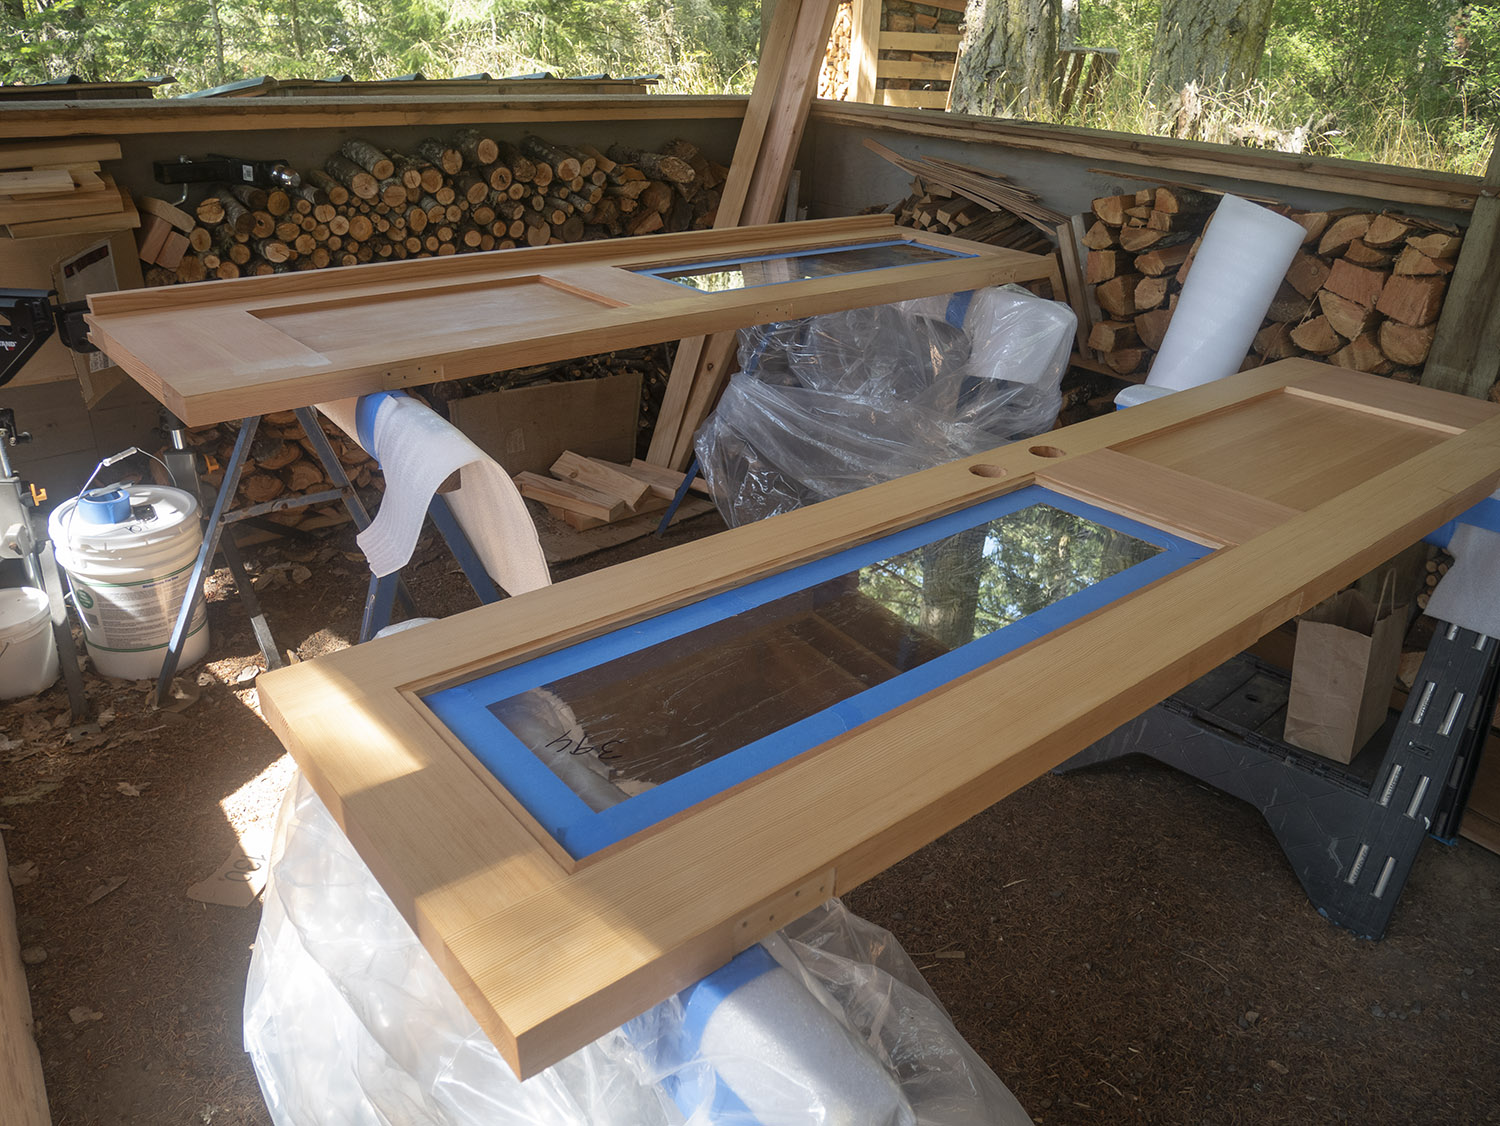
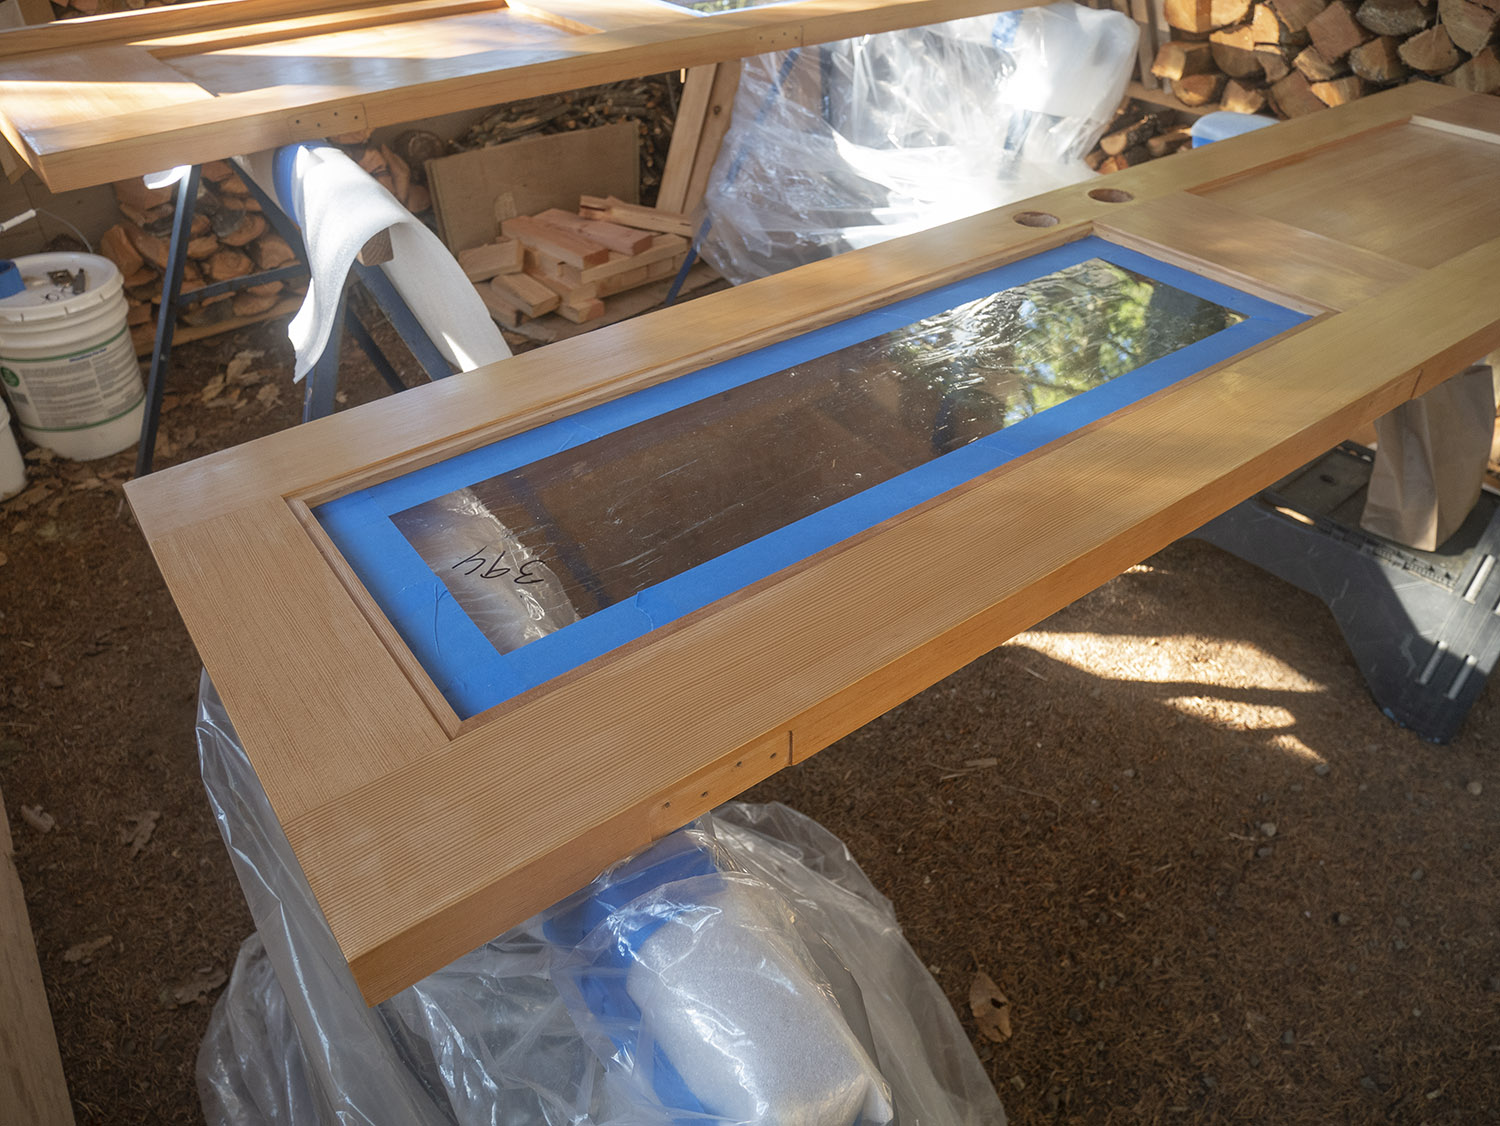
I started the doors today. I was so nervous! Still am. I have never used varnish before. First I removed all the hardware (although I missed one piece I need to remember to remove before I do the other sides). Then I sanded the doors to smooth them out and get rid of marks and such. There weren’t many–they looked really good already. Then I vacuumed the doors to get up all the dust. I tried one of those tack clothes and it’s way too tacky–it left residue on my fingers so I figured it would leave all kinds of residue on the doors, so I decided to vacuum instead. Then I cleaned the glass with a damp cloth, and taped the edges with masking tape. Finally, ready to apply the finish!
I started with the frame (not in the pic) as I figured that would be good practice and less important if I screwed it up. The first hard part was getting the finish out of the big can. I bought a gallon of finish, and poured some from the can into a smaller container to make it easier to carry. Fortunately I did the pour out of the car port as I did spill some (not too much). I am using sponge brushes to apply the finish. It doesn’t take much. Also it starts to dry quickly so I am doing only a small section at a time. I noticed if I brush one way, say on the side of a door, and then brush over it going the other way, say on the bottom of the door, the overlap is visible. I am not sure what to do about that.
They look pretty good after one coat… only 7-9 more to go!
July 23 and 24
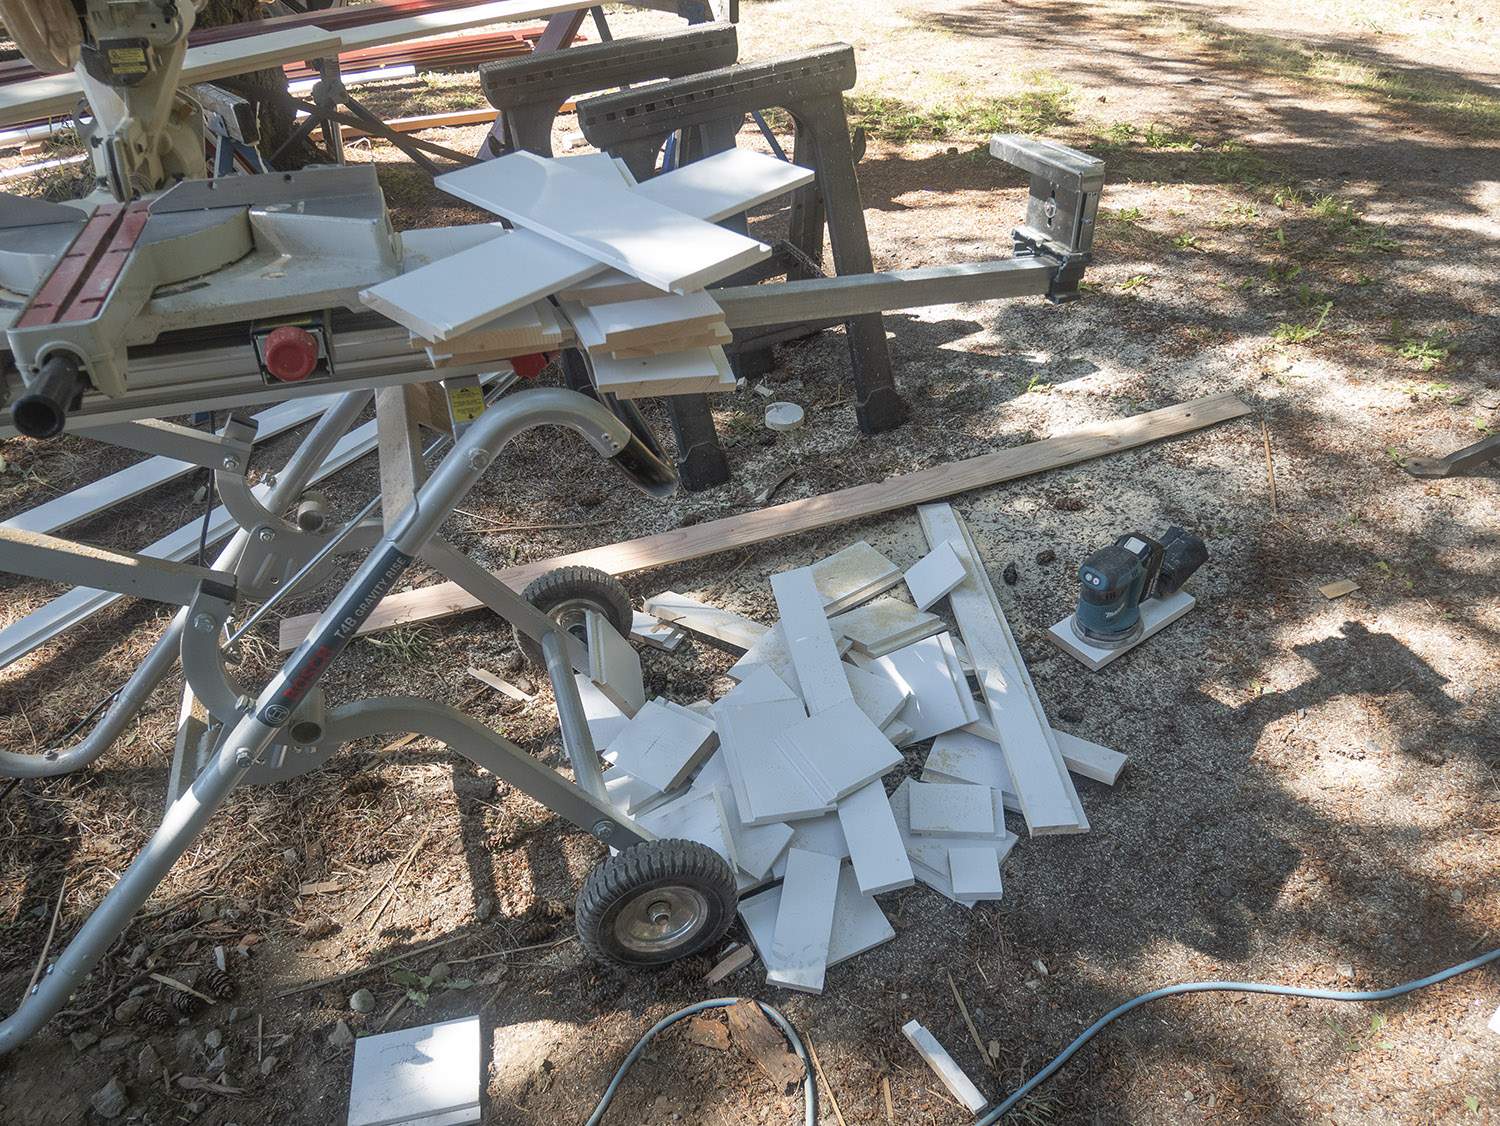
Time to put on the siding! You (well I) might think it would be pretty easy. Then you (I) realize just how many pieces have to be cut. And then you (I) realize you have to measure precisely up to the window, up to the roof, up into the curves, around the electrical, around the wheel well… then you (I) realize. Oh. Yeah. Harder than it looks.
I mainly did the cutting, and Lucas did the math and the positioning and nailing and caulking. In other words, he did the hard stuff. The ends of all the pieces either have to be caulked or painted. The pieces the butt up against the windows have to be caulked where they join the windows, underneath, as well as on top. They have to caulked around where they butt up against the electrical, as well as where they but up against the roof. Lucas did an amazing job, and he’s known as the “detail guy”, and let me tell you, it’s great to have a “detail guy” for this. While Lucas and I worked on the siding, Pamela took on the nasty job of cutting and putting in all the insulation (thank you thank you) and then working on the interior measurements for window sills, trim, and wall boards. Sam and I painted wall boards.
I’ll need to paint everything again (siding, and wall boards) once it’s up because everything gets scratched as it gets moved around and installed. Fortunately, it’s a tiny house. I’ll paint the wall boards again before we put in any of the interior stuff so it’s easy. The siding will need to be painted every 5-7 years. Fortunately, it’s a tiny house.
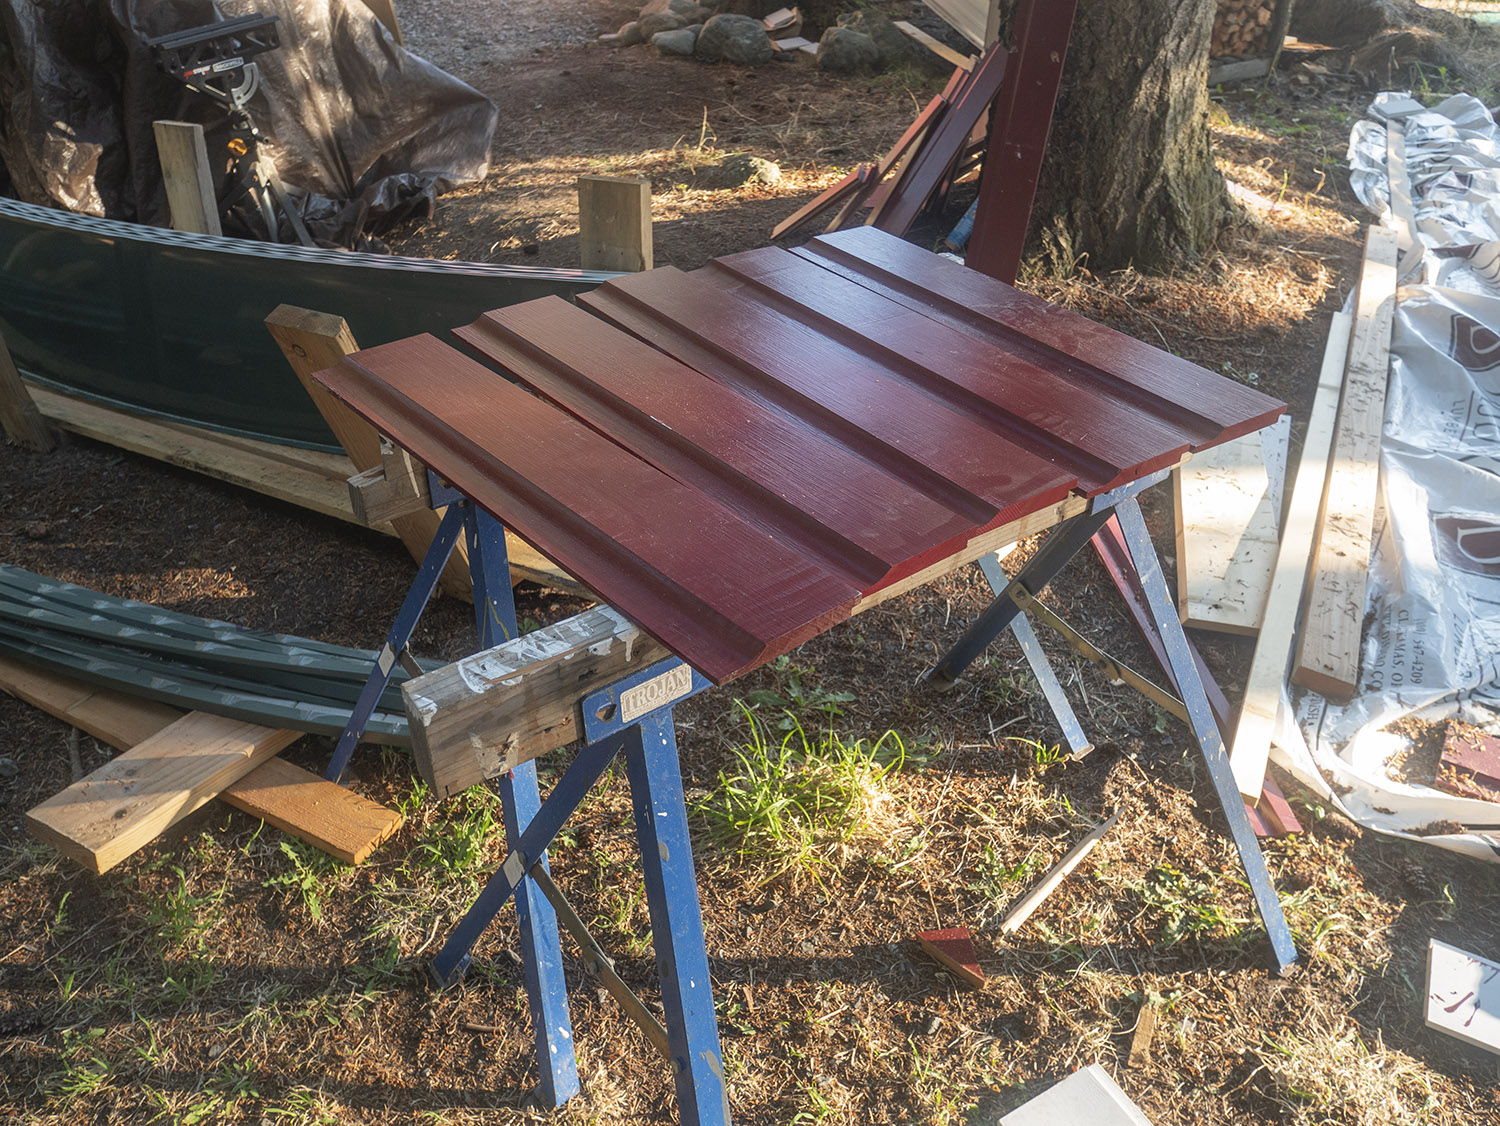
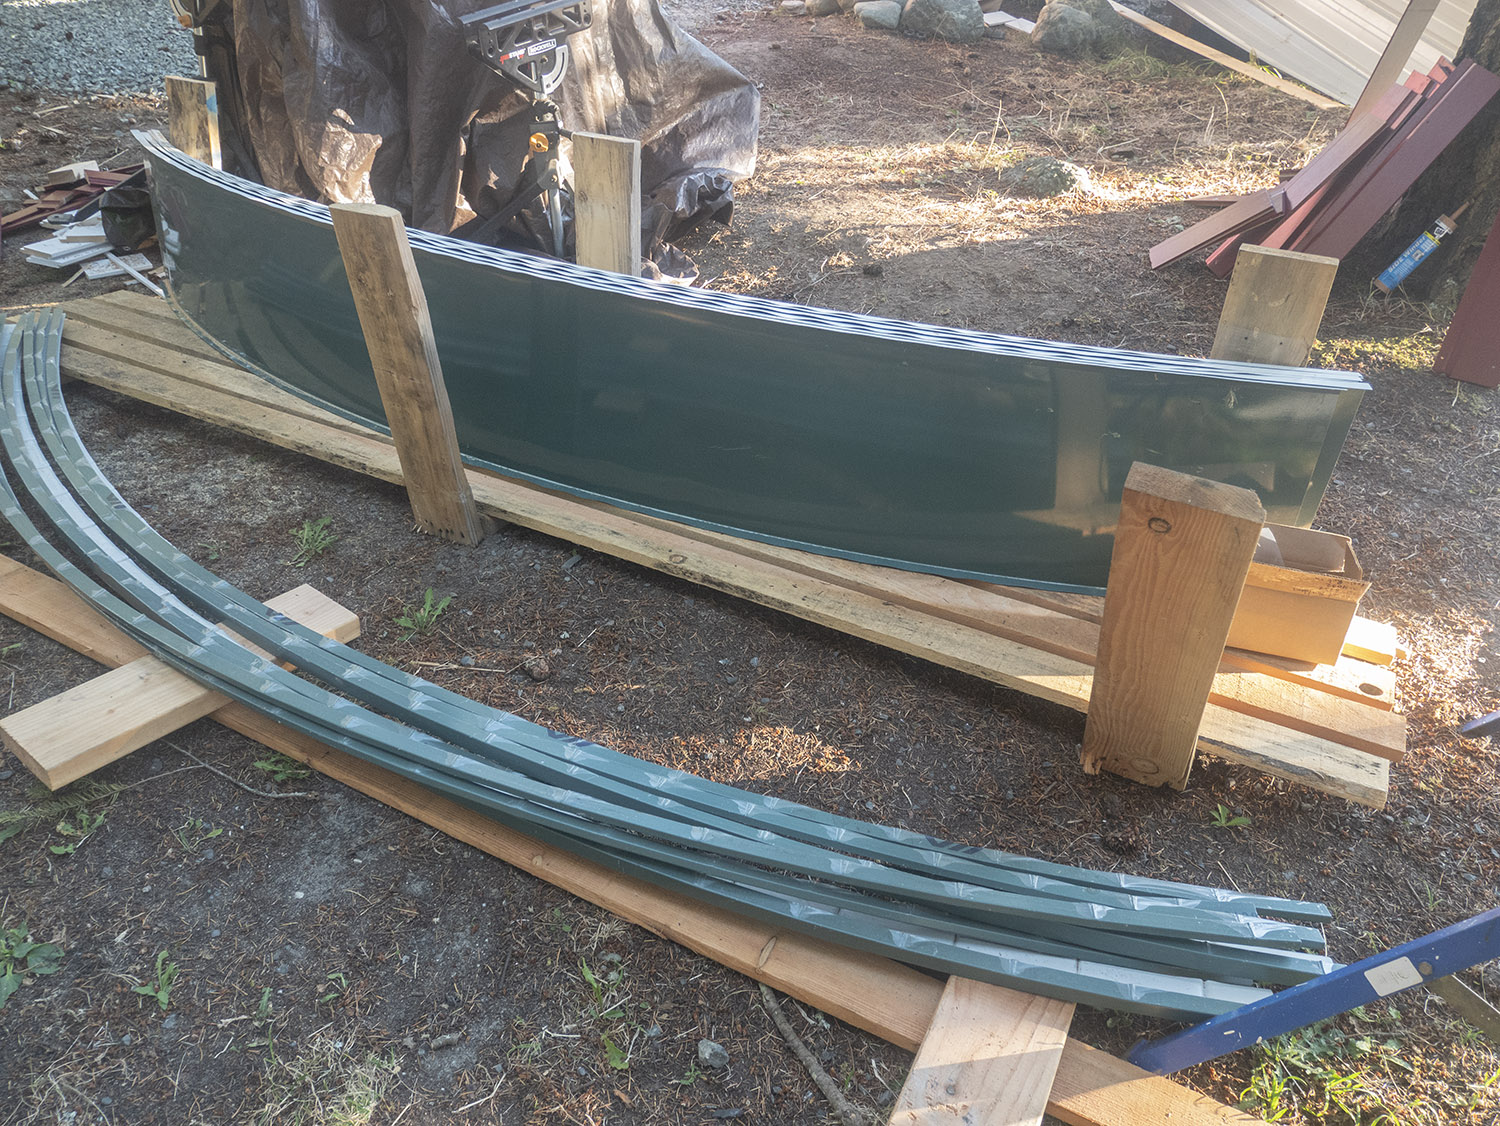
The roofing is ordered: we ended up ordering it pre-bent for the curve which is really the only way to get metal roofing for a curved roof. Hopefully it will be here in 2 weeks or so.
My task this weekend is to sand and paint the window trim and sills, and continue varnishing the door.
It’s looking so great and I’m super excited about how it’s all turning out.
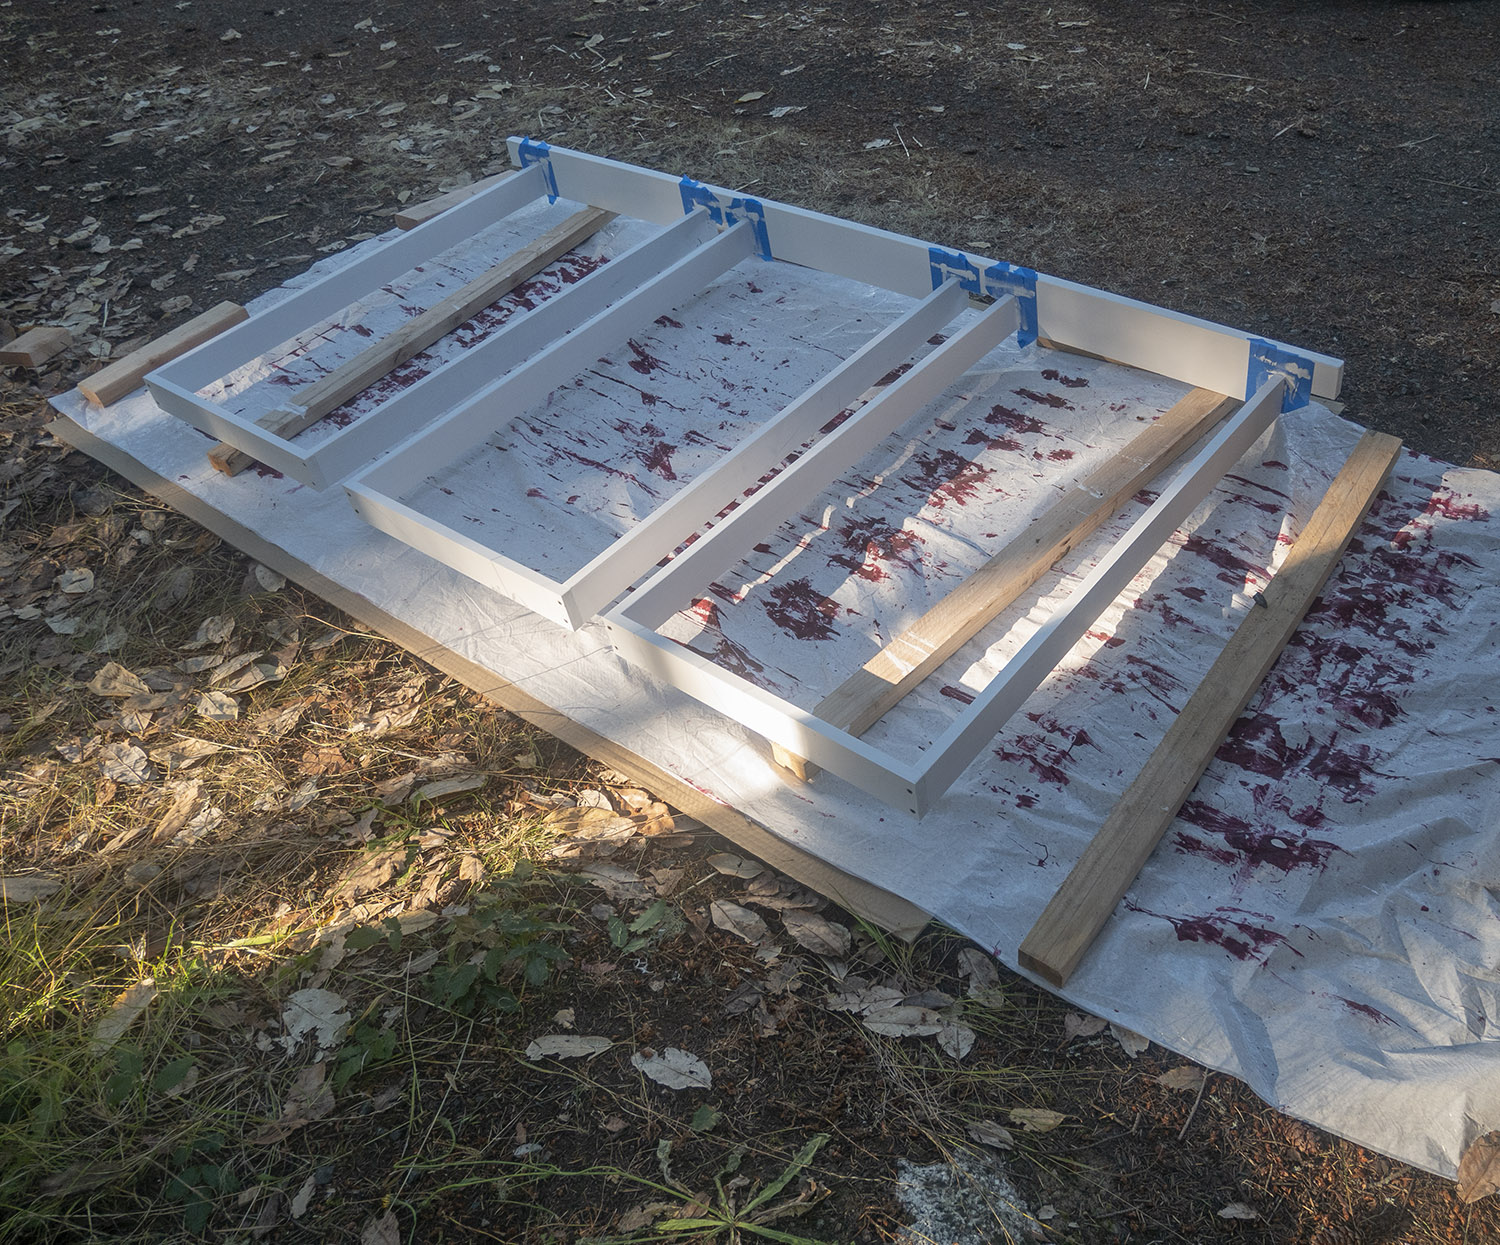
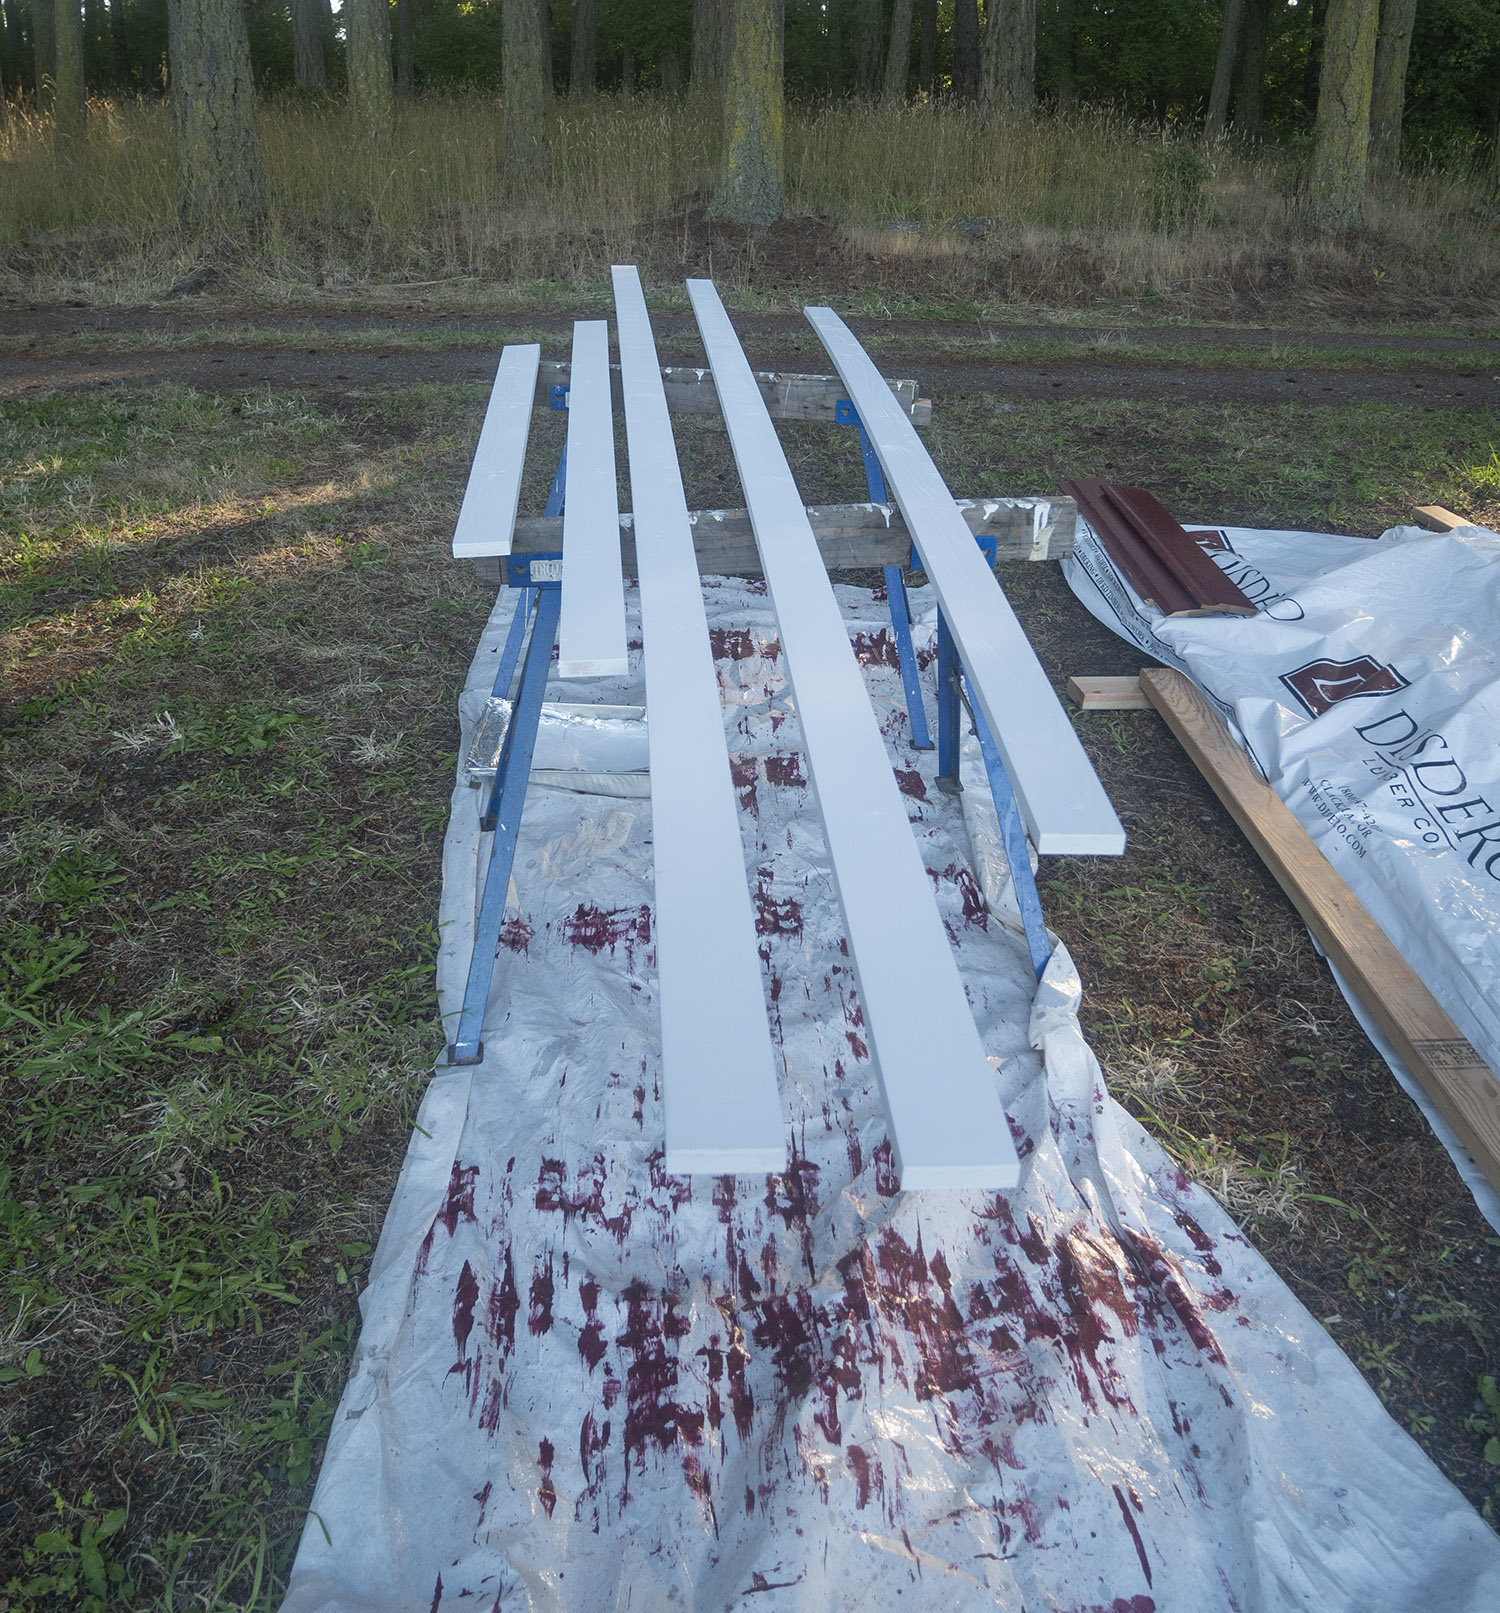
July 25 and 26
Next week we’ll be putting the inside boards up on the walls, so I’ve spent this weekend sanding and painting window sills and trim (I painted the wall boards last week). I put interiorBenjamin Moore semi-gloss white on the sills, and eggshell white on the trim and boards. All the boards need one coat of paint on all sides (if you don’t do all sides then the boards bend from having more moisture on one side than the other), and then 2-3 coats on the side that shows. I’ll repaint everything again once the walls and trim are up to get rid of scratches and such.
I have really been struggling with varnishing the doors. It was looking streaked and blotchy and terrible. I am sanding between coats and that wasn’t helping. So I watched a bunch of youtube videos today and today I tried a new approach: a lot less sanding (less pressure, and only one or two passes) and a lot more varnish. I think I’d been basically sanding off the previous coat each time so I wasn’t really getting anywhere with the varnish layers, and I don’t think I was using enough so it wasn’t building up in spots. We will see if this new approach makes a difference! So far the varnishing has been by far my least favorite part of this whole adventure!
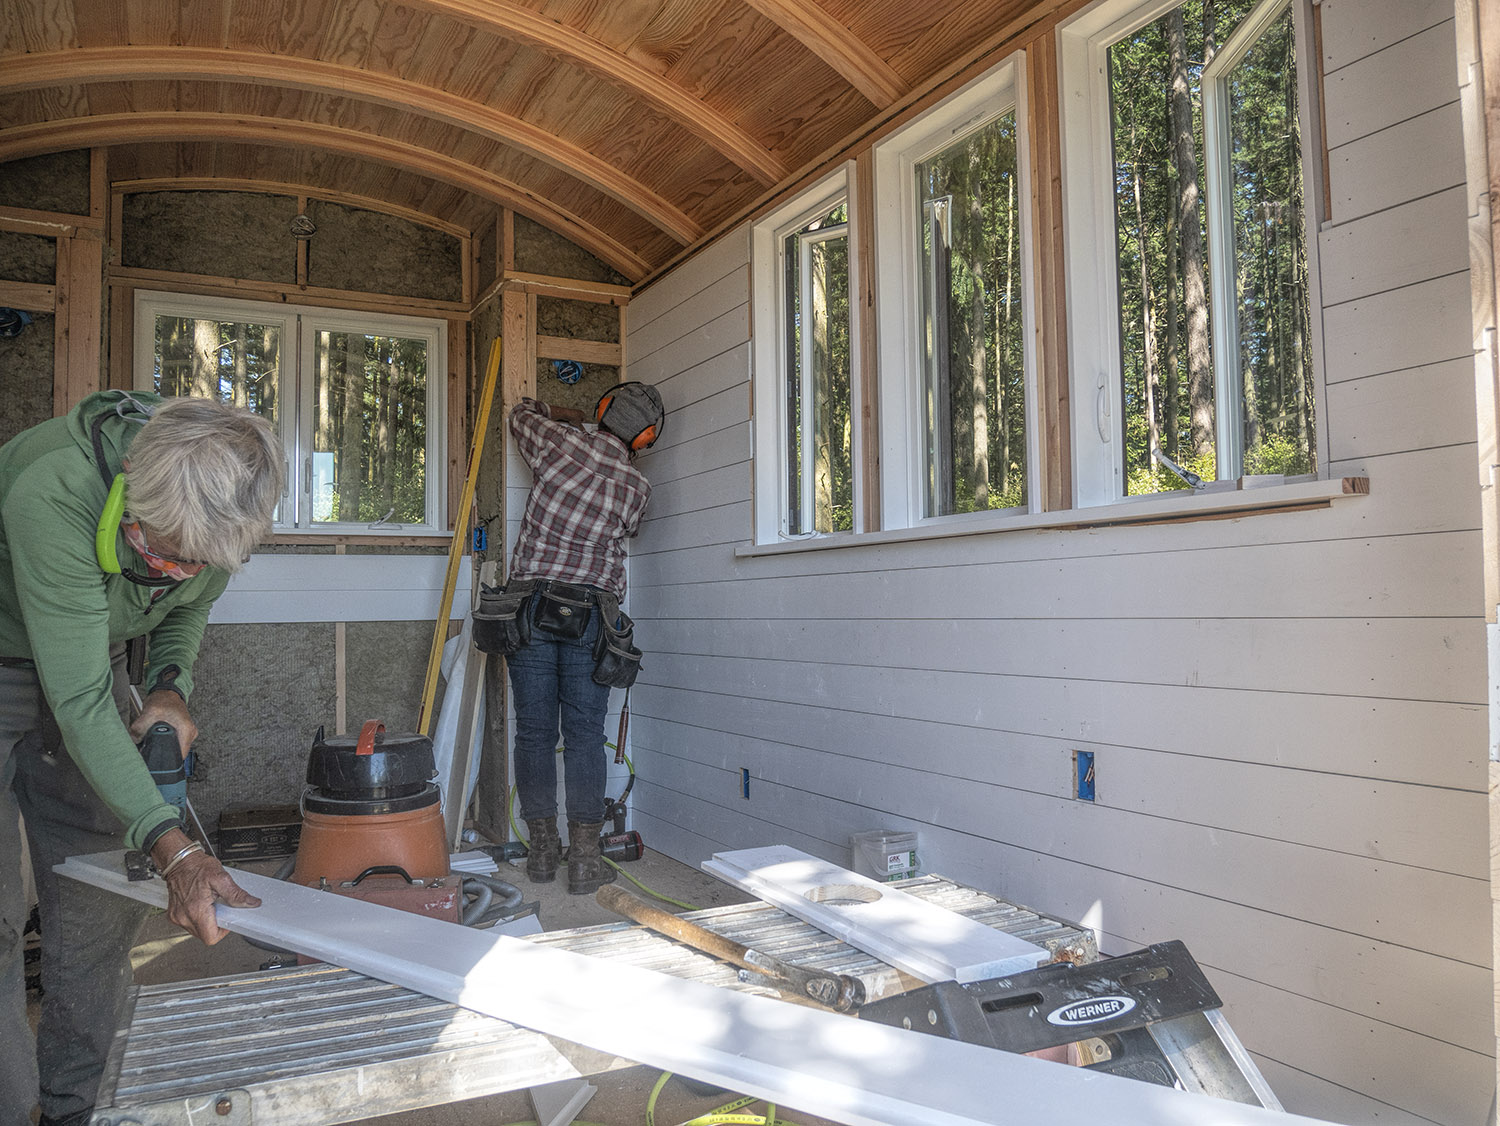
July 28
It’s all about the inside wall boards today… sanding, cutting, nailing. I mostly did cutting and sanding (and a bit of paint touch up) while Sam and Pamela did board nailing and window trim. Like the siding, lots and lots of pieces. The boards get nailed into the studs with a nail gun, using finishing nails. Once the boards get their final coat of paint, the nails will mostly disappear. Very nice! I’m really glad I decided to go with the window sills, I think a window sill is a good thing. I painted those with “semi gloss”, rather than “eggshell” and it was a good decision, as I will probably end up putting jars and various items on the sills 🙂
As Pamela noted – when the insulation went in, it made the space feel small. Now the white boards are going up, it feels spacious and light again! Exciting.
Door varnishing continues…. The interior varnish arrives soon, so soon I will be able to practice what I’ve learned from royally messing up the outside of the doors, and hopefully do better on the inside. We will see.
August 18
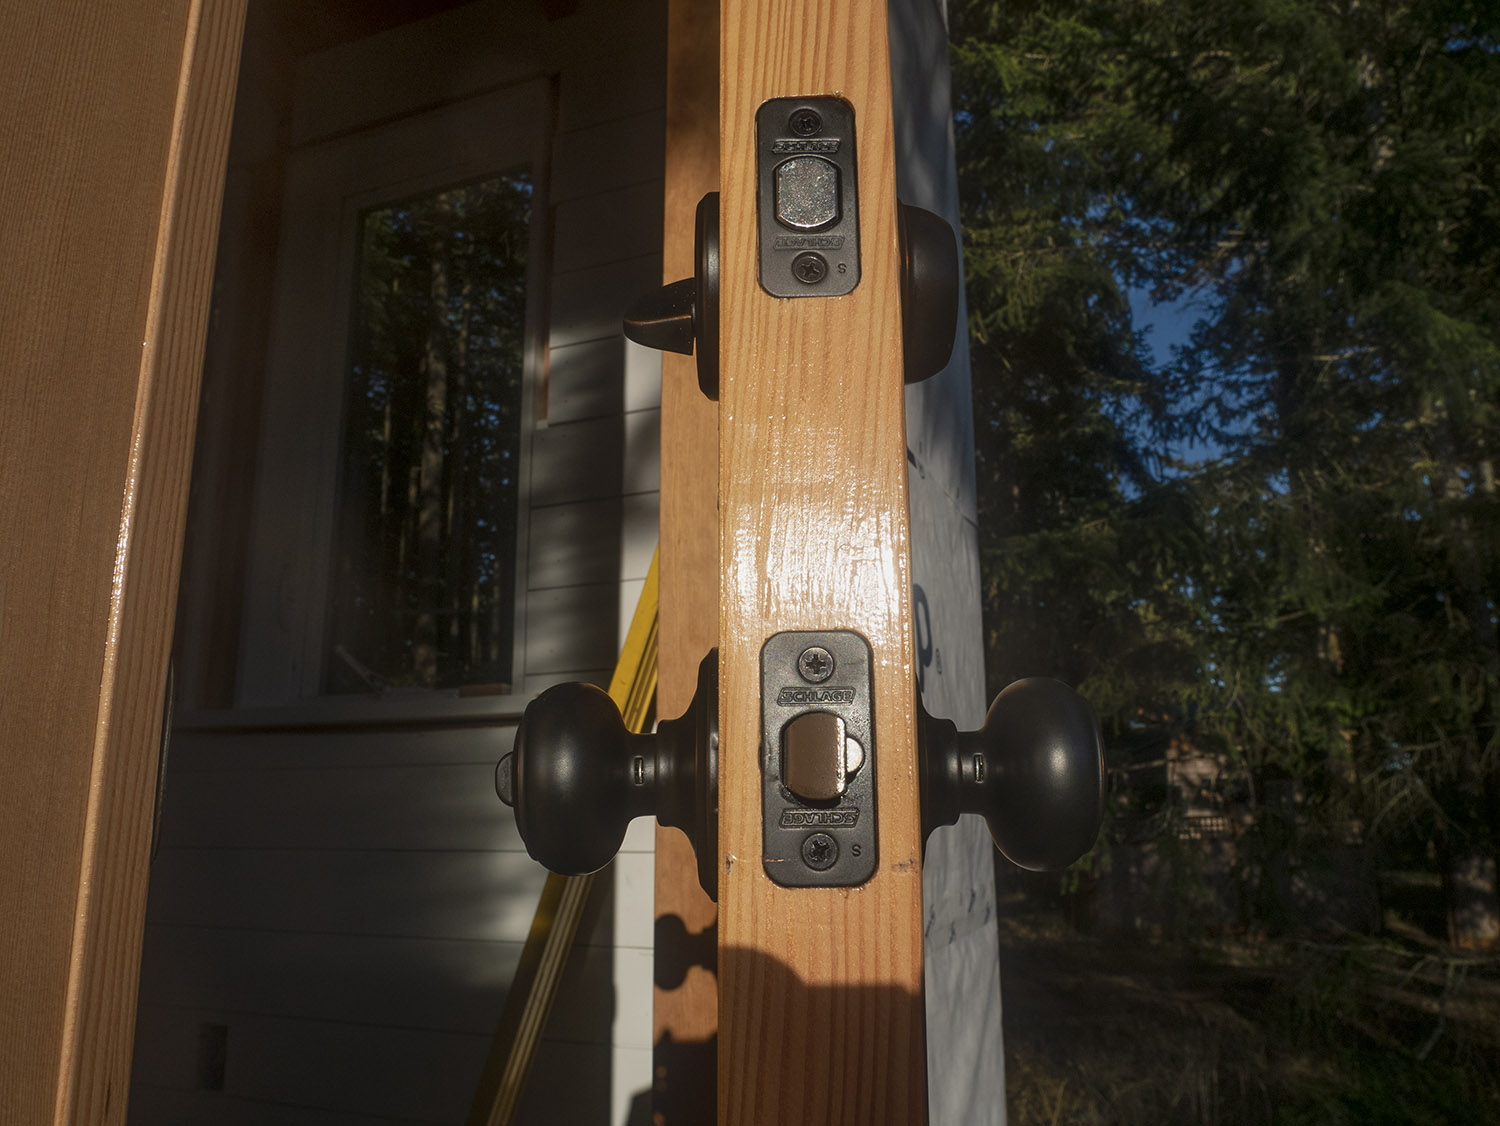
Today we hung the doors, and worked on the siding. The door hanging is a big deal! Although, I discovered as we were doing it, that I had varnished the exterior with the interior varnish, and the interior with the exterior varnish. So, I will need to revarnish the exterior of the doors with the correct varnish. I am hoping they will last until next summer so I can put that unpleasant task off for a good long while.
Otherwise, the door hanging went beautifully. We first checked to make sure the TAS is still level, and it is, at least good enough for the doors to go in. The door jams are horizontally and vertically level. First we put in the frame. Pamela has a couple of good tricks — she uses caulk under the bottom of the door frame along the two bead lines — this seals the bottom of the door frame quite well, and allows the door frame to easily move around a bit for positioning while the caulk is still wet. She uses a very strong caulk for this, one that is almost impossible to remove once it’s dry so she puts down a layer of vicor tape on the plywood before adding the caulk. Then, if something goes wrong and the door frame needs to be removed, we can rip off the vicor and not have to rip up the plywood in order to get the door frame out.
We also double checked the vicor around the rest of the door frame which provides a seal between the frame and the tyvek.
Another trick is that we first positioned the right hand side of the door against the stud, made sure it was level, and then screwed the frame to the stud, with no extra space. She screwed the frame to the stud under where the hinges go, so that you can’t see the screws. Nice!
Next, we measured the width of the frame at the bottom, middle, and top. To make sure the frame is exactly the right size, we then added shims between the frame and the stud on the left side. There’s a little space there because the opening is just a bit bigger than the frame. This allows us to make sure the frame is exactly the correct size for the door. The shims are put in so that it pushes the frame in about 1/8″ too small; then we screw the frame to the stud right through the shims, which pulls the frame out 1/8″ at each spot (bottom, middle and top), so that we’re back to exactly the right size for the doors. Then the shims get cut off so the edges are even with the frame. This space is covered with trim on both the exterior and interior of the door frame. We used plain cedar trim that matches the window trim for this.
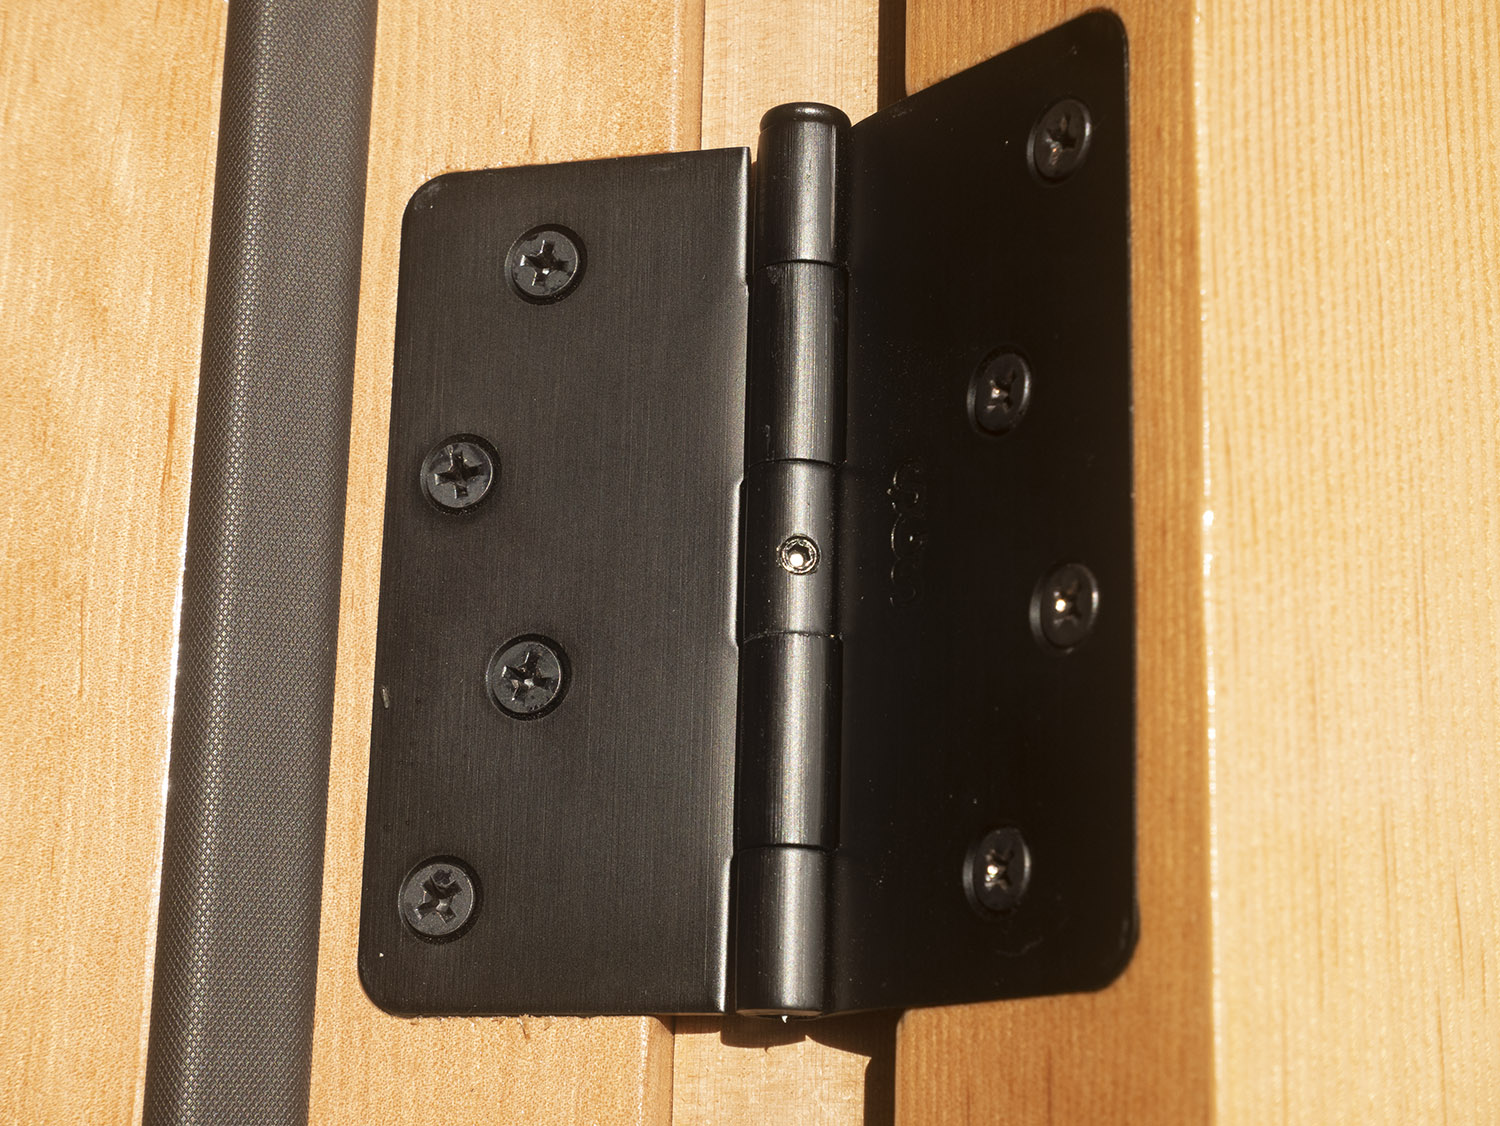
Next it’s time to hang the doors. We discovered that we were missing half the screws (they must have been lost in transportation) so I had to run to the hardware store to match the missing screws and get 24 screws! We first unscrewed the little screw in the middle of the hinge you can see in the top photo — this is the pin lock (with a small hex nut wrench). If you don’t know to do this, it will drive you crazy because the pin won’t come out of the hinge! We then removed the pins from the hinges by using a plug popper tool (I’m not sure what the official name is!) and hammer by tapping on the bottom of the pin until it pops out. Each side of the hinge is then attached to the frame and the door respectively. Once we’ve attached all six pieces, it’s time to put the door in. Pamela and Sam lifted and positioned the door, and when the hinges were matched in the correct position, I popped the pin in. Some of the pins required tapping with the hammer to go down. Then we screwed the tiny pin locks back in.
Next it was time to add the door handle and dead bolt. There are a lot of tricks to this! Fortunately Pamela has all the knowledge and tools. For the door knob, first trick is to get the locking mechanism in the correct way. See how there’s a little bulge facing towards the outside of the door? Since the door opens to the outside, this faces out and it needs to catch on the other door, which has a little piece that goes in the matching hole, that has a little lip which catches that protrusion when the door is closed and keeps it from opening. Once that locking mechanism is in the correct place you then add the plate on top of it to keep it in place. This requires drilling holes into the wood (they are not pre-drilled) and there’s a special bit for that that can drill into the wood and release the sawdist properly. Once those holes are drilled the plate gets screwed in.
Then you fit the outside knob into the lock in the correct position (there are two positions depending on what type of knob you have so it’s important to find the correct one). Then you put the inside knob on and make sure that the lock is in the right position and that the two bolt holes match where the bolts go on the other side. Then you insert the bolts and screw those in. You can remove the inner door knob to do this but it’s a real pain, so we didn’t do that; we screwed the bolts in by hand as far as they would go with a hand screwdriver.
The deadbolt is similar. We had to unlock the deadbolt to get it to match up with the inside piece and work correctly. Pamela made sure the two doors fit together correctly so that the holes line up perfectly and they did.
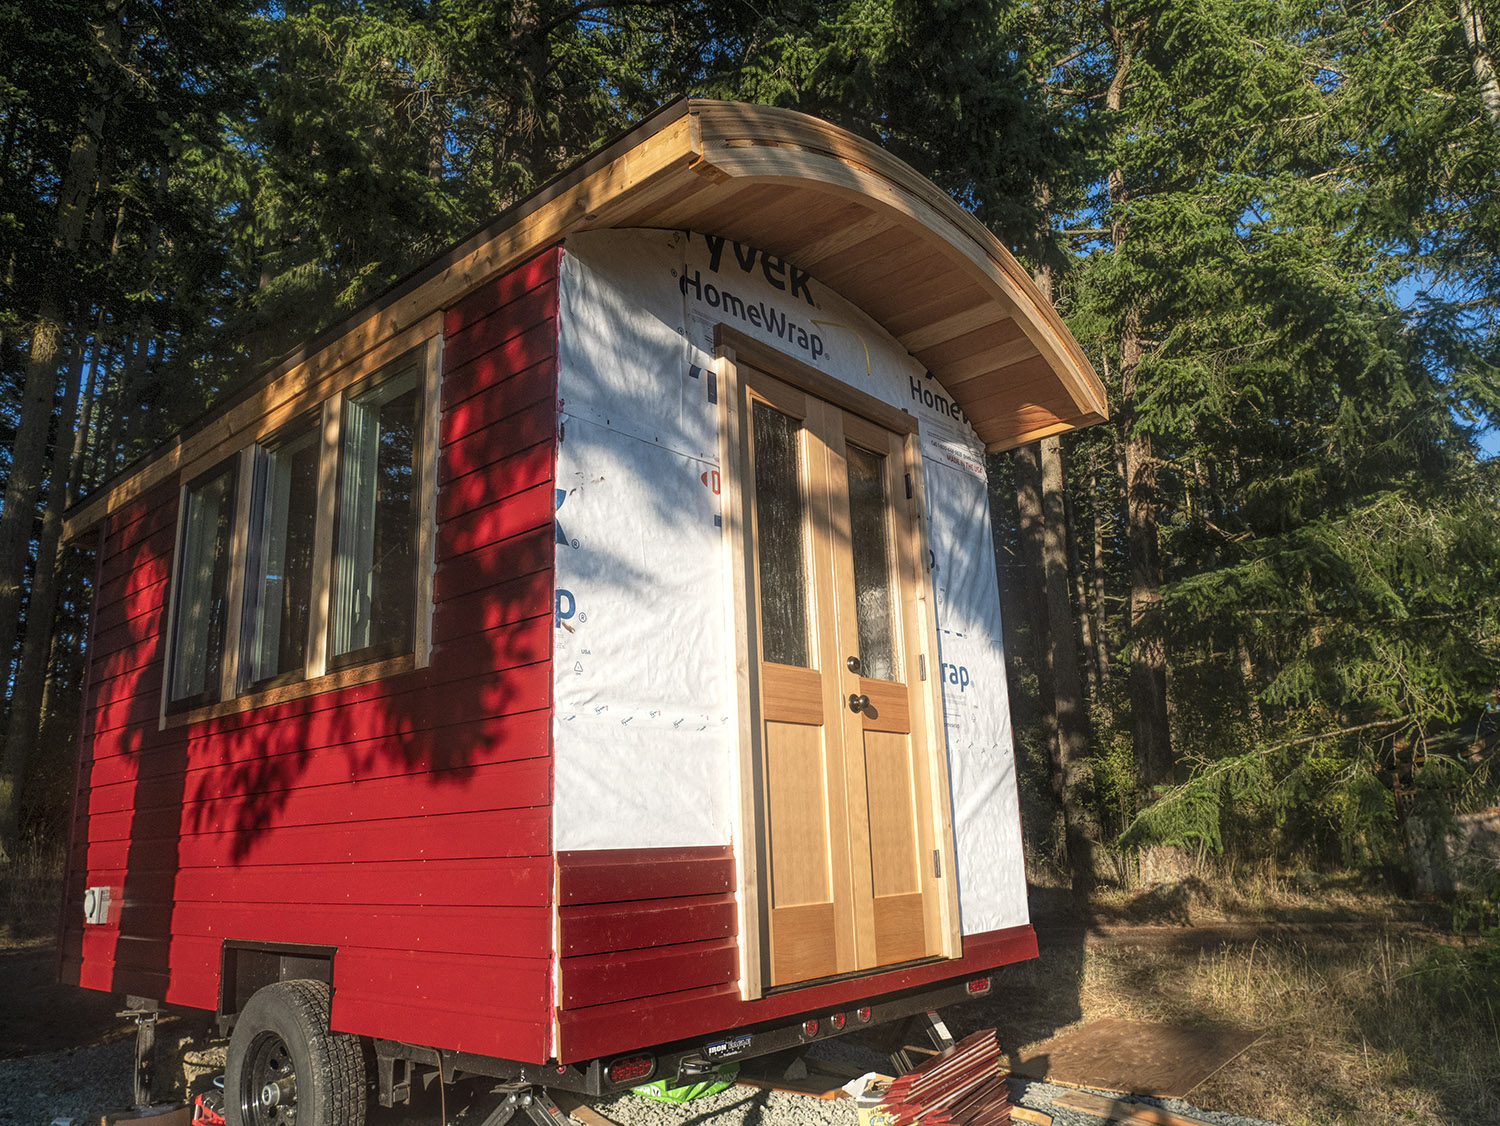
Sam and I also worked on the corner boards for the siding. These are long strips of cedar that make a 90 degree angle to cover up the corners where the siding ends. One board is slightly “fatter” than the other board so that it will overlap and the size will work out. Because the ceiling is curved, for the boards that hit the curve, we had to cut the top of the boards at an angle, and we had to cut notches with the jigsaw in the boards to go around the fascia board on the side of the roof. We use a finishing nail gun to nail the “fat” board to the pieces of siding, then glued the edge of that board with caulk, and then fit the other corner board to that, and nailed that board to the siding. We also nailed the two corner boards together by putting a nail on the edge of the fat board into the side of the other board. We also caulked the top of each board to keep moisture out of the top and bottom. We got four corners done. We’ll do the remaining two corners after the siding is on the front by the doors (hopefully tomorrow).
Sam and I cut, caulked, and placed the bottom siding piece that goes under the front door — we used one long piece of siding notched for the door (we used the jig saw to create the notched part here). There are no studs or rims under the door, so this siding piece is nailed only to the studs on the sides of each door and in the corners.
I then cut a whole bunch of small siding pieces to go up each side of the door, and painted the ends of them. They are all ready for tomorrow to get put on.
The roofing got delivered yesterday, but only half of it arrived, so we are tracking down where the other half is.
I also heard that the lights I got for the studio are ready, so I need to go to the mainland to pick those up.
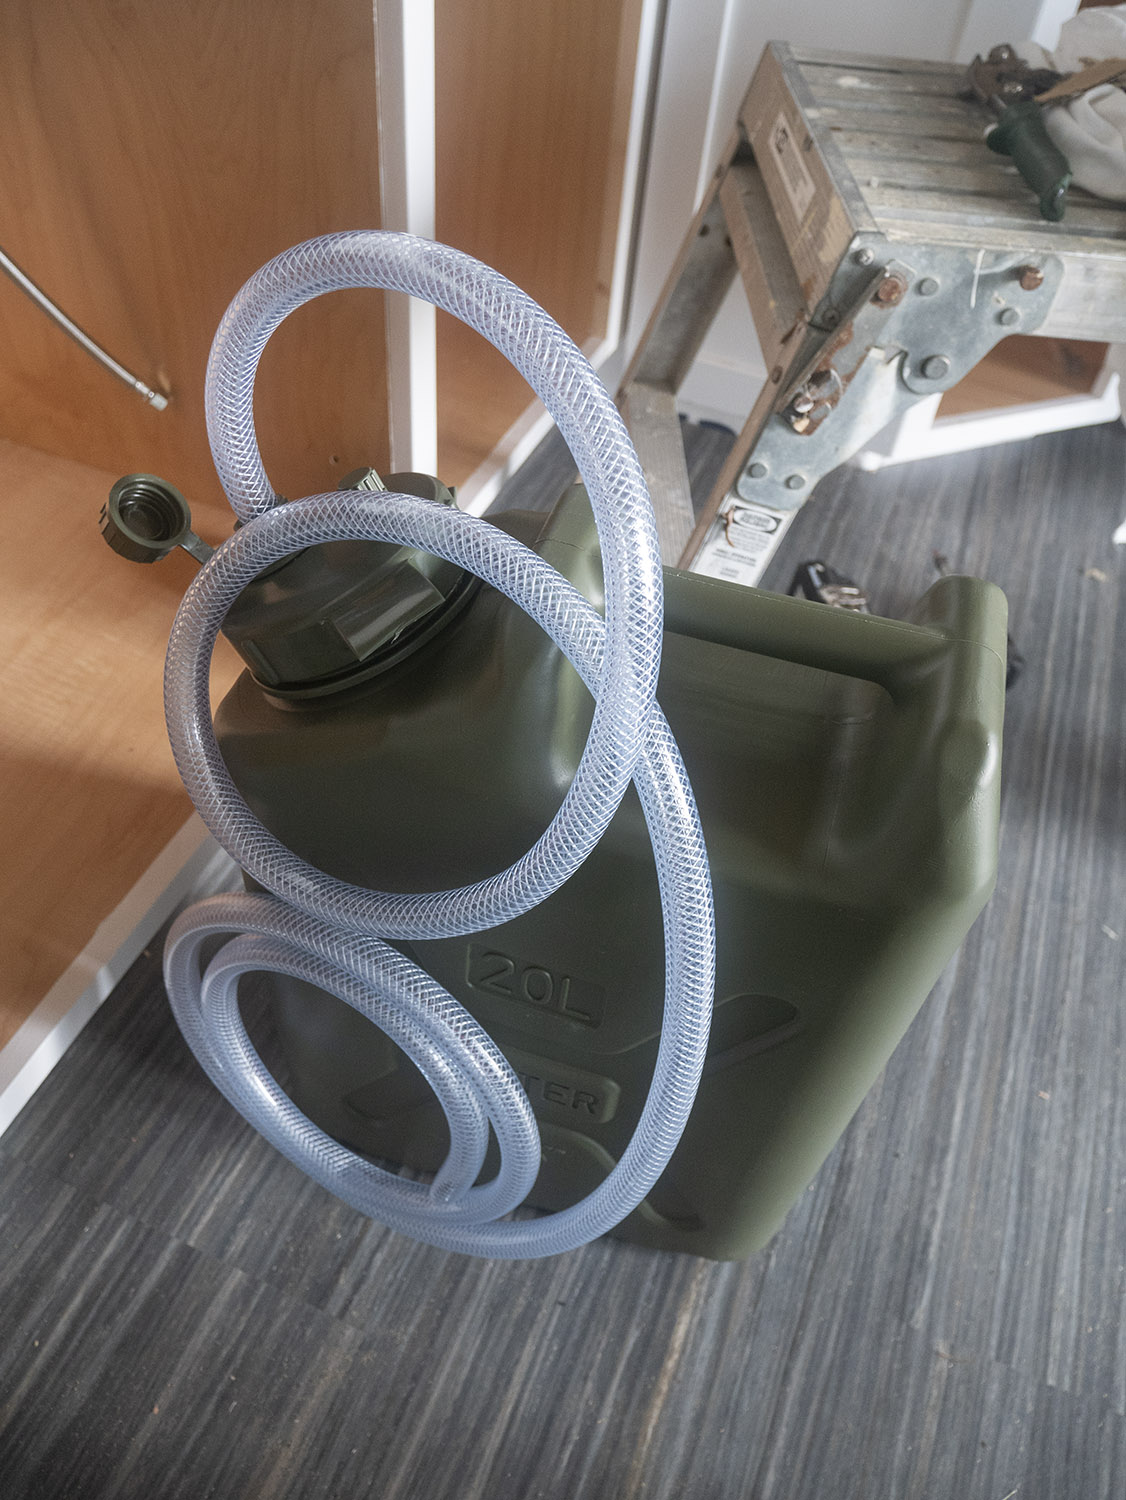
And I am putting together a parts list for the plumbing for the sink. I’ve ordered a small sink that should arrive next week, and so I need to get a faucet, a bucket for grey water that will go under the sink, a water container and a foot pump for the water supply, some hoses, and so on.
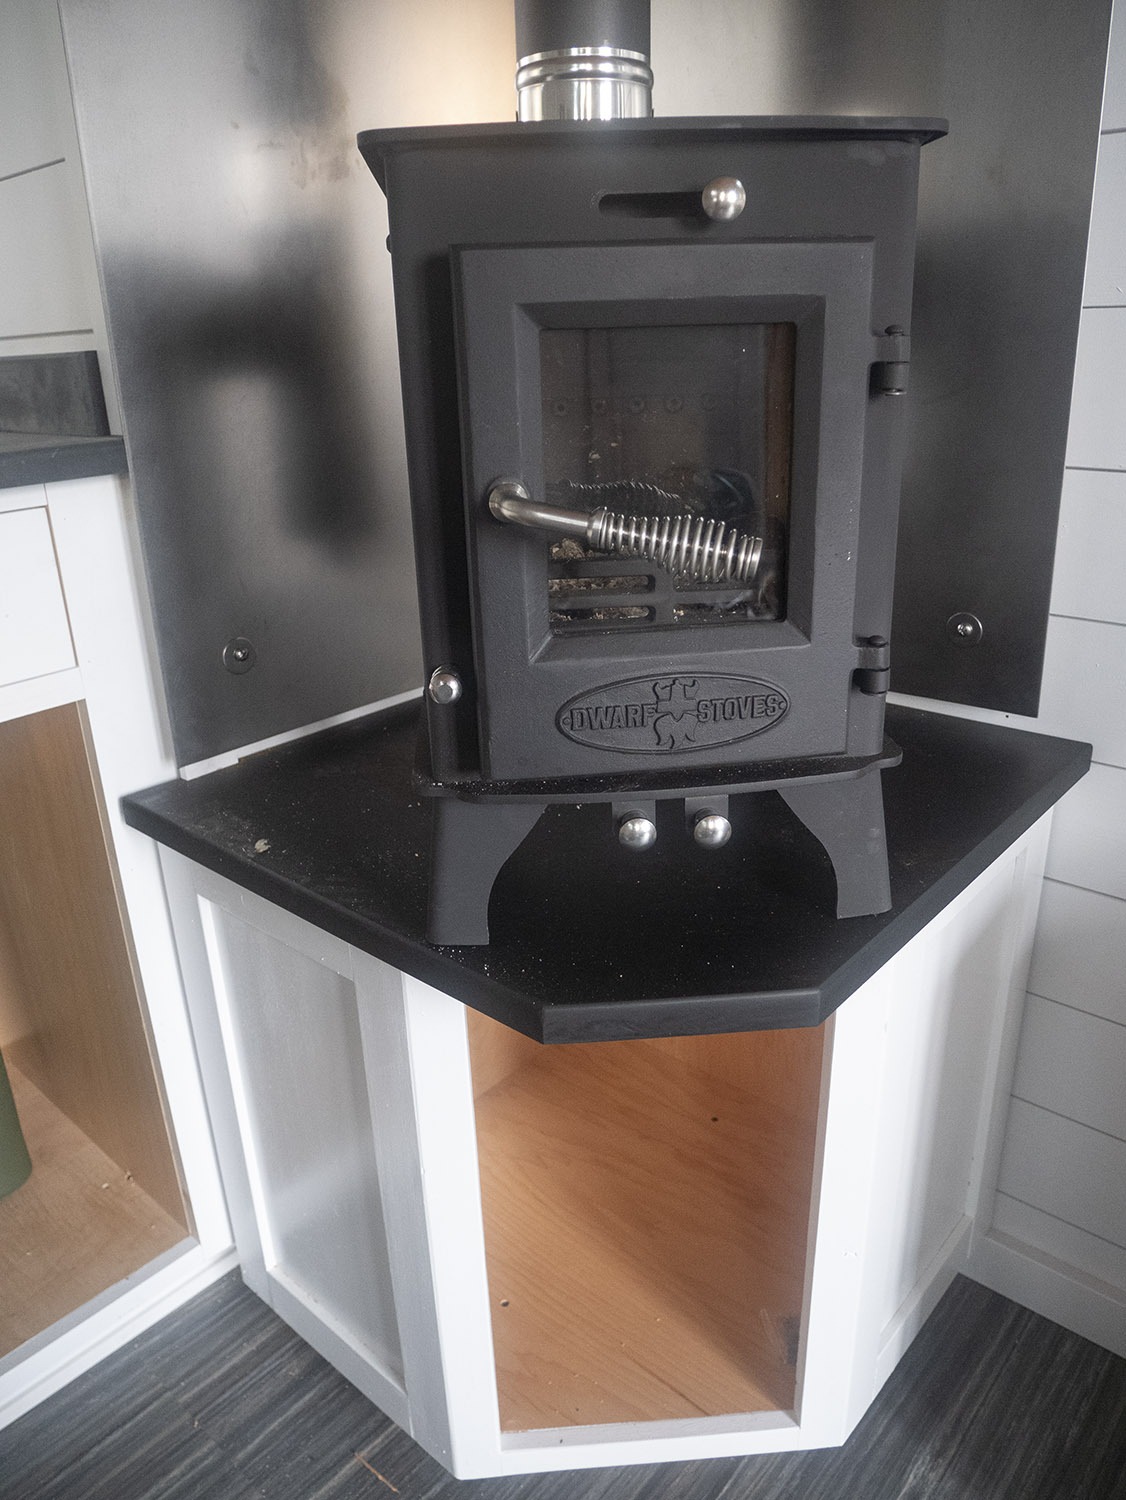
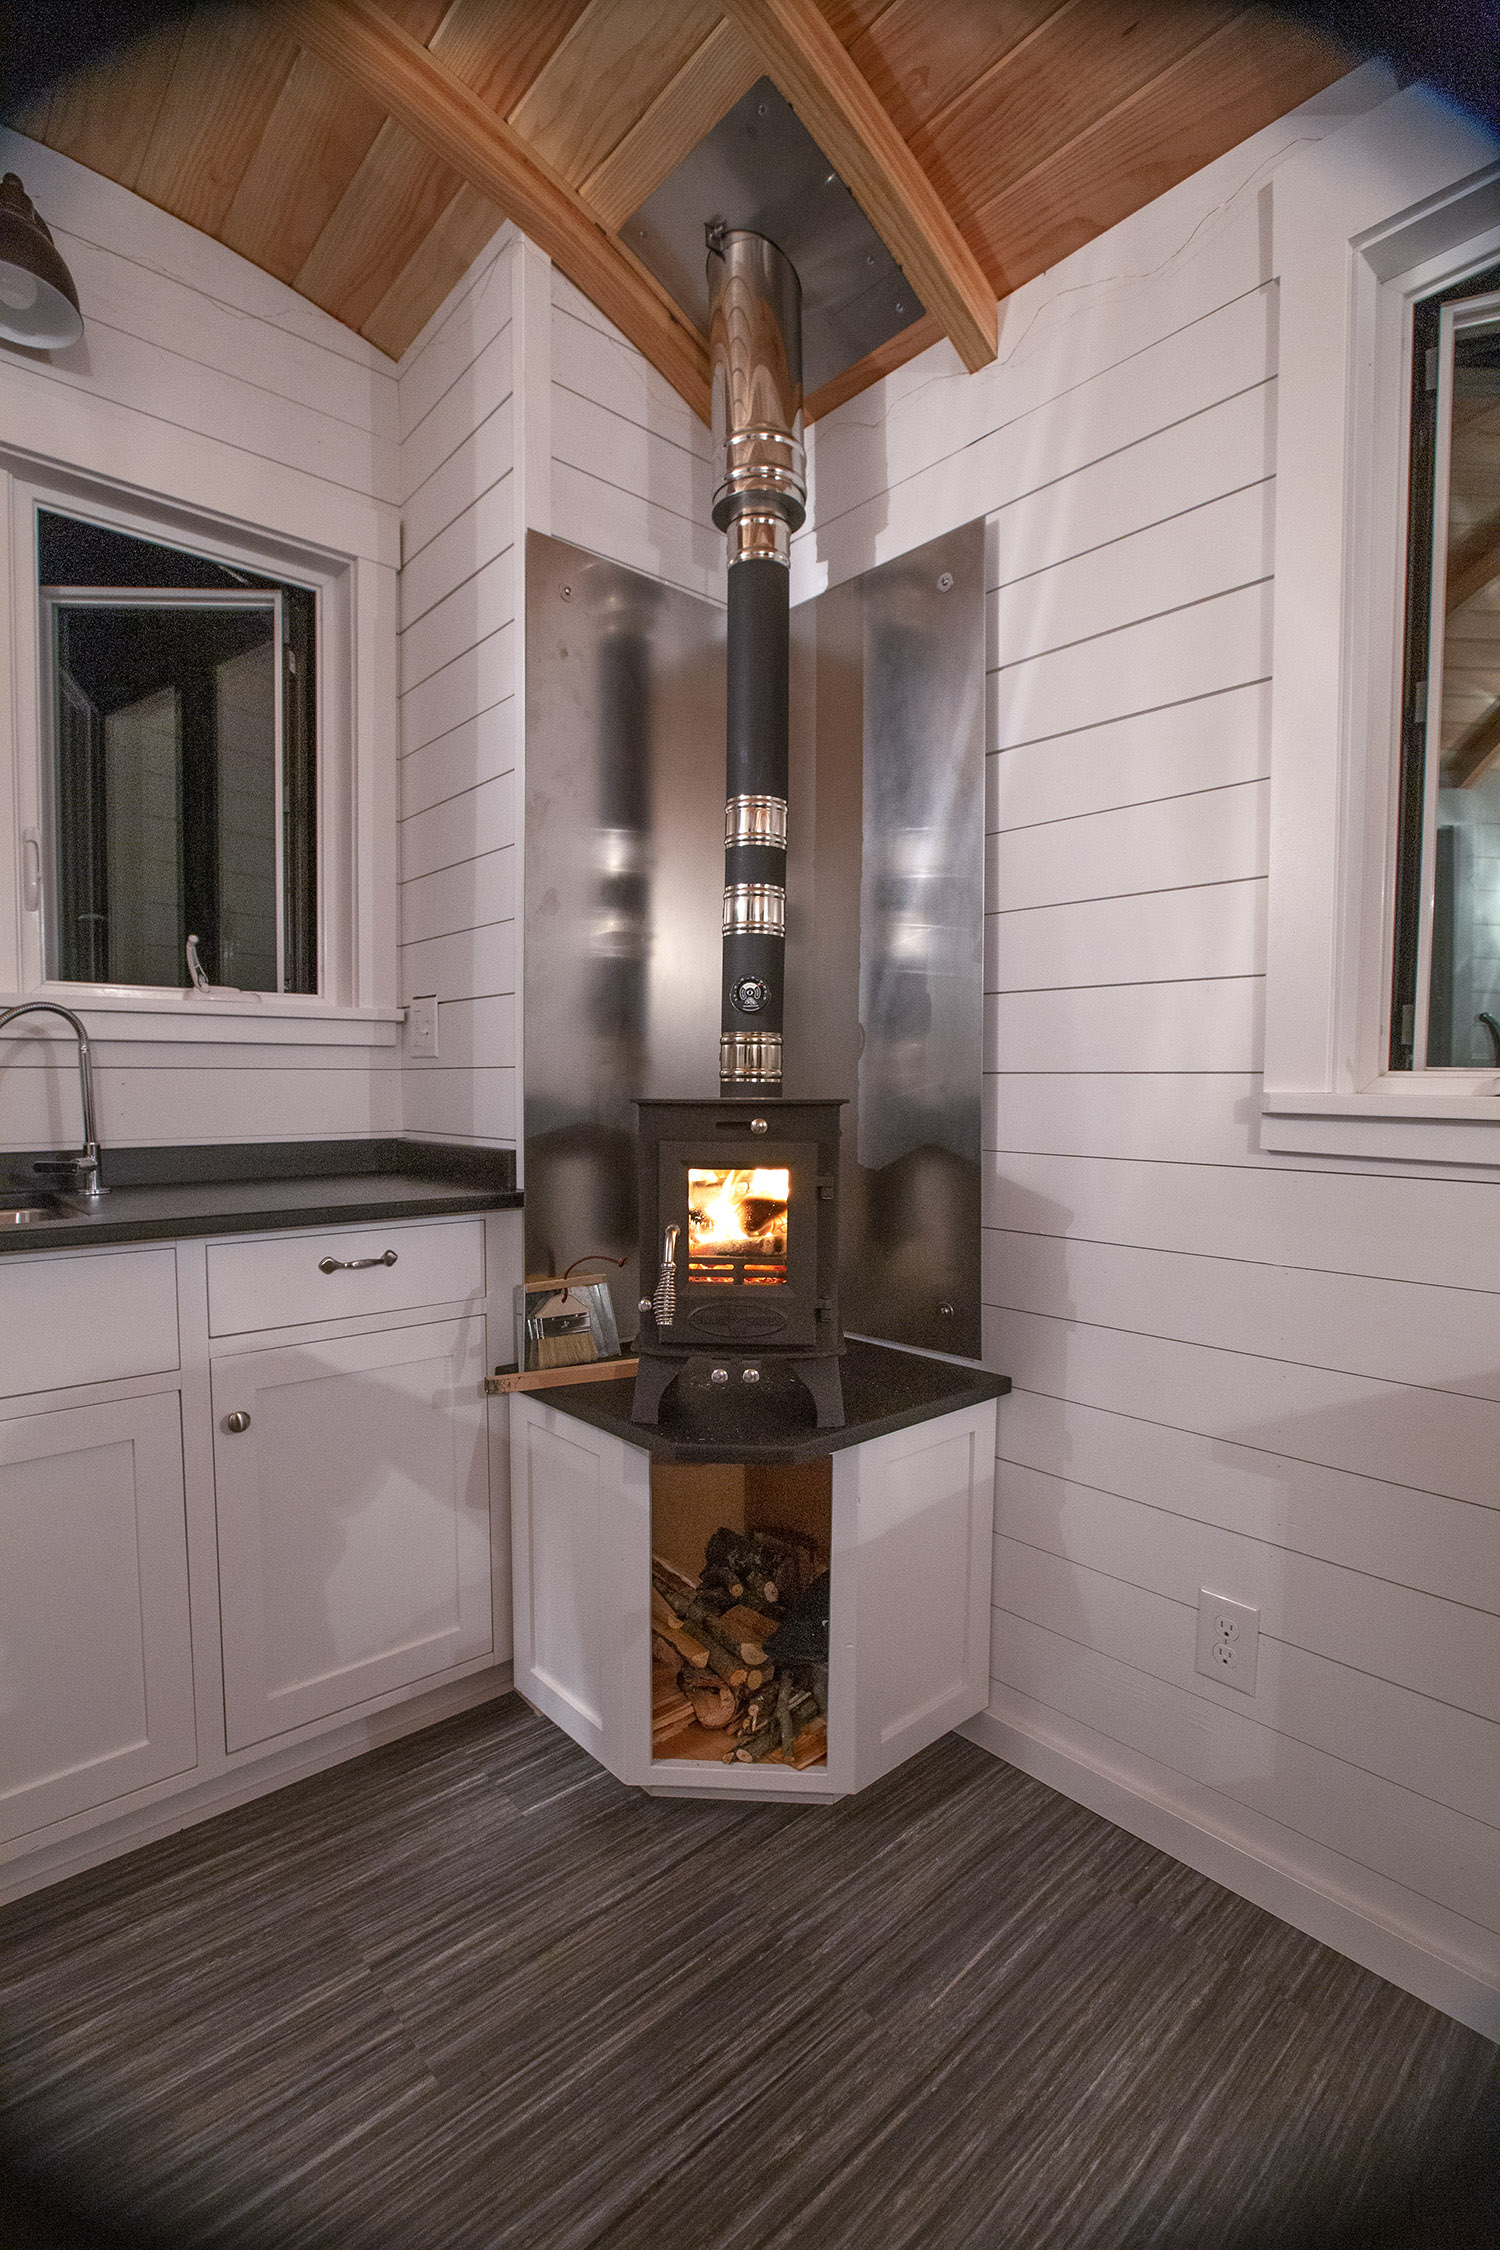
I also emailed a guy who Pamela put me in touch with to get some paperstone that I’ll be using both for the kitchen countertop as well as the top of the stand where the wood stove will go.
Last week I ordered the heat shield from “the metal guy” here in Lopez (John B.) — he’s making me a piece from stainless steel that will go in the corner behind the stove and the pipe to shield the wall from the heat. He’s going to brush the steel with a tool and we’ll mount it to the wall with some copper tubing. It should look really cool!
Lots still to do, but it’s starting to look like a real tiny house.
August 19
Today we got the outside done (except for the roof — still waiting on the rest of the roofing to come). We got the rest of the siding done, and the corner boards done. I mostly was sanding and painting and cutting, while Sam and Lucas put siding up. They also made the block that will support the outside light over the door. It is a lovely piece of cedar, with a whole drilled through it that matches the size of the light base. We had to move the wire over just a bit, so Sam drilled a hole from the outside into the plywood to scoot the wire over a bit and taped the tyvek around the wire to keep it in place and seal it up.
I also painted a bunch of trim for the interior. Pamela started building the box that the wood stove will sit on.
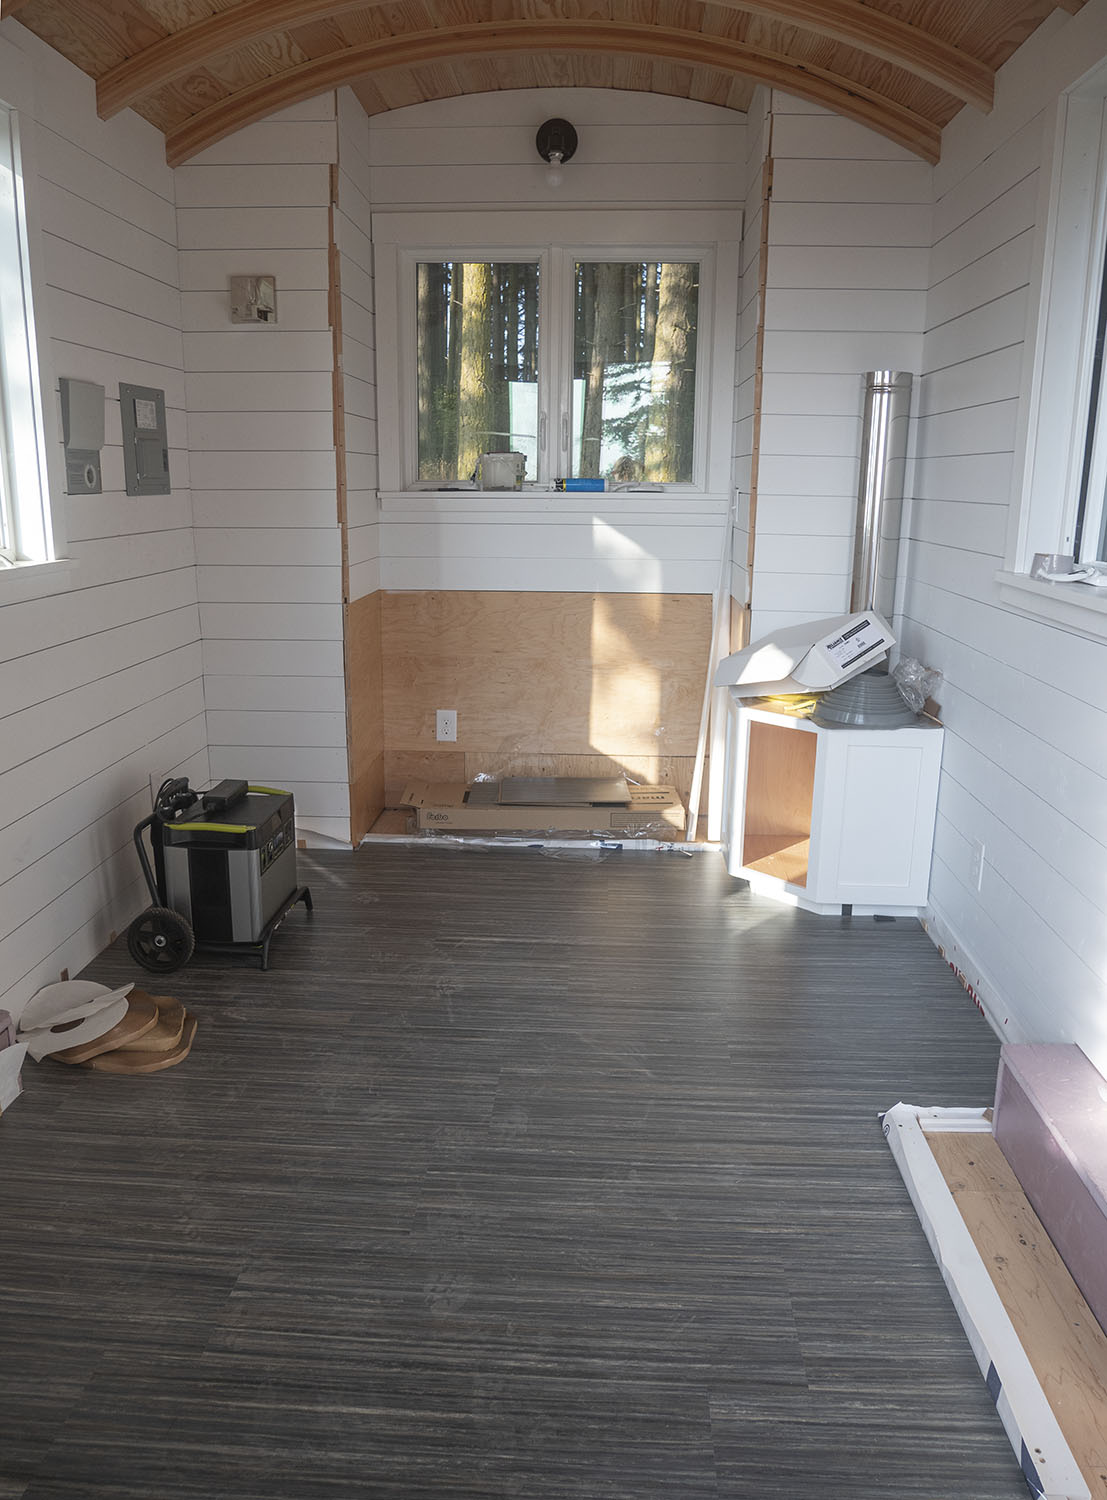
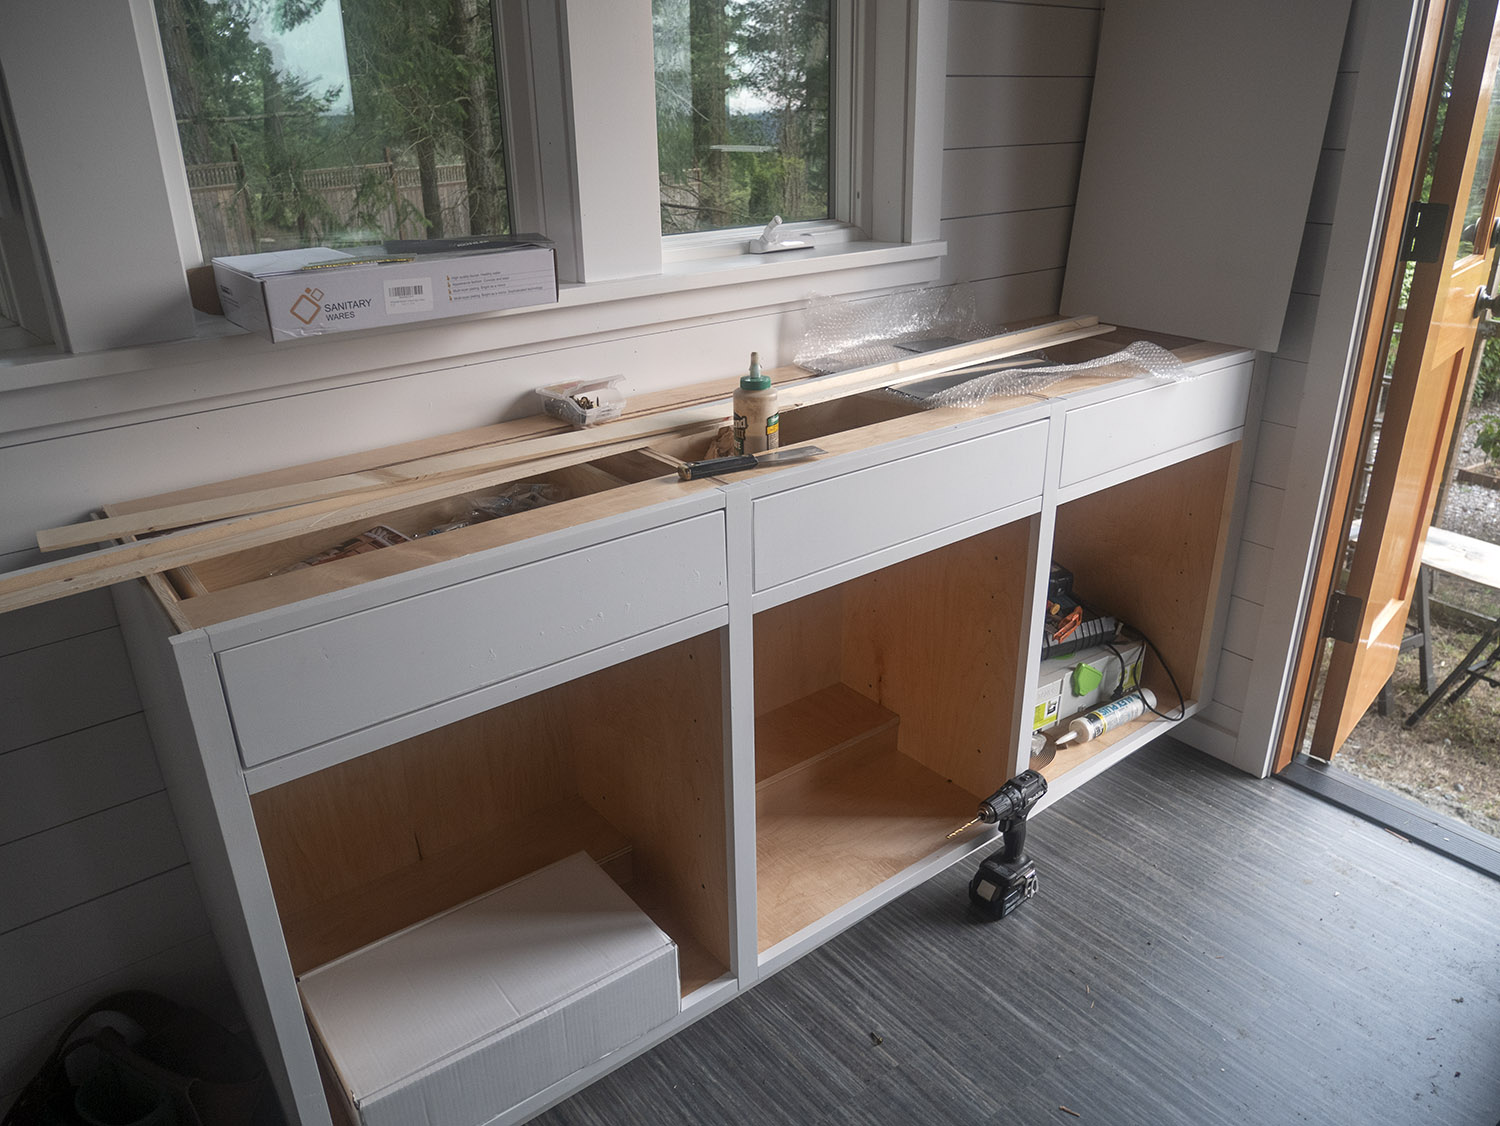
Now that the outside is (mostly) done, Pamela and I will work on the inside. We’ll built the kitchen cabinet, the storage cabinet and the desk, as well as install the wood stove.
August 25
As of today the electrical wiring is mostly done, and the inside boards and trim are almost done (except for two trim pieces that will go on after the kitchen cabinet is in). The stand for the tiny stove is also done.
Electrical is set up to take 120V 30A from outside the house into a panel. The feed in will be only from a 15A pole, but it would support 30 if I need it to in the future. The house has four circuits, which is likely overkill for a tiny house, but there you go. 🙂
There is a switch panel next to the regular panel which allows me to plug in an external battery or inverter for solar panels. So if I have this plugged in, I can switch to off-grid power and back to grid power easily.
I need to repaint the final boards that got put into today, and the ceiling needs a bit of sanding and cleanup to get rid of a few marks in the beams and decking so I’ll probably do all that next while we’re waiting for the roofing and the plywood that we’re using to make the kitchen cabinets and desk and storage cabinet. I’m also still waiting on the heat shield for behind the stove. Once that’s here and the roofing is on, we can install the tiny stove.
The to do list is finally feeling like it’s getting a bit shorter (although it’s still plenty long).
September 11
The last couple of weeks have been a hurry up and wait situation… waiting on the rest of the roofing! It finally came in this week (although without all the accessories we need to get the ribs on). We were able to get the panels on today. Each panel was coated with a thin plastic covering — I get that, it helps prevent scratches, but dang, it was a lot of plastic, and it was a pain to get off. It was my job to take off the plastic, and hand the panels to Pamela and Lucas who put them on. Each panel has a 1 inch vertical edge on both sides (going across the roof). Two of these one from each panel next to each other get clipped together, and the clips have screw holes where you screw into the roof to secure the panels. The ribs will go over where two panels meet and get screwed together. So there won’t be any holes in the roof that go vertically through the metal into the roof, which hopefully will reduce all opportunities for leaks. The components to get the ribs on and connected didn’t come so those are on order. (hurry up and wait).
We got all the panels done in the morning, so in the afternoon we put the flooring in. First we put a layer of Tyvek down to act as a vapor barrier, to keep the flooring from absorbing moisture that comes through the subfloor. We had a bit of overlap of the Tyvek on the walls which will get cut off when we put the baseboards in. The Tyvek gets taped to the floor.
The flooring is marmoleum “click cinch”, made out of cork. The pieces of flooring are really easy to put together! The flooring gets put in perpendicular to the entrance to the house, so that when you walk in, you don’t see the seams. Good trick! We start on the left and work to the right, and cut the last piece to fit. The remainder of the last piece becomes the first piece on the next row. That way the cuts on each row are staggered which also helps to hide the seams. We use a 1/4″ spacer all around the edges. This prevents the floor from buckling as it expands in different weather. The spacers we leave in until we put the baseboards in which covers the space between the edge of the flooring and the wall. We got the whole floor done except for the very last row by the front door (not in the pic) which needs to wait until we get a tool to remove some of the trim on the door so we can slip the flooring underneath the trim.
Paul (electrician) stopped by to finish that up. He cut off the end of the 12 gauge extension cord I bought to replace the regular end with an “RV” end, which is a 240V capable connection in case I ever take the TAS somewhere with that kind of hookup. The line coming in is connected to 120V at the current location. The whole system can handle 240V 30A but will be connected to 120V 15A unless I take it somewhere else. The battery bank connects right into the left panel, and I can switch from the line in on the pole, to the battery bank if the power goes out, or if I want to use the battery + solar panels as my main power source.
September 27
More hurry up and wait for the past couple of weeks. We did get the ribs installed on the roof — all but two. Yes, the roofing company shorted us 2 ribs! So, we’re still waiting on those.
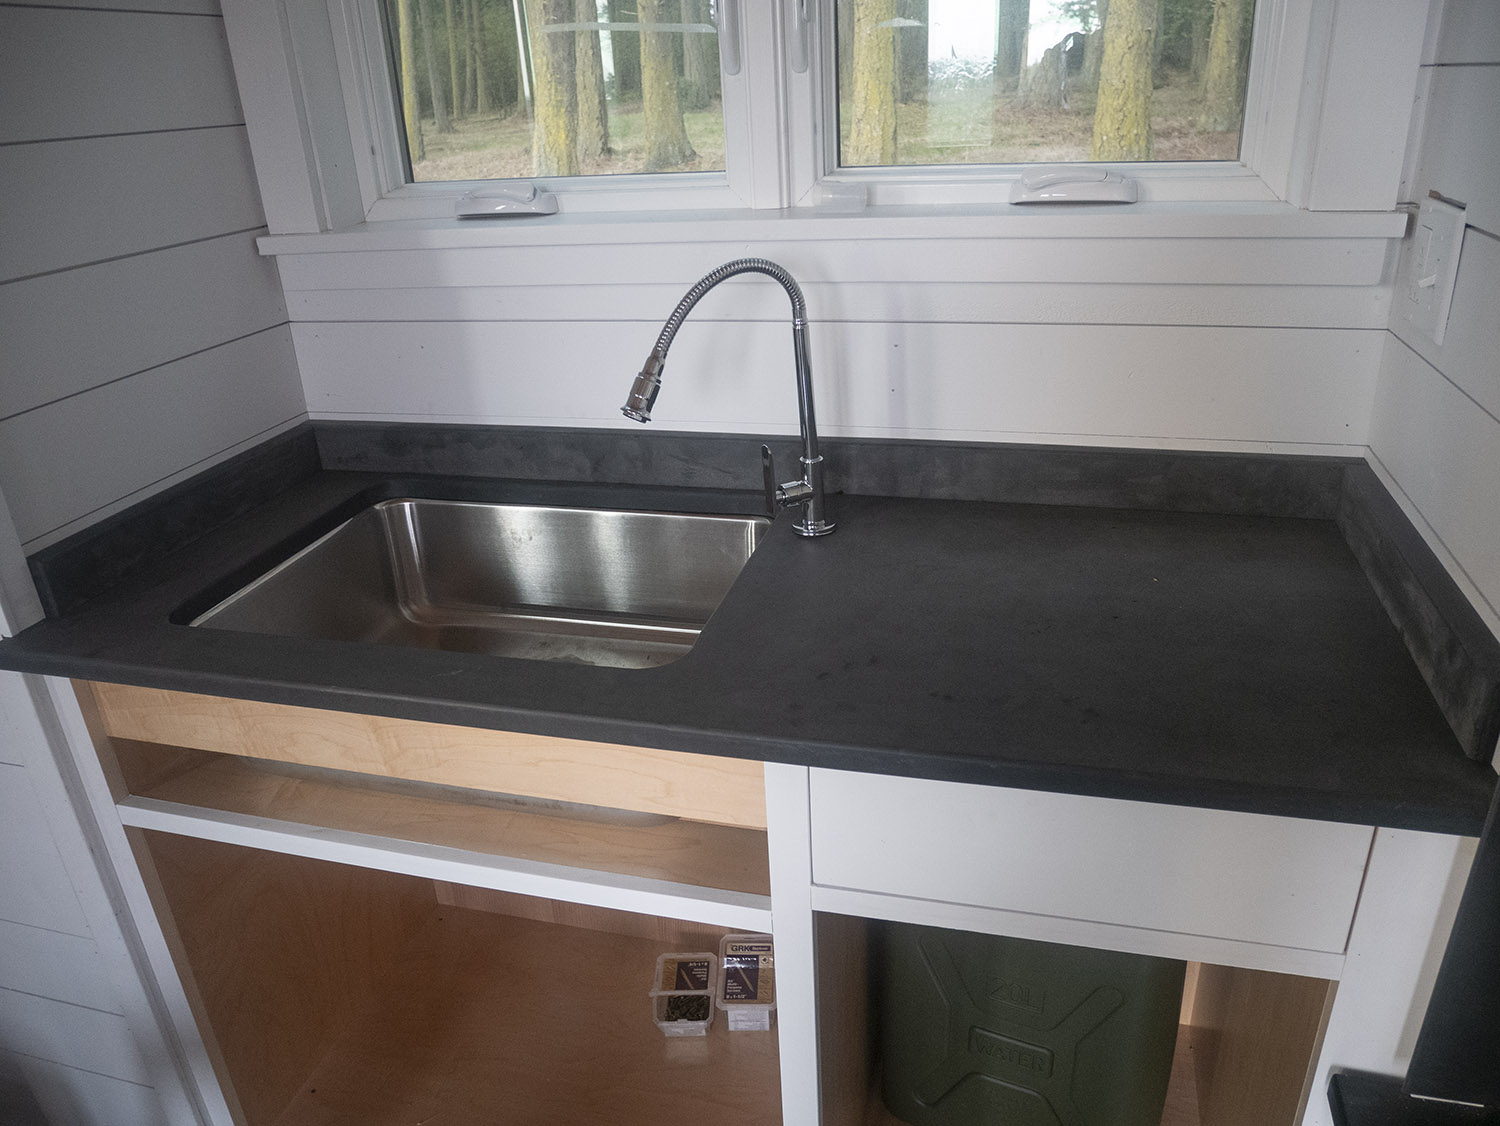
We got the paperstone for the countertop in the kitchen, and the top of the Tiny Stove stand cut, and I sanded and waxed the stand surface piece; Pamela is cutting the kitchen counter piece with holes for the sink and faucet so I’ll need to sand and wax that once that’s done.
And varnished the end beams on the roof to help protect them from the rain, and caulked (silicone caulking) the ends of the ceiling boards in between the two beams on each end.
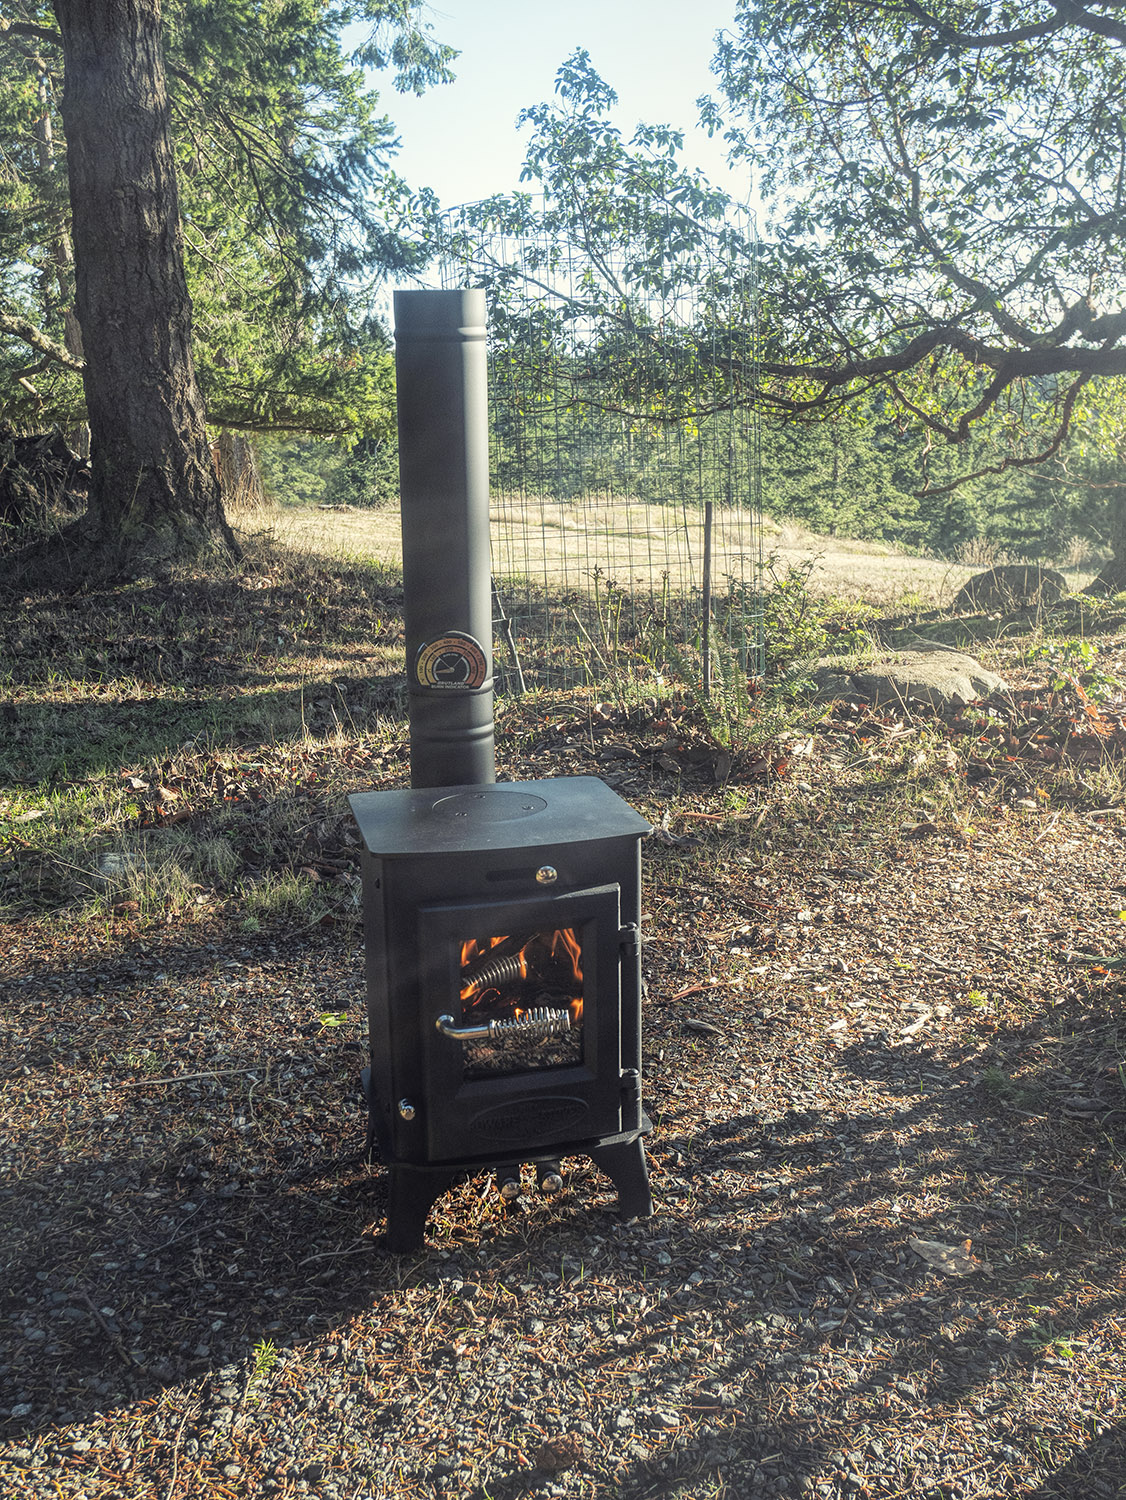
This coming week it’s time to install the Tiny Stove 2 (TS2) so today I put it outside and did the “first burn”. This is an extra hot burn that helps to cure the enamel paint on the outside of the stove. It stinks to high heaven which is why we do the first burn outside. It worked great! I can’t wait to get it installed.
September 28
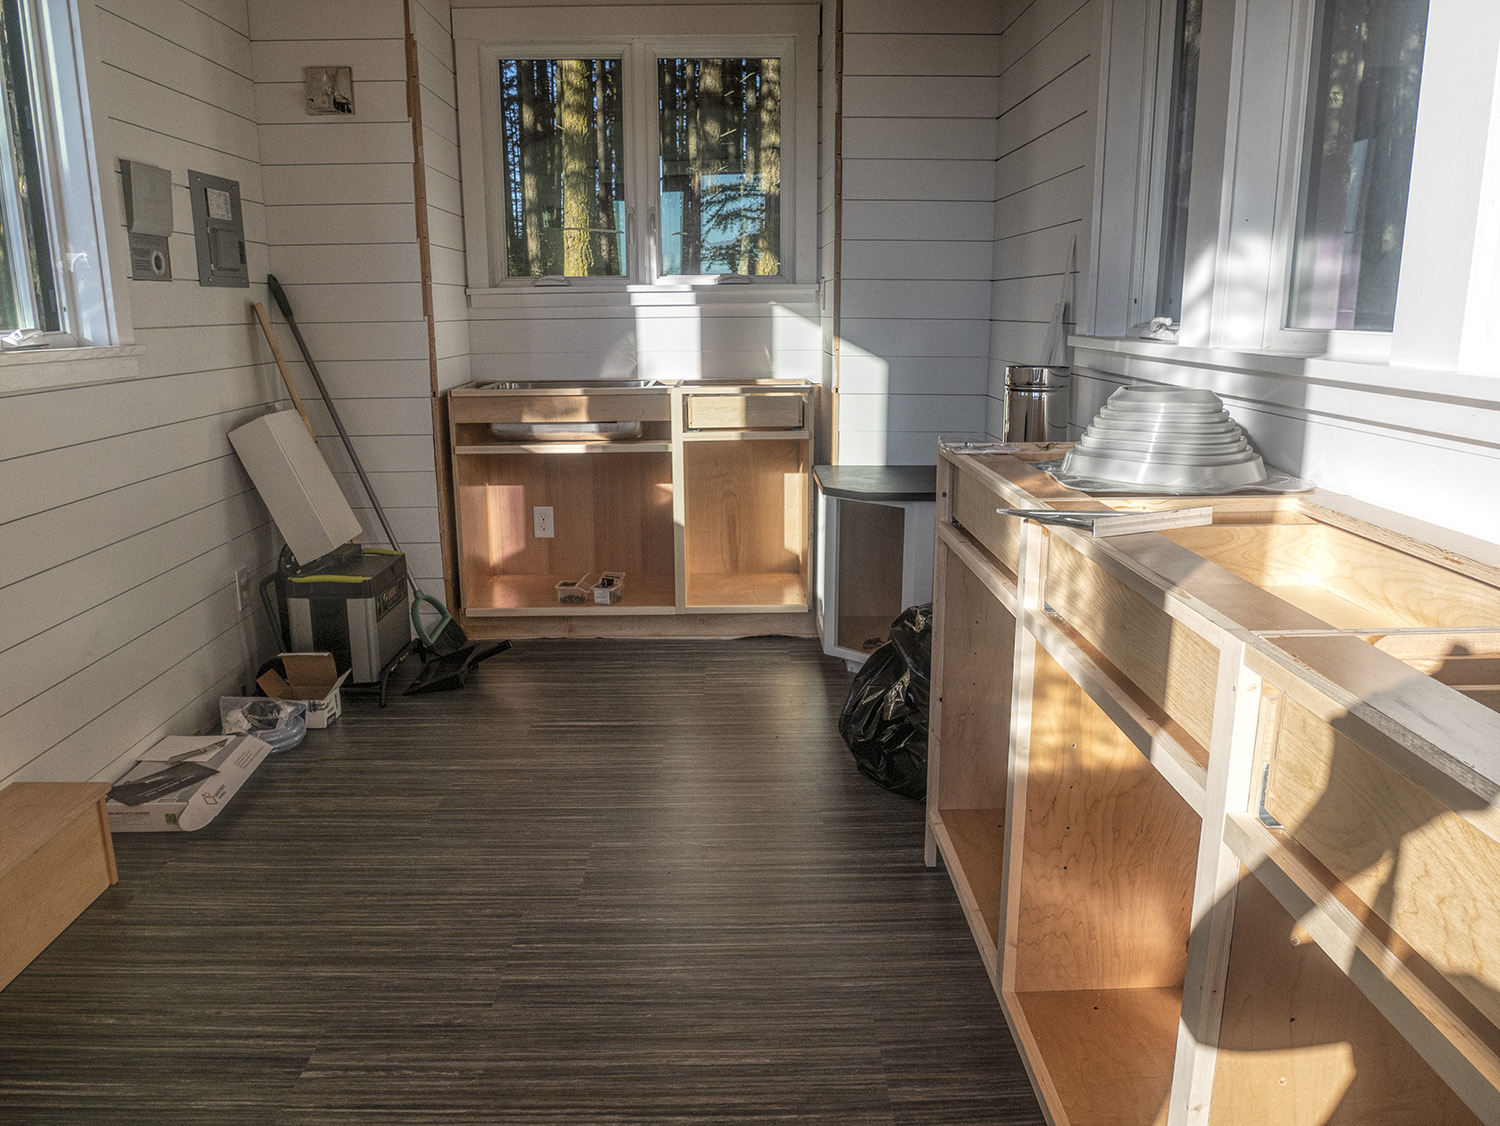
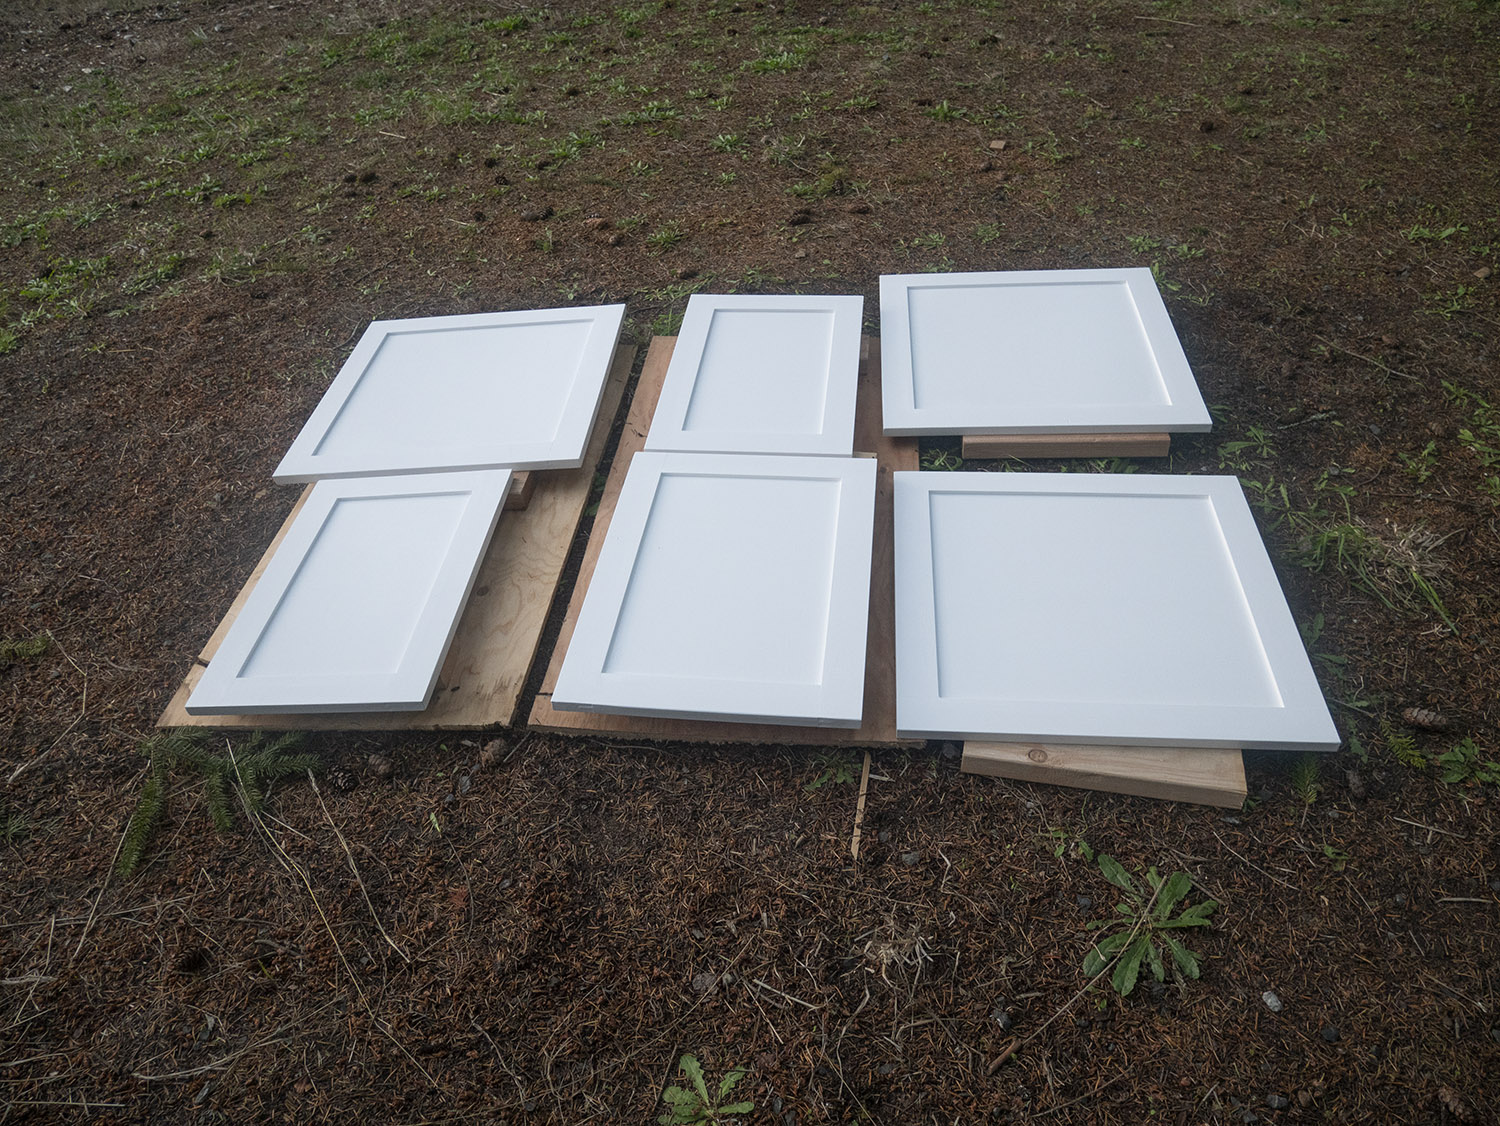
Cabinet day! The cabinet frames are in! And the sink!
In addition to helping put in the cabinets, I spent the day painting trim; I touched up the window trim in the house, and also painted baseboards and trim for the cabinets. And I washed the house (kinda dirty) and taped it because I’m going to touch up the siding tomorrow and finish the cabinet trim, and the wall boards around the electrical boxes which I didn’t get to before.

September 29
Long day of painting and sanding and painting and sanding and I forgot to take a photo and now it’s dark…. so first pic of TAS at night!
I painted the trim on the cabinets – first I primed them, and then painted them with two coats of semi-gloss. I also touched up a few other window trim areas that needed semi-gloss.
I finished touching up the walls with eggshell, especially around the electrical as that whole section hadn’t had another coat since the boards were installed.
I got a piece of galvanized steel from John B to use as a magnetic white board, so I primed it with special primer for metal (self-etching metal primer), and then painted it with 3 coats of semi-gloss.
I sanded the kitchen counter, mostly in the rim area where the sink is going to go. I need to sand a bit more but it’s almost ready.
And, I started repainting the siding on the house. I got about half done. It’s hard work; I’m using a brush and my hand cramps now and then. But it looks great! It’s a great week to do it weather-wise, and aside from getting rid of all the scratches etc. that happened at install time, another coat of paint will hopefully help the paint last longer so I don’t have to paint it again for another 5-7 years or so.
Tomorrow we install the kitchen counter top, the kitchen cabinet trim, and the tiny stove! And hopefully I can finish painting the exterior siding.
September 30
Today was intense. I started early to finish painting the siding and finishing sanding the kitchen counter and got that done by about 9:30am. Pamela arrived and my job was to drill the hole for the faucet in the counter top. Unfortunately we didn’t have a hole bit that was the right size. We tried to get one at the hardware store, but the attachment for the drill was the wrong size. So we just went with a regular large size bit (1 1/8″)…. and it took me about two hours. I went through 4 batteries, and the drills would over heat after a while; fortunately Pamela has multiple drills. I had to let the paper stone cool down every once in a while, as well as give my arm a rest. We finally got the hole done but dang that took a long time.
While I was drilling the hole, Pamela worked on the cabinet trim and got most of that done and most of the baseboards done too.
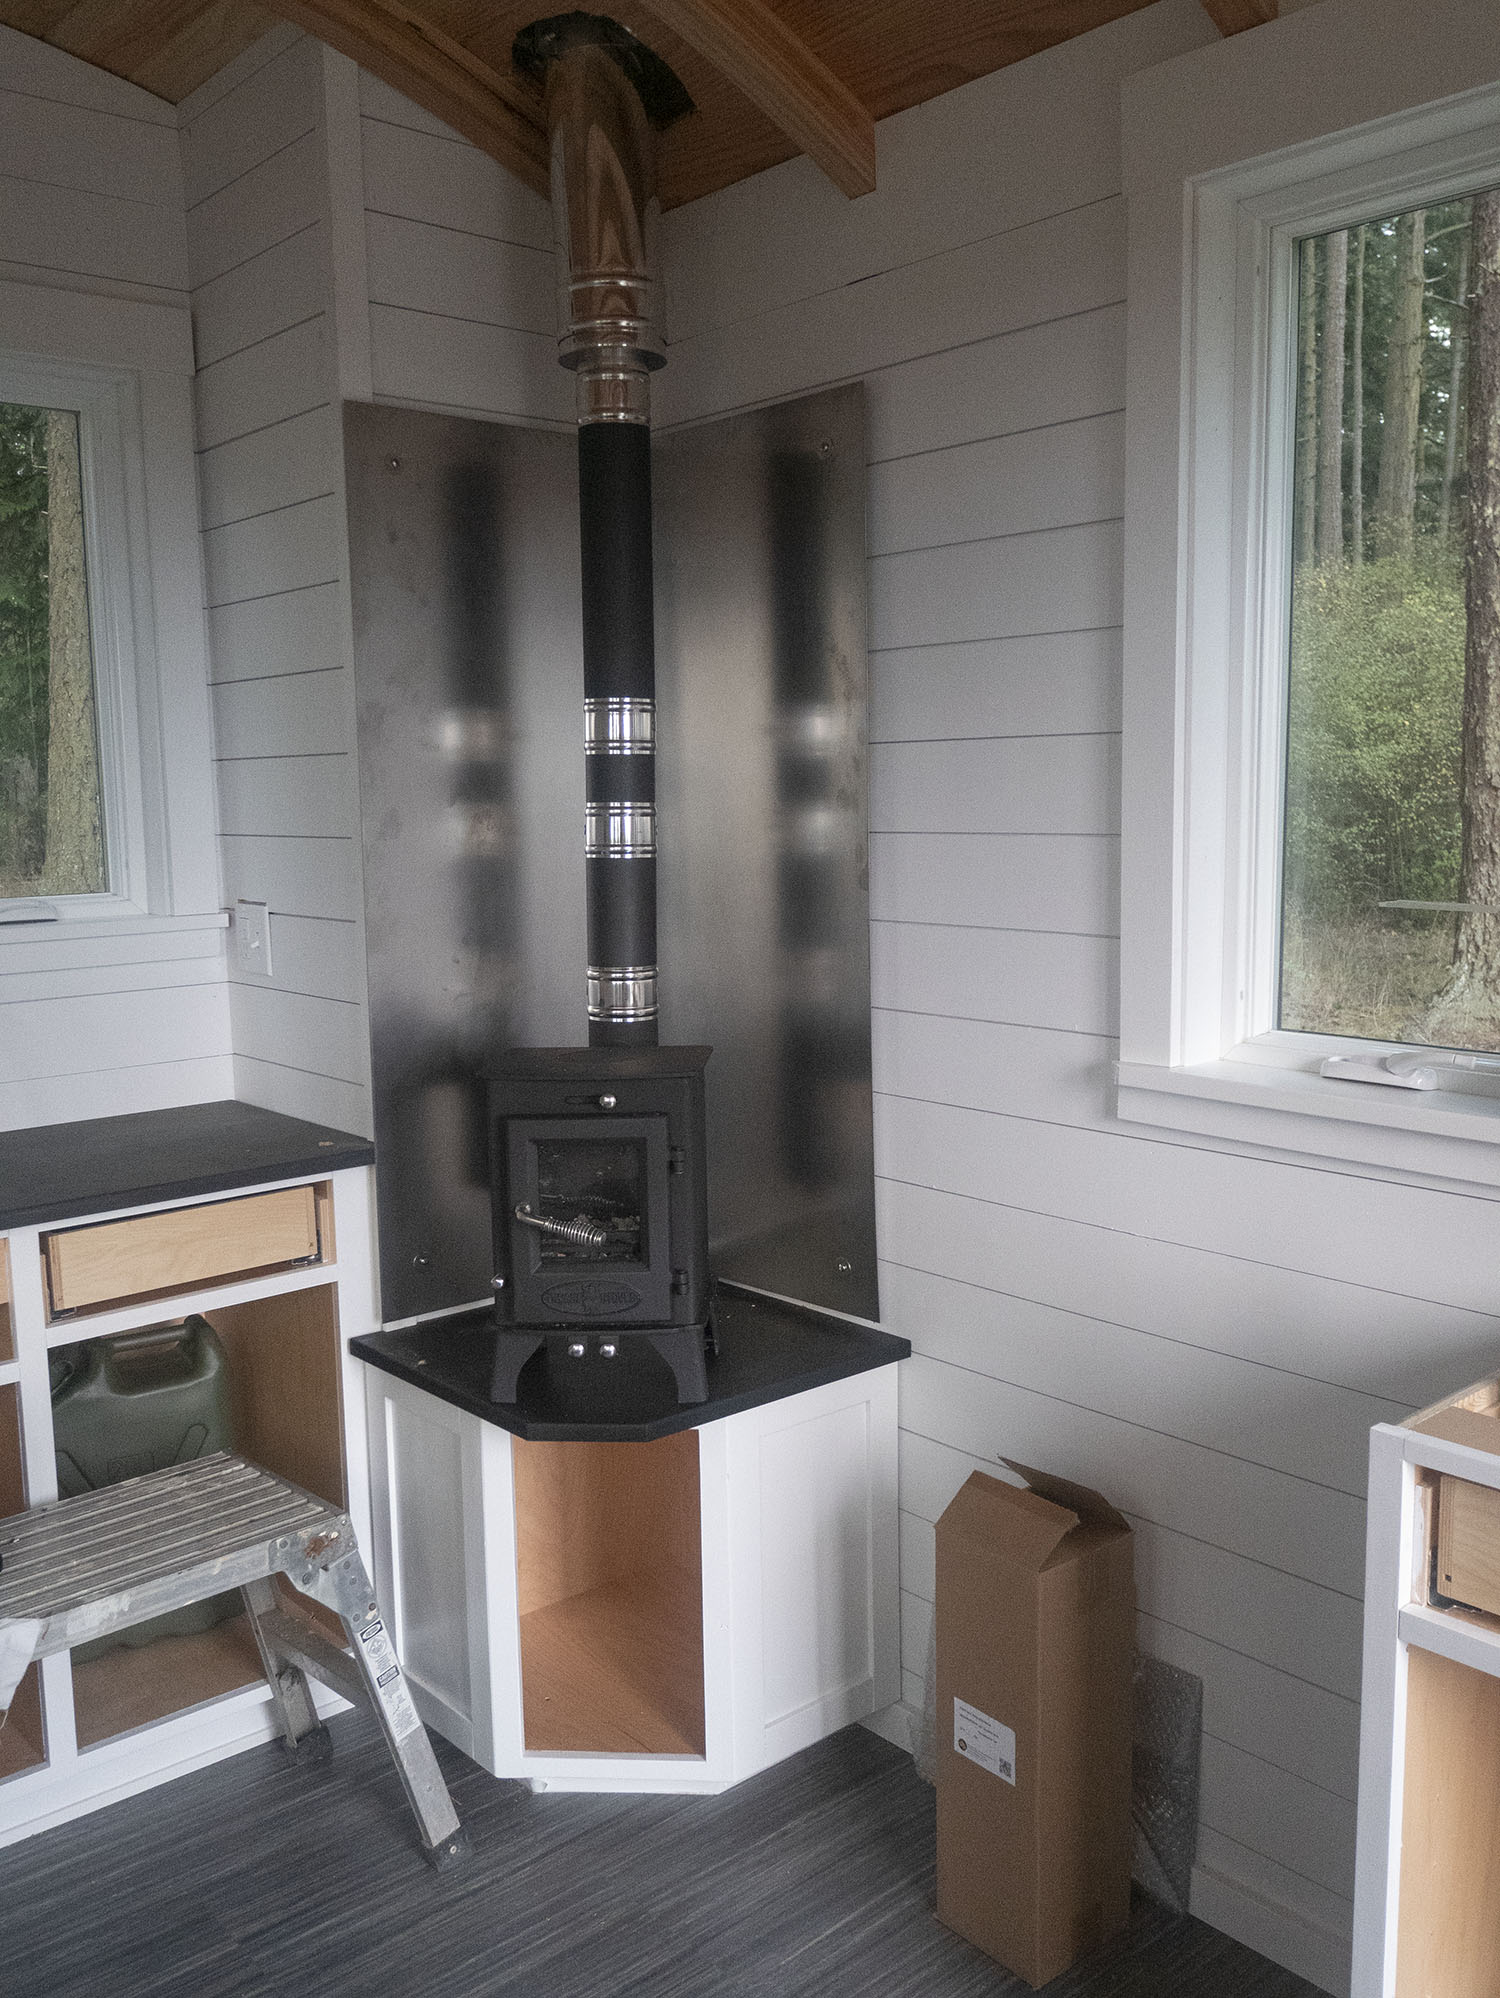
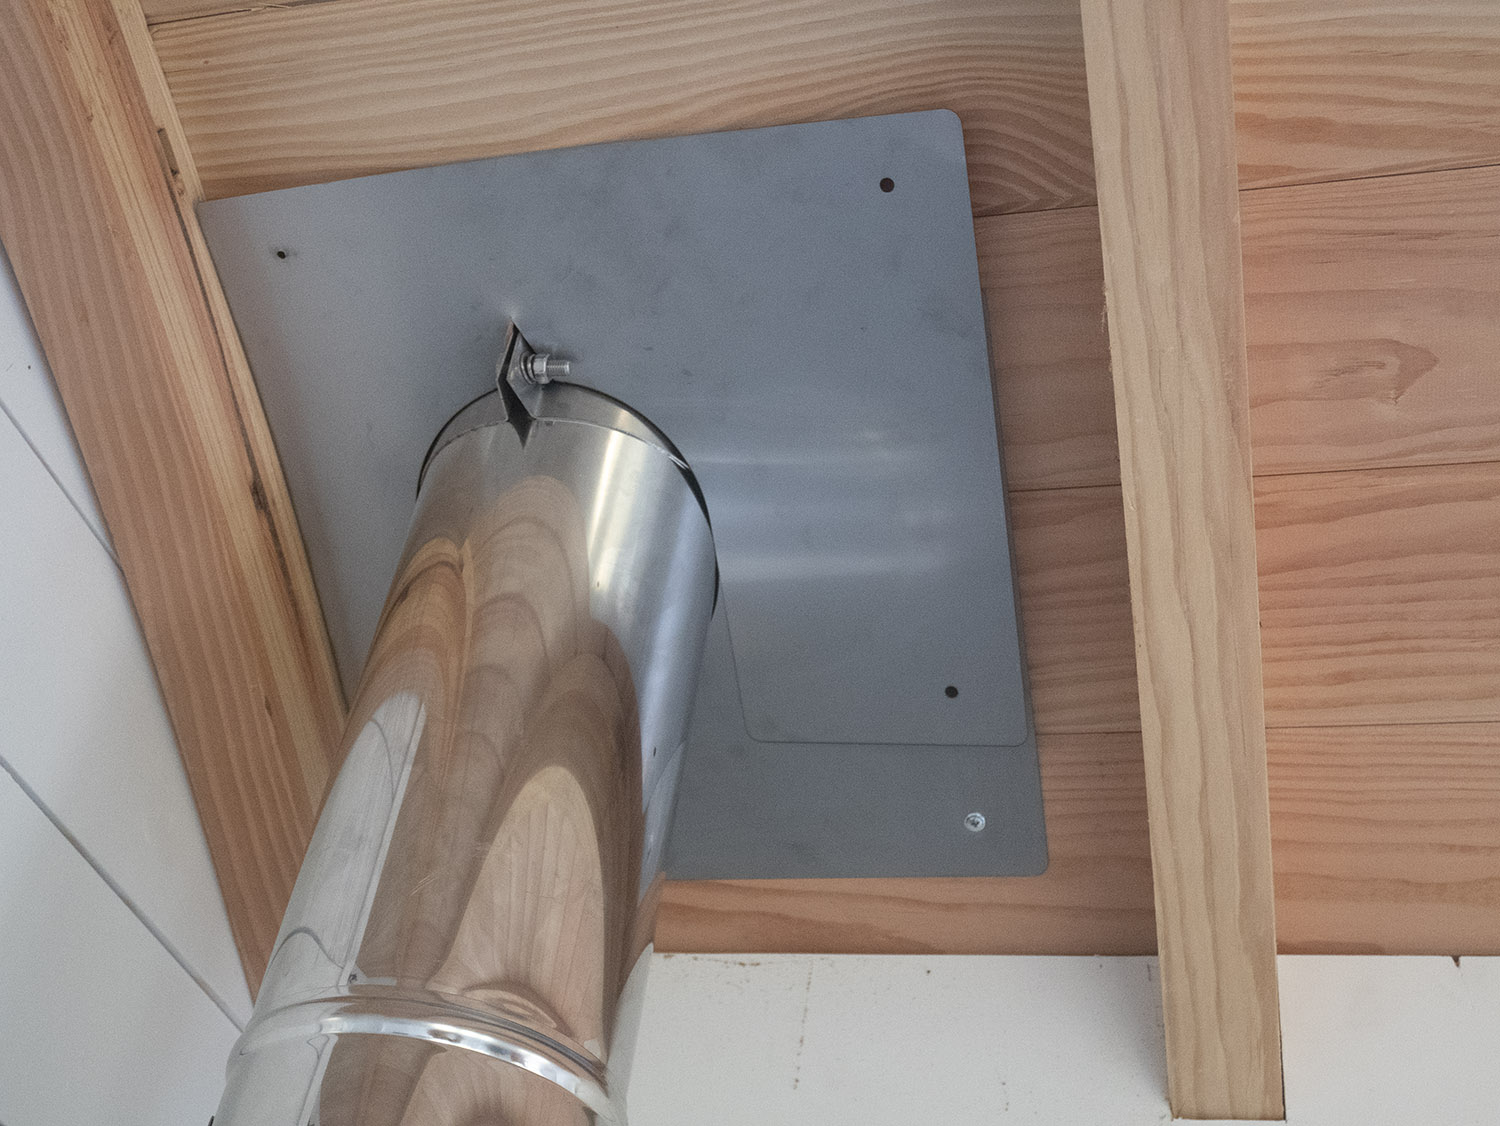
After lunch we installed the Tiny Wood Stove. After we figured out where the hole in the ceiling would be based on the required distance of the stove pipe from the heat shield, Pamela drilled a hole with a long bit all the way through the ceiling and the roof. Then we drew, roughly, where the boundary of the hole would be. Because it’s a curved roof, the hole is not circular but elliptical. It was a little tricky to figure out but we got it. Then Pamela cut from the bottom with the jigsaw. She got half the hole made, and then Reggie took the jigsaw up to the roof and started drilling the hole from above. Once that was done, Pamela finished up the hole from the bottom with the sawzall. It feels a bit insane to make a huge hole in the roof after we did all that work to make sure the roof was tight and well insulated and all of that… but… a chimney requires a hole! So there it is.
We put the heat sheild up after drilling holes for the screws to put it up. Pamela had made 4 1″ pieces of copper as spacers. The heat shield is about 1″ too big on the side of the counter (not sure how I managed to screw that up) but anyway, it’ll be fine.
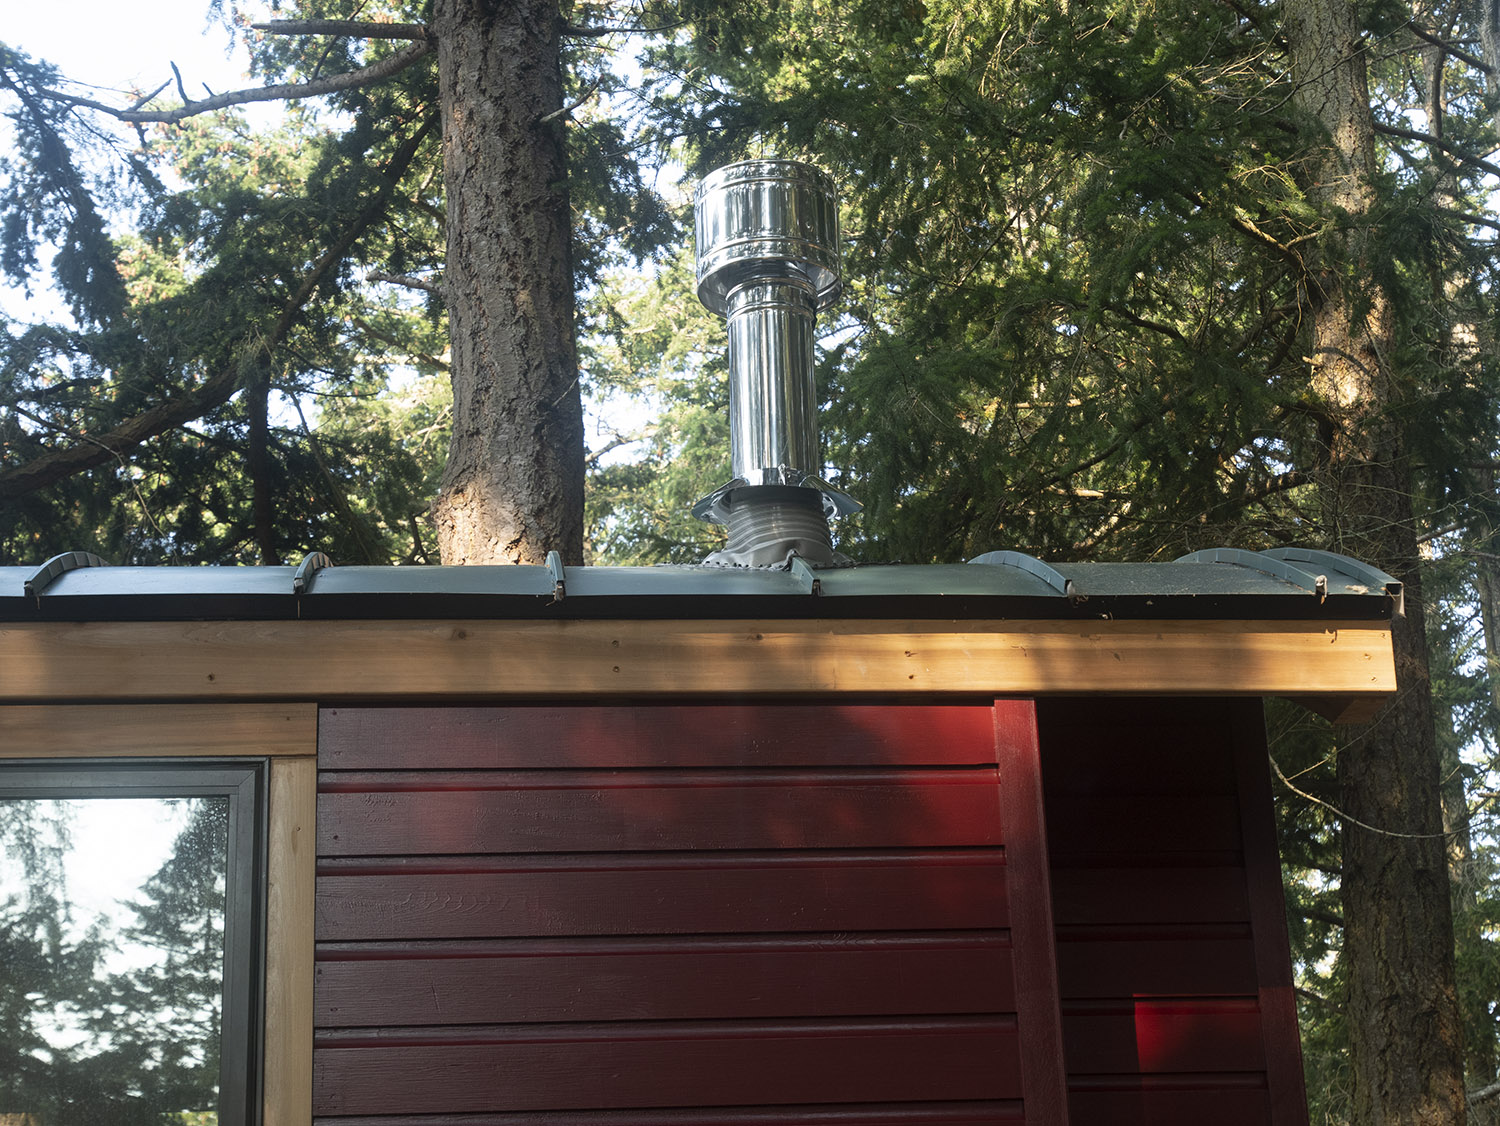
Then we installed the bracket that holds the pipe in place. This was tricky, again because it’s not a circular hole, but also because we wanted to see if we could screw the bracket to the inside of the ceiling rather to the outside of the roof. We did and it worked fine… we could only get 3 screws on each side rather than 6 but it should hold just fine. Most of the weight of the chimney is held up by the stove anyway. Then we slide the double insulated pipe up through the bracket. Of course, we did it the wrong way at first, and had to flip it. Then we put the stove on the stand and measured for the rest of the pipe. I purchased an expandable piece of pipe so that made it pretty easy to fit the pipe to the stove. Once all that was fit and centered and plumb, Pamela put the “boot” on, the rubber piece that goes around the chimeny on the roof, and used silicone and roofing screws to secure it to the roof. Then the rain shield and then the chimeny cap and it’s done!
October 1
Another busy day! I spent most of the morning organizing. A construction site quickly starts gathering bits and bobs of various left overs, trash, etc. Pamela is so great about estimating materials that we’ve had very little “scrap” as it’s called, but there is always some. A big pile of plywood under the house, some 2×4’s, some painted wood ends from trim and siding and so on, boxes of screws used and then taken out, unused bolts, etc. I went through most of the scrap and decided what to keep and where to store it, what to give away, and what needs to go to the dump. Anything that is “pure wood” I kept, except the smallest pieces, to either build something else with or burn. Anything with paint (trim, siding) or glue (plywood) on it that is too small to use goes to the dump, unfortunately. And I’m hoping someone will want the bigger plywood scraps. The bolts go to a friend, and eventually I will sort the bix box o’ screws into screws that can be reused, and screws that go to metal recycling.
Pamela arrived with trim to paint and the backsplash for the kitchen counter top to sand, so I worked on that while she went to John B’s to get a piece of metal for the ceiling above the tiny stove cut. We will do the normal ceiling metal piece around the pipe, and then John will also create one small extra piece to hide the bracket which is sticking down below the ceiling level (because of the round roof).
When she returned we got various trim pieces installed, the backsplash installed, and I drilled holes in the cut metal pieces for the ceiling.
On the kitchen counter: the counter top itself is mostly just sitting on top of the cabinet — the only thing we did to secure it down was to silicone glue / gel it to the sink. We “splooged” (Pamela’s technical term) the silicone gel all around the sink just behind where the lip of the counter would be and then dropped the counter top on top and pressed down hard. This secures the sink to the counter top and also means water can’t get between the counter and the sink and drip down into the cabinet.
The backsplash pieces are similarly splooged to the counter with silicone. Other than that, the whole thing is just sitting there. Which is kind of nice because it means if it ever cracks or something goes wrong with the sink, hopefully it will be easier to fix than if it is secured some other way to the cabinet. Hopefully nothing will go wrong! I haven’t waxed the counter top yet since we are still banging about in there, but it will look lovely and shiny once I’ve cleaned it and waxed it once everything else is done.
Tomorrow I will be sanding and painting the cabinet doors! And hopefully we’ll get the piping and foot pump installed in the kitchen, and the drain tightened in the kitchen sink with a tool borrowed from Richard.
October 2
Pamela brought over the cabinet doors to sand and paint, and then left me to my own devices while she ran off to go hiking. No Fair! Okay I suppose at the end I have the Tiny Art Studio, so it is sorta fair. Still.
In any case, it took me most of the day to sand and paint the doors with 1 coat primer and 2 coats semi-gloss. They look beautiful!! Pamela did put the hardware on the drawers before she left and once the doors and door hardware go in, the cabinets will be almost done.
I also worked on the kitchen water situation. The pipe I got fits the water jug perfectly (nice and tight!) so I got that stuck in the jug. I need to get a 5 gallon bucket to put under the drain, and a 7-8″ drain pipe that will go through the bucket lid to drain the sink. The pipe from the water jug will go to a foot pump and then from the foot pump to the faucet. That’s pretty much it. I like simple.
Before Pamela left, we ran through the “to do” list and it’s getting short! Woo Hoo! Finish the last two ribs on the roof, finish the sink, install the cabinet doors, shelves for the storage cabinet, top for the storage cabinet, desk, put up the white board, ….
Then I need to install the rest of the lighting pieces, touch up just a bit of paint here and there on the inside, wax the counter top, and clean clean clean.
Then move in! Which will take about an hour 🙂
I’m hoping all or most of that can happen next week.

October 9
Woo hoo! This morning Pamela came over and we got the last two ribs put on the roof.
I still have to get gutters put on, and install a light, get some desk grommets, and build a deck… no rest for the weary. But the studio is basically done.
Today I moved all my art stuff into the studio. I was loathe to “mess it up” since it was soooo nice and clean and tidy but of course I got over that very quickly, and now it feels so great to have all my art mess-making stuff in one place. I still need to organize the tube paints, but pretty much everything else has a home in a drawer or cabinet. At some point I’d like to get some of that magnetic paint and paint some spots on the walls with it so I have more place to hang things up to dry. The magnetic white board I put up works great but isn’t very big. There isn’t much wall space in this Tiny Art Studio, which is great – I love having so many windows, but I’ll have to get a bit creative about where to hang things for drying and evaluating.
Tonight I had the first fire in the tiny stove 2 in the studio. I got a really nice hot fire going and opened all the windows so it would continue to cure the enamel. It didn’t smell too bad and it got really nice and toasty in there, even with all the windows open. I also put the screens in because the bugs were starting to come in with the windows being open. And I got some string lights hung too.
I really love the sink – it’s a big sink for a tiny house, with plenty of room to clean stuff up and easy to clean up after. The plumbing is working great, the foot pump is great, and it’s just the perfect amount of water to clean and so not wasteful. I need to get a tea kettle to put on the stove, so I can have hot water and a cup of tea while I’m in there playing. The chimney seemed to draw just fine, and the ceiling didn’t catch on fire. Yay! Most important thing 🙂 (That reminds me I should put a fire extinguisher in there).
Tomorrow I’m hoping to get a hook for the light I want to hang over the desk, and get that hung. That’s the last of the lighting.
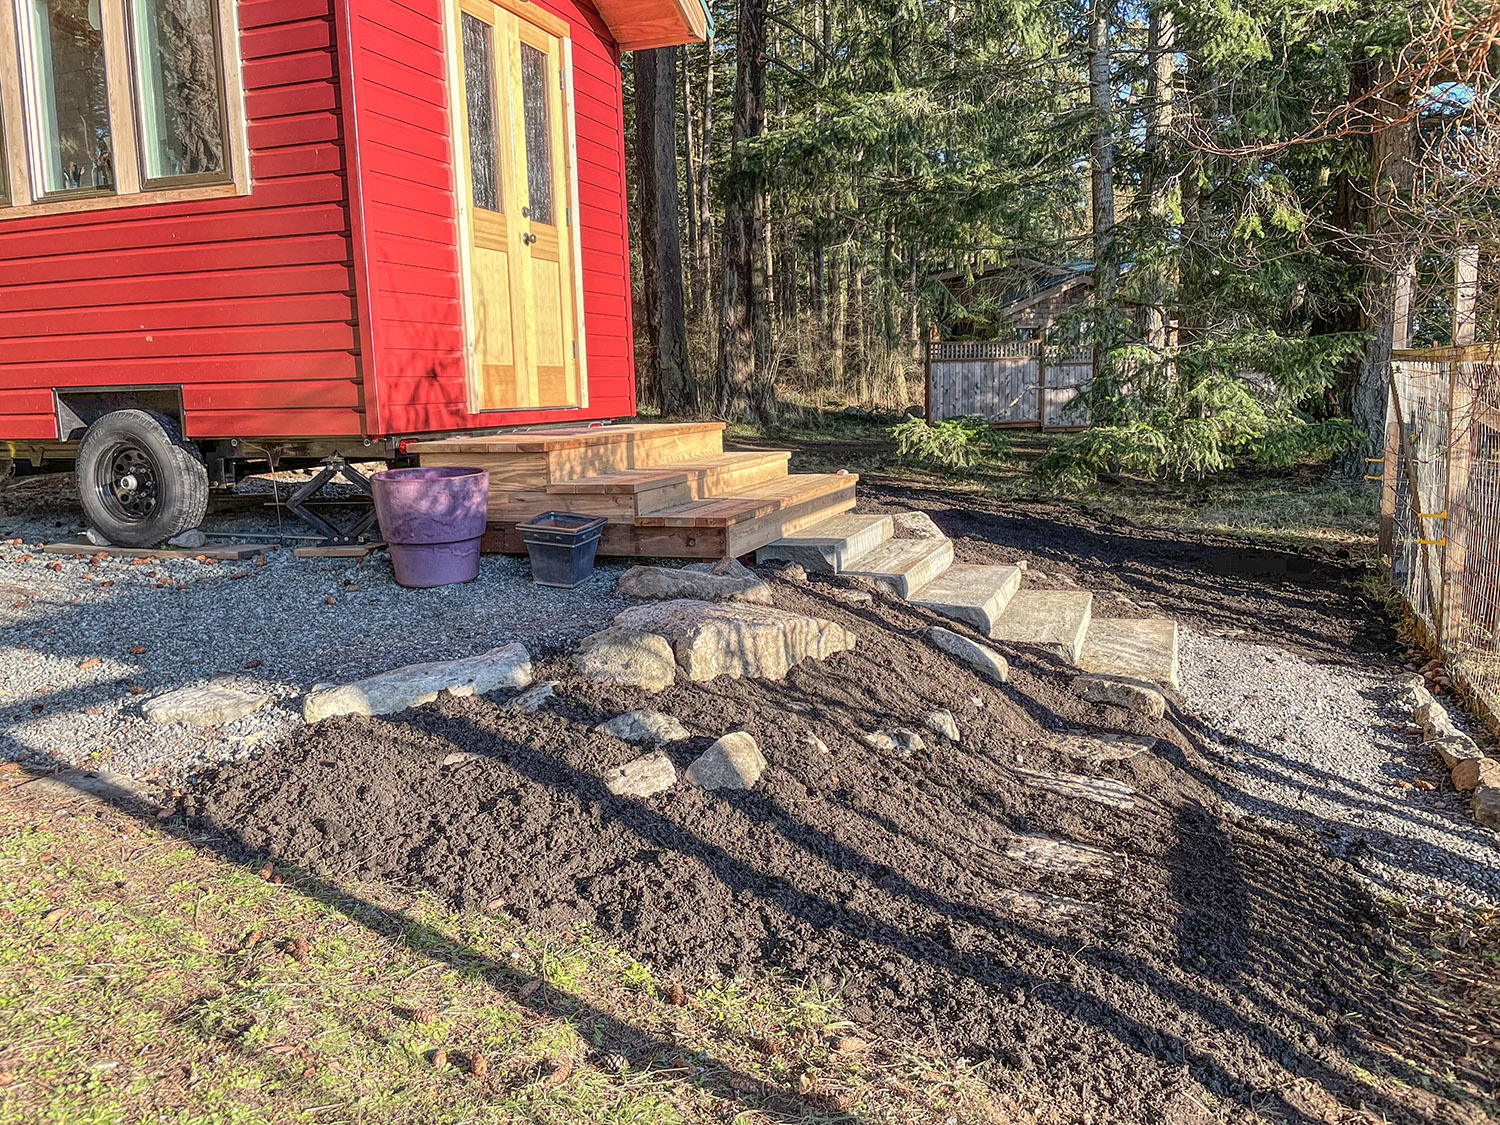
December 16
I went to Seattle to buy some beautiful stone to make steps for the TAS. Then, the next two days, my friend Reggie and I built steps from cedar and from stone. Reggie had brought over some rocks he dug up at someone else’s house, and we used the largest of those to anchor the corners of the wood steps and shore up the platform the TAS is sitting on (sand and gravel).
Once we got the steps done and the rocks set, we got two big loads of gravel to fill everything in and make sure the stone steps and rocks stay in place. I took some photos but they were on my old phone and that is now gone!

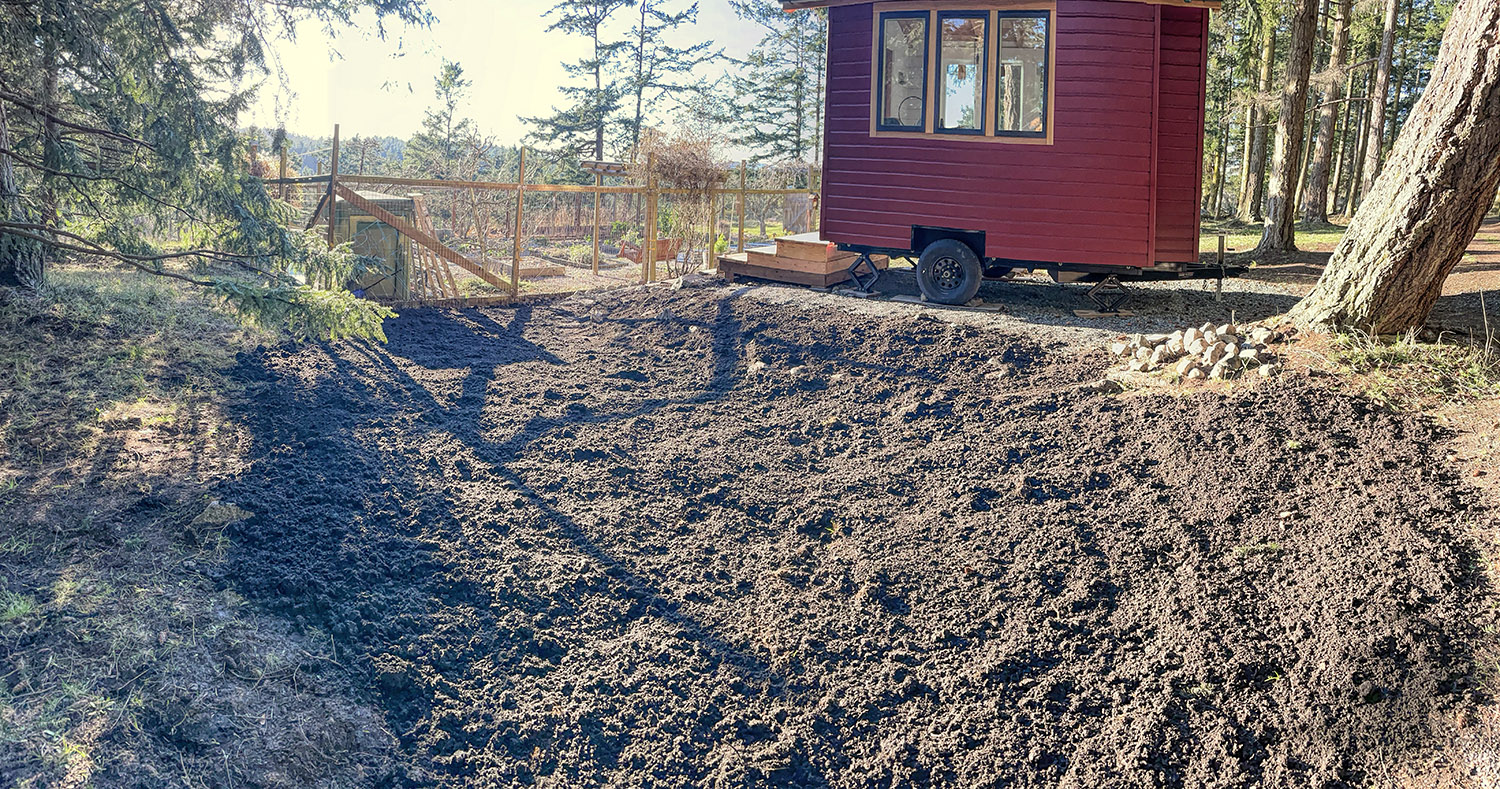
January 22, 2021
The gravel around the rocks has all settled nicely so I took advantage of the great weather to get a load of top soil delivered (3 yards), and spent the day putting top soil on the rock garden area around the TAS, and covering up the area where the excavator had torn up the ground. Once I had distributed all the soil, I seeded the large area with crimson clover seed.
Later this spring I will plant some plants (ferns, lavender, rosemary, mullein, thyme) in the rock garden and seed it with poppies. I also need to get some potting soil for the big pots and put some plants in there.